- Messages
- 925
- Reaction score
- 8
- Points
- 28
A kindly reminder to everyone na nagtratry ng mga tricks na pinopost ko. Please do it at your own risk. I suggest and advise na kung meron kayong mga virtual machine with installed O.S (windows) doon nyo po muna pagpractisan or kung wala kayong VM back up na lang mga important files sa external para safe po. Enjoy mga peeps..
Its nice to be back again and again. As i promise doon sa thread about 50 Most Amazing Tech Tricks You can’t Find on Internet na sinabi ko magpopost ulit ako so eto ung para sakin is useful. If ever meron kayong mga suggestion or tricks na gusto nyo ishare or hindi pa nman alam ng iba or alam na at nakalimutan lang feel free to comment or post it here para marefresh tayong lahat.
") so hope you like it guys.
so hope you like it guys.CREDIT TO ORIGINAL AUTHOR FOR HIS VERY USEFUL TWEAKS AND TRICKS: Akhilesh Sharma (Tweaks and Tricks #1 - #8)
#1 Make Undeletable, Unrenamable Folders
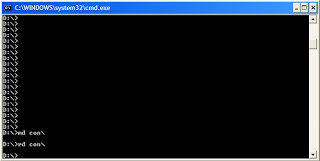
Basic Concept
The basic concept behind this trick is the use of Keywords. Keywords are reserved words in any programming language that cannot be used as names of variables. Windows also uses certain keywords in its programming. Some of them are con, aux, lpt1, lpt2, lpt3, lpt4, lpt5, lpt6, lpt7, lpt8 and lpt9.
View attachment 236944
Trick
So the question arises, how can we make a folder with a keyword as its name? The solution to this problem is included in Windows itself. As we know that Windows has evolved from D.O.S.(Disk Operating System), its commands can be used in Windows. You can use D.O.S. Programming in Windows to create a folder with a keyword as its name using the steps given below:-
1. Click on Start.
2. Click on Run. Type in "cmd" without quotes.
3. In the Command Prompt Window that opens, type the name of the drive you wish to create your folder in the format <drive-name>: and press Enter. e.g. If you wish to create the undeletable folder in D drive, type "D:" without the quotes. Note that the folder cannot be created in the root of C: drive (if C: is your system drive).
4. Type this command- "md con\" or "md lpt1\" without the quotes and press Enter. You can choose any of the keywords given above as the name of your folder.
Now Windows will create an undeletable, unrenamable folder in the drive you entered in Step 3. However, the folder can be renamed to another keyword using Windows Explorer.
Deleting the Folder
Although, it is not possible to manually delete the folder, you can delete the folder by typing "rd con\" or "rd lpt1\" in Step 4 instead of "md con\" or "md lpt1\".
Windows Compatibility: This works on Windows XP, Windows Vista, Windows 7, Windows 8 and Windows 8.1.
Try it yourself to create one such folder which can neither be deleted nor be renamed.
#2 Shutdown Your Computer or a Remote PC via Command Prompt
Required
A computer running Windows (XP, Vista, 7, 8 or 8.1) with the command prompt working perfectly, i.e. not disabled by a virus.
View attachment 236947
Initial Steps
1) Press Windows Key + R.
2) Enter CMD and press Enter.
This will start the command prompt. Follow the instructions below depending on what you want to do.
Shutdown Local Machine (Your Computer)
Type "shutdown -s" without the quotes in the command prompt and press Enter. Shutdown is the command being executed and the switch -s tells the computer to shutdown.
Restart your Local Computer
Type "shutdown -r" in the command prompt and press Enter. In this case, the command switch -r is telling the computer to restart after shutdown.
Log Off the Current User
Type "shutdown -l" in the command prompt and press Enter. The -l command switch tells the computer to log off.
Shutdown a Remote Computer
Type "shutdown -s -m \\name of the computer" in the command prompt and press Enter. Replace \\name of the computer with the actual name of the remote computer you are trying to shutdown. As mentioned earlier, you must have administrative access to the computer you are trying to shutdown. To know if you have administrative access, press Windows key + R and then type the name of the computer and press Enter.
Note: If you don't remember the name of the remote computer, you can look for it by opening a list of all the computers you are connected to by executing "net view" in command prompt.
If you can connect to the computer, you will be asked to login with your username and password. Upon entering them, a window will display the list of all the directories available to you. This should help you know whether you can or cannot shutdown the remote computer.
Hibernate a Local Computer
Type in "Rundll32.exe Powrprof.dll,SetSuspendState" without the quotes and press Enter. Your computer should hibernate, if it does not, then you must enable hibernation to do this.
Shutdown your or a remote computer after a specific time
Type "shutdown -s -t 60" to shutdown your computer after 60 seconds. Upon executing this, a countdown timer displaying a warning message will be shown. This command uses the -t command switch followed by a variable (which is 60 in this case) which represents the number of seconds after which the computer will shutdown.
Display a Message containing the reason for shutdown
Type shutdown -s -t 500 -c "I am tired. I don't want to work anymore." (with the quotes) in the Command Prompt and press Enter. The -c switch is used in the code to give the reason for shutting down and what is followed in quotes will be displayed in the dialog box as the reason. This can be used to display all sorts of funny messages. One example :-
Skynet has become self aware. John Connor did not stop me. You can not use your PC anymore.
Stop a System Shutdown
Type "shutdown -a" and press Enter. This will stop the system from shutting down if the countdown to shut down has not reached 0.
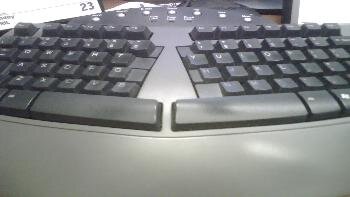
#3 Useful Keyboard Shortcuts for Windows Computers
View attachment 236950
Windows key+D: This shortcut is the keyboard equivalent of “Show the Desktop”. It is useful for quickly minimizing every open window when someone walks in and you are doing some private work.
Ctrl+Shift+Esc: This shortcut directly starts the task manager. While Alt+Ctrl+Del was used to bring out the Task Manager in Windows XP and earlier versions, in Windows 10, Windows 8.1, Windows 8 and Windows 7, it just brings up the lock this computer screen
Ctrl+Click: This shortcut is useful for opening a link in a background tab. This is useful when you have to load a page without leaving the current one.
Alt+Print Screen: takes the screenshot of the current active window as opposed to just Print Screen which takes the screenshot of the entire screen.
Shift+Click for Yes to All and No to All: If you have a lot of dialog boxes asking yes and no question, just shift+click Yes or No on one to yes all or no all.
Ctrl+C on an error dialog box to copy its contents: Suppose your computer is giving an error message and you want to copy its contents to send to the support guy, what do you do? Just press Ctrl+C while the dialog box is highlighted and its contents will be copied to your clipboard.
Ctrl+T: This keyboard shortcut opens a new tab in internet browsers.
Ctrl+Shift+T: Reopens the last closed tab.
Ctrl+Shift+N: This shortcut opens a new incognito window in Google Chrome.
Ctrl+Shift+P: Opens a new private window in Mozilla Firefox.
Alt+Enter after writing the domain name in the address bar of your browser to insert .com automatically.
Shift+Enter inserts .net domain name extension.
Ctrl+W: This shortcut closes the current tab in your browser quickly.
Ctrl+Backspace: This shortcut deletes the last word you have typed. It is useful in case you typed in a wrong word and want to delete it quickly.
Ctrl+Left or Right Arrow key: This shortcut allows you to move the cursor one word at a time instead of the default one character at a time.
Ctrl++: This shortcut allows you to zoom in web pages in web browsers. Useful when text on a web page is too small to read properly. Ctrl+Scroll wheel can also zoom in documents, file thumbnails and icons in Windows 10, Windows 8.1, Windows 8, Windows 7 and Windows Vista.
Ctrl+-: This shortcut does the reverse of the previous shortcut.
Ctrl+0: Reset the webpage's zoom.
Windows key+M: Minimizes all the open windows.
Ctrl+L: This shortcut allows you to quickly jump to the address bar of your web browser.
Windows key+Pause/Break: Quickly open the system properties dialog box.
Ctrl+Shift+Delete: This shortcut opens the option to delete your browser's history, cookies, cache and other details that it stores while you browse the internet. This shortcut is extremely useful for the privacy conscious.
Windows Key+L: This shortcut locks your computer.
Ctrl+H: makes the history appear.
CTRL+B: Bold CTRL+U: Underline CTRL+I: Italic.
Alt+Select: This shortcut allows you to select rectangular blocks of text in Word processors, something that is not possible with simple select.
F2: Allows you to rename the selected file.
Holding Shift while inserting a device with removable storage prevents automatic run.
Ctrl+F: This keyboard shortcut opens the Find option in any program.
Ctrl+S: If you are working on a software and want to quickly save your progress, this shortcut will come in handy.
Ctrl+Home and Ctrl+End: Useful for quickly going to the top and bottom of a page.
Ctrl+P: Useful for printing the current page.
Space Bar: While viewing a web page in a browser, pressing space bar moves the page down.
Alt+Tab: Useful for quickly cycling between running applications. Press along with Shift to cycle backwards.
Ctrl+Tab: Cycle between tabs in your browser.
Ctrl+F5: Clears the cache and refreshes the current tab.
Shift+Right click: Open alternate right click options.
Alt+Double click: Open the file's properties. Alt+Enter can also be used for this.
#4 Recover Deleted files in Windows with Free Tools
View attachment 236952
Have you ever deleted a file that you did not wish to and wanted to recover it but did not find it in the recycle bin? You probably deleted it permanently with Shift+Delete or emptied the Recycle Bin. Now what? Don't worry, you may still have a chance to get it back. This article lists some free software that can recover deleted files from your hard drive or any other storage device instantly.
But how do the software mentioned below undelete deleted files?
When files are deleted, Windows does not delete them from your hard disk. It marks the storage space as empty for new data to be written and deletes the index entry that tells the location of those files. Unless, new files are written on that space, the deleted files are still recoverable. That's what allows these software to recover deleted files.
There are many free software that allow users to do this. Some of them are given below:-
1) Pandora RecoveryView attachment 236954
recover deleted files in WindowsPandora Recovery is a free software that offers a wizard based interface for recovering files. It allows you to browse a drive's individual folders to look for deleted files. It also allows you search for a deleted file based on its name, file size, creation date and last access time. Its deep scan allows you to recover files that other software might have missed. Although deep scan does not return a file's original name and location, it still is effective to recover data from drives with corrupted file tables and drives that were recently formatted. It can even recover data from CDs and DVDs.
2) TOKIWA DataRecoveryView attachment 236955
At just over 200KB, TOKIWA DataRecovery is the smallest file recovery program in the market. It supports undeletion from FAT 12, FAT16, FAT32 and NTFS file systems. It also supports recovering NTFS compressed and EFS encrypted files. This software supports Windows and is portable as well. It also has a file shredder that allows you to wipe out files in a manner that they cannot be recovered again
3) RecuvaView attachment 236956
Another great freeware, Recuva offers a wizard based interface to unerase files. Recuva offers scanning deleted files based on their type (music, pictures, videos etc.). It also allows deep scanning in case a file you deleted is unrecoverable via normal search. Like TOKIWA DataRecovery, Recuva also offers securely deleting files. Recuva also has a portable version that you can keep in your flash drive.
All of these recovery software support recovery from memory sticks, digital camera cards and MP3 players. They support undeleting all types of pictures, software, movies and documents from both FAT and NTFS formatted drives. They work on Windows 8.1, Windows 8, Windows 7, Windows Vista and Windows XP.
View attachment 236953
1) When a file is deleted accidentally on a storage device, make sure that you don't do anything on it as doing that would increase the chances of new data being written over your deleted files; which would make file recovery impossible.
2) If you have deleted files on your main computer (the one you are using right now), do not browse the internet, download new software or shut it down. Keep it running and go to another computer, download one of the software mentioned above that is portable and save it on a flash drive. Then plugin the flash drive in your current system and perform file recovery. Regardless of whether you accidentally delete files a lot or not, make sure to always have that software in your flash drive in case you accidentally delete important files.
3) If one software fails to recover your deleted file, it does not mean that another one wouldn't recover it to
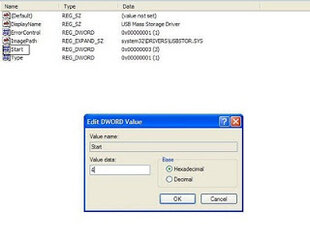
#5 Disable USB ports on Windows PC via Registry
With this trick, you can disable access to your USB(Universal Serial Bus) ports on your Windows based PC to prevent people from taking out data without permission or spreading viruses through the use of USB (pen and flash) drives.
To use this trick to disable USB ports, follow the steps given below:-
1. Click on Start.
2. Click on Run. If you cannot find RUN, type it in the search box.
3. Type "regedit" without quotes. This will launch the Registry Editor.
4. Navigate to HKEY_LOCAL_MACHINE\SYSTEM\CurrentControlSet\Services\usbstor.
5. In the work area, double click on Start.
6. In the Value Data box, enter 4.
7. Click on OK.
8. Close Registry Editor and refresh your desktop.
9. To re-enable access to your USB ports, enter 3 in the Value Data box in Step 6
View attachment 236958
View attachment 236958
Try it yourself to make your PC invulnerable from data theft and malware which spread through USB ports. This works on Windows XP, Windows Vista, Windows 7 and Windows 8.
Note: This trick also disables access to your USB connected peripheral devices. So, do not use it if you have USB connected keyboard and mouse.
#6 Make your Computer Welcome You
Do you watch movies? Have you always loved the way how Computers in movies welcome their users by calling out their names? I bet that you too would want to know how you can achieve similar results on your PC and have a computer said welcome.
Then you are at the right place, this article describes exactly how you can make your computer welcome you like this.
With this trick, you can make your Computer welcome you in its computerized voice. You can make your Windows based computer say "Welcome to your PC, Username."
Make Windows Greet you with a Custom Voice Message at Startup
To use this trick, follow the instructions given below:-
1. Click on Start. Navigate to All Programs, Accessories and Notepad.
2. Copy and paste the exact code given below.
4. Click on File Menu, Save As, select All Types in Save as Type option, and save the file as Welcome.vbs or "*.vbs".
5. Copy the saved file.
6. Navigate to C:\Documents and Settings\All Users\Start Menu\Programs\Startup (in Windows XP) and to C:\Users\ {User-Name}\AppData\Roaming\Microsoft\Windows\Start Menu\Programs\Startup (in Windows 8, Windows 7 and Windows Vista) if C: is your System drive. AppData is a hidden folder. So, you will need to select showing hidden folders in Folder options to locate it.
7. Paste the file.
View attachment 236959
Now when the next time you start your computer, Windows will welcome you in its own computerized voice.
Note: For best results, it is recommended to change sound scheme to No Sounds.
You can change the sound scheme to No Sounds by following the steps given below:-
Go to Control Panel.
1. Then click on Switch to Classic View.
2. Then Click on Sounds and Audio Devices.
3. Then Click on the Sounds Tab.
4. Select No Sounds from the Sound Scheme option.
5. If you wish to save your Previous Sound Scheme, you can save it by clicking Yes in the popup menu.
6. Click on OK.
Kindly visit my other Useful & Helpful Threads below my sig. Please show your support if this is helpful for you by clicking button
Basic Concept
The basic concept behind this trick is the use of Keywords. Keywords are reserved words in any programming language that cannot be used as names of variables. Windows also uses certain keywords in its programming. Some of them are con, aux, lpt1, lpt2, lpt3, lpt4, lpt5, lpt6, lpt7, lpt8 and lpt9.
View attachment 236944
Trick
So the question arises, how can we make a folder with a keyword as its name? The solution to this problem is included in Windows itself. As we know that Windows has evolved from D.O.S.(Disk Operating System), its commands can be used in Windows. You can use D.O.S. Programming in Windows to create a folder with a keyword as its name using the steps given below:-
1. Click on Start.
2. Click on Run. Type in "cmd" without quotes.
3. In the Command Prompt Window that opens, type the name of the drive you wish to create your folder in the format <drive-name>: and press Enter. e.g. If you wish to create the undeletable folder in D drive, type "D:" without the quotes. Note that the folder cannot be created in the root of C: drive (if C: is your system drive).
4. Type this command- "md con\" or "md lpt1\" without the quotes and press Enter. You can choose any of the keywords given above as the name of your folder.
Now Windows will create an undeletable, unrenamable folder in the drive you entered in Step 3. However, the folder can be renamed to another keyword using Windows Explorer.
Deleting the Folder
Although, it is not possible to manually delete the folder, you can delete the folder by typing "rd con\" or "rd lpt1\" in Step 4 instead of "md con\" or "md lpt1\".
Windows Compatibility: This works on Windows XP, Windows Vista, Windows 7, Windows 8 and Windows 8.1.
Try it yourself to create one such folder which can neither be deleted nor be renamed.
#2 Shutdown Your Computer or a Remote PC via Command Prompt
Required
A computer running Windows (XP, Vista, 7, 8 or 8.1) with the command prompt working perfectly, i.e. not disabled by a virus.
View attachment 236947
Initial Steps
1) Press Windows Key + R.
2) Enter CMD and press Enter.
This will start the command prompt. Follow the instructions below depending on what you want to do.
Shutdown Local Machine (Your Computer)
Type "shutdown -s" without the quotes in the command prompt and press Enter. Shutdown is the command being executed and the switch -s tells the computer to shutdown.
Restart your Local Computer
Type "shutdown -r" in the command prompt and press Enter. In this case, the command switch -r is telling the computer to restart after shutdown.
Log Off the Current User
Type "shutdown -l" in the command prompt and press Enter. The -l command switch tells the computer to log off.
Shutdown a Remote Computer
Type "shutdown -s -m \\name of the computer" in the command prompt and press Enter. Replace \\name of the computer with the actual name of the remote computer you are trying to shutdown. As mentioned earlier, you must have administrative access to the computer you are trying to shutdown. To know if you have administrative access, press Windows key + R and then type the name of the computer and press Enter.
Note: If you don't remember the name of the remote computer, you can look for it by opening a list of all the computers you are connected to by executing "net view" in command prompt.
If you can connect to the computer, you will be asked to login with your username and password. Upon entering them, a window will display the list of all the directories available to you. This should help you know whether you can or cannot shutdown the remote computer.
Hibernate a Local Computer
Type in "Rundll32.exe Powrprof.dll,SetSuspendState" without the quotes and press Enter. Your computer should hibernate, if it does not, then you must enable hibernation to do this.
Shutdown your or a remote computer after a specific time
Type "shutdown -s -t 60" to shutdown your computer after 60 seconds. Upon executing this, a countdown timer displaying a warning message will be shown. This command uses the -t command switch followed by a variable (which is 60 in this case) which represents the number of seconds after which the computer will shutdown.
Display a Message containing the reason for shutdown
Type shutdown -s -t 500 -c "I am tired. I don't want to work anymore." (with the quotes) in the Command Prompt and press Enter. The -c switch is used in the code to give the reason for shutting down and what is followed in quotes will be displayed in the dialog box as the reason. This can be used to display all sorts of funny messages. One example :-
Skynet has become self aware. John Connor did not stop me. You can not use your PC anymore.
Stop a System Shutdown
Type "shutdown -a" and press Enter. This will stop the system from shutting down if the countdown to shut down has not reached 0.
#3 Useful Keyboard Shortcuts for Windows Computers
View attachment 236950
Windows key+D: This shortcut is the keyboard equivalent of “Show the Desktop”. It is useful for quickly minimizing every open window when someone walks in and you are doing some private work.
Ctrl+Shift+Esc: This shortcut directly starts the task manager. While Alt+Ctrl+Del was used to bring out the Task Manager in Windows XP and earlier versions, in Windows 10, Windows 8.1, Windows 8 and Windows 7, it just brings up the lock this computer screen
Ctrl+Click: This shortcut is useful for opening a link in a background tab. This is useful when you have to load a page without leaving the current one.
Alt+Print Screen: takes the screenshot of the current active window as opposed to just Print Screen which takes the screenshot of the entire screen.
Shift+Click for Yes to All and No to All: If you have a lot of dialog boxes asking yes and no question, just shift+click Yes or No on one to yes all or no all.
Ctrl+C on an error dialog box to copy its contents: Suppose your computer is giving an error message and you want to copy its contents to send to the support guy, what do you do? Just press Ctrl+C while the dialog box is highlighted and its contents will be copied to your clipboard.
Ctrl+T: This keyboard shortcut opens a new tab in internet browsers.
Ctrl+Shift+T: Reopens the last closed tab.
Ctrl+Shift+N: This shortcut opens a new incognito window in Google Chrome.
Ctrl+Shift+P: Opens a new private window in Mozilla Firefox.
Alt+Enter after writing the domain name in the address bar of your browser to insert .com automatically.
Shift+Enter inserts .net domain name extension.
Ctrl+W: This shortcut closes the current tab in your browser quickly.
Ctrl+Backspace: This shortcut deletes the last word you have typed. It is useful in case you typed in a wrong word and want to delete it quickly.
Ctrl+Left or Right Arrow key: This shortcut allows you to move the cursor one word at a time instead of the default one character at a time.
Ctrl++: This shortcut allows you to zoom in web pages in web browsers. Useful when text on a web page is too small to read properly. Ctrl+Scroll wheel can also zoom in documents, file thumbnails and icons in Windows 10, Windows 8.1, Windows 8, Windows 7 and Windows Vista.
Ctrl+-: This shortcut does the reverse of the previous shortcut.
Ctrl+0: Reset the webpage's zoom.
Windows key+M: Minimizes all the open windows.
Ctrl+L: This shortcut allows you to quickly jump to the address bar of your web browser.
Windows key+Pause/Break: Quickly open the system properties dialog box.
Ctrl+Shift+Delete: This shortcut opens the option to delete your browser's history, cookies, cache and other details that it stores while you browse the internet. This shortcut is extremely useful for the privacy conscious.
Windows Key+L: This shortcut locks your computer.
Ctrl+H: makes the history appear.
CTRL+B: Bold CTRL+U: Underline CTRL+I: Italic.
Alt+Select: This shortcut allows you to select rectangular blocks of text in Word processors, something that is not possible with simple select.
F2: Allows you to rename the selected file.
Holding Shift while inserting a device with removable storage prevents automatic run.
Ctrl+F: This keyboard shortcut opens the Find option in any program.
Ctrl+S: If you are working on a software and want to quickly save your progress, this shortcut will come in handy.
Ctrl+Home and Ctrl+End: Useful for quickly going to the top and bottom of a page.
Ctrl+P: Useful for printing the current page.
Space Bar: While viewing a web page in a browser, pressing space bar moves the page down.
Alt+Tab: Useful for quickly cycling between running applications. Press along with Shift to cycle backwards.
Ctrl+Tab: Cycle between tabs in your browser.
Ctrl+F5: Clears the cache and refreshes the current tab.
Shift+Right click: Open alternate right click options.
Alt+Double click: Open the file's properties. Alt+Enter can also be used for this.
#4 Recover Deleted files in Windows with Free Tools
View attachment 236952
Have you ever deleted a file that you did not wish to and wanted to recover it but did not find it in the recycle bin? You probably deleted it permanently with Shift+Delete or emptied the Recycle Bin. Now what? Don't worry, you may still have a chance to get it back. This article lists some free software that can recover deleted files from your hard drive or any other storage device instantly.
But how do the software mentioned below undelete deleted files?
When files are deleted, Windows does not delete them from your hard disk. It marks the storage space as empty for new data to be written and deletes the index entry that tells the location of those files. Unless, new files are written on that space, the deleted files are still recoverable. That's what allows these software to recover deleted files.
There are many free software that allow users to do this. Some of them are given below:-
1) Pandora RecoveryView attachment 236954
recover deleted files in WindowsPandora Recovery is a free software that offers a wizard based interface for recovering files. It allows you to browse a drive's individual folders to look for deleted files. It also allows you search for a deleted file based on its name, file size, creation date and last access time. Its deep scan allows you to recover files that other software might have missed. Although deep scan does not return a file's original name and location, it still is effective to recover data from drives with corrupted file tables and drives that were recently formatted. It can even recover data from CDs and DVDs.
2) TOKIWA DataRecoveryView attachment 236955
At just over 200KB, TOKIWA DataRecovery is the smallest file recovery program in the market. It supports undeletion from FAT 12, FAT16, FAT32 and NTFS file systems. It also supports recovering NTFS compressed and EFS encrypted files. This software supports Windows and is portable as well. It also has a file shredder that allows you to wipe out files in a manner that they cannot be recovered again
3) RecuvaView attachment 236956
Another great freeware, Recuva offers a wizard based interface to unerase files. Recuva offers scanning deleted files based on their type (music, pictures, videos etc.). It also allows deep scanning in case a file you deleted is unrecoverable via normal search. Like TOKIWA DataRecovery, Recuva also offers securely deleting files. Recuva also has a portable version that you can keep in your flash drive.
All of these recovery software support recovery from memory sticks, digital camera cards and MP3 players. They support undeleting all types of pictures, software, movies and documents from both FAT and NTFS formatted drives. They work on Windows 8.1, Windows 8, Windows 7, Windows Vista and Windows XP.
View attachment 236953
1) When a file is deleted accidentally on a storage device, make sure that you don't do anything on it as doing that would increase the chances of new data being written over your deleted files; which would make file recovery impossible.
2) If you have deleted files on your main computer (the one you are using right now), do not browse the internet, download new software or shut it down. Keep it running and go to another computer, download one of the software mentioned above that is portable and save it on a flash drive. Then plugin the flash drive in your current system and perform file recovery. Regardless of whether you accidentally delete files a lot or not, make sure to always have that software in your flash drive in case you accidentally delete important files.
3) If one software fails to recover your deleted file, it does not mean that another one wouldn't recover it to
#5 Disable USB ports on Windows PC via Registry
With this trick, you can disable access to your USB(Universal Serial Bus) ports on your Windows based PC to prevent people from taking out data without permission or spreading viruses through the use of USB (pen and flash) drives.
To use this trick to disable USB ports, follow the steps given below:-
1. Click on Start.
2. Click on Run. If you cannot find RUN, type it in the search box.
3. Type "regedit" without quotes. This will launch the Registry Editor.
4. Navigate to HKEY_LOCAL_MACHINE\SYSTEM\CurrentControlSet\Services\usbstor.
5. In the work area, double click on Start.
6. In the Value Data box, enter 4.
7. Click on OK.
8. Close Registry Editor and refresh your desktop.
9. To re-enable access to your USB ports, enter 3 in the Value Data box in Step 6
View attachment 236958
View attachment 236958
Try it yourself to make your PC invulnerable from data theft and malware which spread through USB ports. This works on Windows XP, Windows Vista, Windows 7 and Windows 8.
Note: This trick also disables access to your USB connected peripheral devices. So, do not use it if you have USB connected keyboard and mouse.
#6 Make your Computer Welcome You
Do you watch movies? Have you always loved the way how Computers in movies welcome their users by calling out their names? I bet that you too would want to know how you can achieve similar results on your PC and have a computer said welcome.
Then you are at the right place, this article describes exactly how you can make your computer welcome you like this.
With this trick, you can make your Computer welcome you in its computerized voice. You can make your Windows based computer say "Welcome to your PC, Username."
Make Windows Greet you with a Custom Voice Message at Startup
To use this trick, follow the instructions given below:-
1. Click on Start. Navigate to All Programs, Accessories and Notepad.
2. Copy and paste the exact code given below.
3. Replace Username with your own name.Dim speaks, speech
speaks="Welcome to your PC, Username"
Set speech=CreateObject("sapi.spvoice")
speech.Speak speaks
4. Click on File Menu, Save As, select All Types in Save as Type option, and save the file as Welcome.vbs or "*.vbs".
5. Copy the saved file.
6. Navigate to C:\Documents and Settings\All Users\Start Menu\Programs\Startup (in Windows XP) and to C:\Users\ {User-Name}\AppData\Roaming\Microsoft\Windows\Start Menu\Programs\Startup (in Windows 8, Windows 7 and Windows Vista) if C: is your System drive. AppData is a hidden folder. So, you will need to select showing hidden folders in Folder options to locate it.
7. Paste the file.
View attachment 236959
Now when the next time you start your computer, Windows will welcome you in its own computerized voice.
Note: For best results, it is recommended to change sound scheme to No Sounds.
You can change the sound scheme to No Sounds by following the steps given below:-
Go to Control Panel.
1. Then click on Switch to Classic View.
2. Then Click on Sounds and Audio Devices.
3. Then Click on the Sounds Tab.
4. Select No Sounds from the Sound Scheme option.
5. If you wish to save your Previous Sound Scheme, you can save it by clicking Yes in the popup menu.
6. Click on OK.
Kindly visit my other Useful & Helpful Threads below my sig. Please show your support if this is helpful for you by clicking
buttonAttachments
-
 Make+undeletable,+unrenamable+folders.JPG9.2 KB · Views: 540
 -
 shutdown-command-prompt.jpg21.9 KB · Views: 1,439
 -
 Keyboard-shortcuts.jpg5.3 KB · Views: 18,666
 -
 recover-deleted-files.jpg4.4 KB · Views: 18,648
 -
 Recover-Undelete-Files-Deleted.jpg2.5 KB · Views: 18,593
 -
 Deleted-files-back.PNG7.9 KB · Views: 18,634
 -
 undelete-files-in-windows.PNG2.6 KB · Views: 18,609
 -
 undelete-files.png8.6 KB · Views: 18,618
 -
 Disable+access+to+USB+ports+in+your+PC.JPG15 KB · Views: 370
 -
 Make+your+computer+welcome+you.JPG14.2 KB · Views: 562
Last edited:


")