Hi guys! After a long time I’m here again to give you some updates to my tutorials. Mejo naging busy kaya ngayon lang uli ako makakagawa ng update. Kaylangan ko muna kasing grumaduate at tapusin ung Thesis kong website at magfocus ng konte sa panchichix, hehe joke lang sa work. Susubukan ko maglagay ng ibat ibang update. Salamat sa mga nagvview sa blog ko, kahit mukang ewan ung mga laman at karamihan kalokohan at mali mali pa ung mga grammar hehe. Tnx Tnx.
By the way I’m going to give you an idea on how to make printing an ID pictures easier. This is a support page for the one I made before where you can find at http://artifactors.blogspot.com/2013/04/how-to-make-id-picture-2x2-1x1-in-adobe.html
Ok, a lot of us knows how to edit images, repair or layout designs. But this post right now is dedicated to
Small or large scale Business
Computer Shop
Internet Cafe
Printing Services
that needs to automate their task on lay outing an already edited image in a canvas of Adobe Photoshop.
There’s a lot of Computer Shop or Internet Café right now that already added a service of printing ID pictures. I can say that it is really a good additional income for them and printing easier and faster is really a big advantage when the market becomes bigger.
I will not make all things complicated here. I already made the automation, I’m just going to help you on how to use it. So it’s really just a spoon feed help.
On every automated action that I made, I use standart A4 size canvass with a resolution of 300. If you have any suggestions for paper size or ID packages, please contact me via facebook -https://www.facebook.com/ialexies so that we can add it on our listing and that can benefit everyone.
So start heating up you’re your computer, UNLEASH THE MONSTER!!! OPEN ADOBE PHOTOSHOP!!!
Download ATN File: here
STEPS
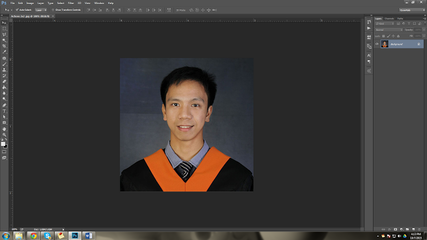
1. Have a 2x2 inches picture with 300 resoution. Be sure that you have the right dimensions and resolution or else it will not work properly. (Check the image size by pressing Alt+Ctrl+I). If you're just testing this tutorial, you can use my picture, just don't make it a monster :3
View attachment 235518
As I told you, this does not includes Editing of the image. So you need to edit the picture first or change the background.
View attachment 235519
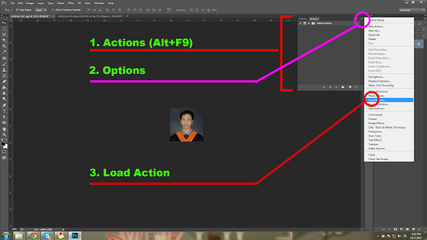
2. Now let's start on the Automation. Go to Window-Actions or just press Alt+F9. The Action pannel will show up. Click the Option to show the drop down menu, then select Load. Browse the ATN File ("ID Pictures 10072015.atn") that you have download from the top of this page then load it.
View attachment 235520
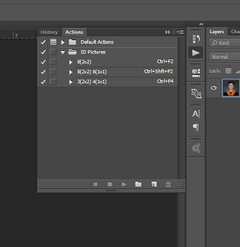
3. Now the Actions has been added. You can see now the ID Pictures Directory which contains different actions that we have.
''
View attachment 235521
It also shows the packages and its shortcut
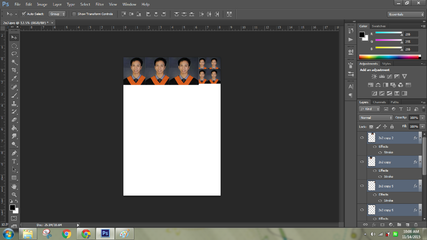
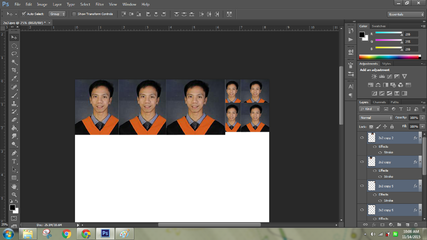
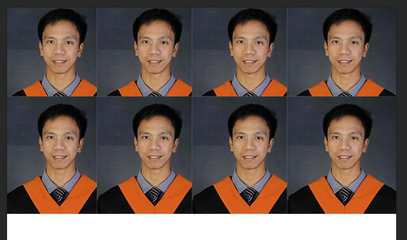
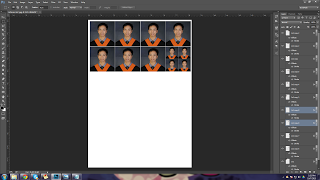
For 8 pieces of 2x2 picture - Press Ctrl+F2
For 7 pieces of 2x2 picture and 8 Pieces of 1x1 - Press Ctrl+Shift+F2
For 3 pieces of 2x2 picture and 4 Pieces of 1x1 - Press Ctrl+F4
Now You can enjoy it!! For suggestions and request Please contact me at FB
View attachment 235522
— Share It —
By the way I’m going to give you an idea on how to make printing an ID pictures easier. This is a support page for the one I made before where you can find at http://artifactors.blogspot.com/2013/04/how-to-make-id-picture-2x2-1x1-in-adobe.html
Ok, a lot of us knows how to edit images, repair or layout designs. But this post right now is dedicated to
Small or large scale Business
Computer Shop
Internet Cafe
Printing Services
that needs to automate their task on lay outing an already edited image in a canvas of Adobe Photoshop.
There’s a lot of Computer Shop or Internet Café right now that already added a service of printing ID pictures. I can say that it is really a good additional income for them and printing easier and faster is really a big advantage when the market becomes bigger.
I will not make all things complicated here. I already made the automation, I’m just going to help you on how to use it. So it’s really just a spoon feed help.
On every automated action that I made, I use standart A4 size canvass with a resolution of 300. If you have any suggestions for paper size or ID packages, please contact me via facebook -https://www.facebook.com/ialexies so that we can add it on our listing and that can benefit everyone.
So start heating up you’re your computer, UNLEASH THE MONSTER!!! OPEN ADOBE PHOTOSHOP!!!
Download ATN File: here
STEPS
1. Have a 2x2 inches picture with 300 resoution. Be sure that you have the right dimensions and resolution or else it will not work properly. (Check the image size by pressing Alt+Ctrl+I). If you're just testing this tutorial, you can use my picture, just don't make it a monster :3
View attachment 235518
As I told you, this does not includes Editing of the image. So you need to edit the picture first or change the background.
View attachment 235519
2. Now let's start on the Automation. Go to Window-Actions or just press Alt+F9. The Action pannel will show up. Click the Option to show the drop down menu, then select Load. Browse the ATN File ("ID Pictures 10072015.atn") that you have download from the top of this page then load it.
View attachment 235520
3. Now the Actions has been added. You can see now the ID Pictures Directory which contains different actions that we have.
''
View attachment 235521
It also shows the packages and its shortcut
For 8 pieces of 2x2 picture - Press Ctrl+F2
For 7 pieces of 2x2 picture and 8 Pieces of 1x1 - Press Ctrl+Shift+F2
For 3 pieces of 2x2 picture and 4 Pieces of 1x1 - Press Ctrl+F4
Now You can enjoy it!! For suggestions and request Please contact me at FB
View attachment 235522
— Share It —
Attachments

Last edited:
")
 TS thanks dito, balak ko mag open ng id printing e maganda daw kitaan e. TS malaking bagay itong shinare mo. Salamat.