- Messages
- 358
- Reaction score
- 1
- Points
- 28
Attention: THIS is not FREE, you will have to pay atleast $5 to rent a Cloud VPS na pwede ninyong magamit for hosting a website, applications, VPN and Shadowsocks.
Tip lang: Gamitin nyong pang host ng WordPress site nyo ang Cloud VPS na to. Malaki ang kikitain sa pag blog at the same time may sariling VPN at Shadowsocks din kayo.
This tutorial will help you setup your very own Shadowsocks server on Vultr Cloud VPS.
Signing Up an Account in Vultr
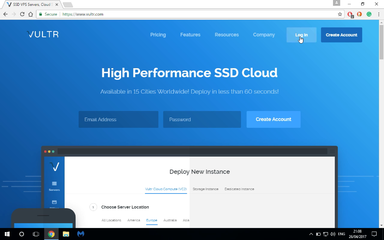
If you don’t have a Vultr account, first you should sign up to get one. For new users, Vultr offers
a FREE $10 credit.
View attachment 311633
Disclaimer: Links to vultr on this tutorial is my affiliate link.
If you sign-up under this link your account will be credited $50 and use it to fund your Vultr account.
Lets Start!...
Create a Server at Vultr
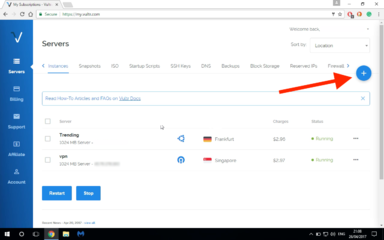
1. After you have logged in your Vultr account,
Click on the blue “+” link on the right side of the interface.
View attachment 316424
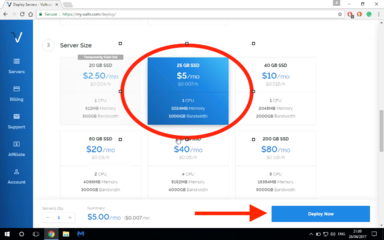
Then you will be asked to choose options to Deploy New Instance.
Suggested and recommended options
Server Location: Mas malapit mas OK
Server Type: Ubuntu 16.10
Choose a size: select $5/mo (or the bigger one if you decide to do so)
Leave steps 4, 5, 6, 7
Enter any server and label name of your choice
Then click on the “Deploy Now” button to create your instance.
View attachment 316425
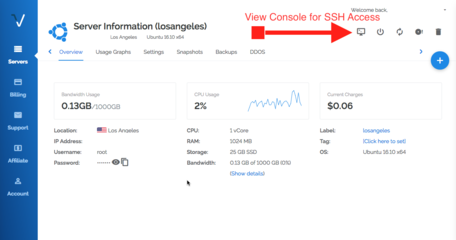
Once it’s done, you will be able to see your newly created instance listed under the Servers section of your
Vultr control panel.
Along with the name of the instance, you will also see an IP address for this.
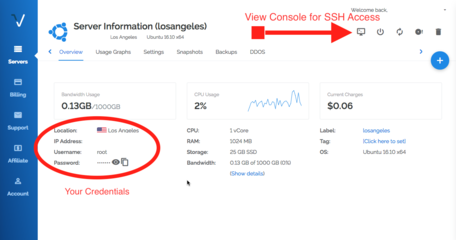
Click your server to see your external IP address and your SSH Credentials
Connecting to Vultr Server to Setup Shadowsocks
Now that we have a Vultr server running, we need to connect to it and set up Shadowsocks.
You can connect to the server in two ways: using the web-based access console provided by Vultr, or SSH to it using
a terminal on your local computer.
Now, let’s SSH to your Vultr server using a command like this:
(If you are using the View Console Skip this Step and proceed immediately to 3rd Step)
View attachment 316426
1.
Once you have SSHed to the server, run the following commands:
First, if your login account is not root:
2.
Then let’s update our machine:
3. Login Using Your Credentials as shown in the picture
View attachment 316427
Once your logged in as root enter these commands:
Then let’s install shadowsocks using the following two commands:
4.
Shadowsocks supports a number of encryption methods.
Below are the commands to setup the aes-256-cfb encryption:
5.
Now let’s create a config file for Shadowsocks, which should be created as “/etc/shadowsocks.json”. Let’s use the vi editor to do so:
6.
(press “i” to edit and ESC then “:x” when your done to save the config)
Add the following contents to the shadowsocks config file:
7.1
Note that the configuration above only open up one port (8000) for your Shadowsocks server and it only supports one login.
If you want to set up multiple users each with a different passwords, you can do so by setting up multiple ports, each with a different password.
Below is a a config file example for doing that:
7.2
(press “i” to edit and ESC then “:x” when your done to save the config)
Now we are pretty much ready. We can start our new Shadowsocks server using this command:
8.
If you want to double check if everything is OK, you can check on Shadowsocks’ log file:
9.
If you don’t see any error message in the Shadowsocks log file, then you are fine.
In the future, if you want to stop the Shadowsocks server, use this command: “ssserver -c /etc/shadowsocks.json -d
stop”.
If you want to restart the Shadowsocks server, use this command: “ssserver -c /etc/shadowsocks.json -d restart”.
There’s one more thing we need to set up. We need to make sure every time the server reboots our Shadowsocks
server will be started automatically. To do so, let’s use vi to edit the following file:
10.
In the file opened, add the following line to the bottom, before “exit 0”:
/usr/bin/python /usr/local/bin/ssserver -c /etc/shadowsocks.json -d start
Great. Now we have a Shadowsocks server running on Vultr!
If you want to stop here, it’s totally fine. You can now enjoy your newly created Shadowsocks server on Vultr
and use it as you wish.
But let’s continue with some tips for Shadowsocks server optimization.
Shadowsocks Server Optimization
By default, our Shadowsocks server might not be able handle a lot of traffic.
If you want it to be able to handle a large amount of concurrent connections, you need to increase the max number of open file descriptors. Now let’s do so:
11.
Add the following two lines to that file:
Note: Don’t skip the “*” symbols as they are parts of the lines. After that, let’s temporarily stop the Shadowsocks
server:
And then set the ulimit:
Then let’s tune the kernel parameters by editing the /etc/sysctl.conf file:
Add the following lines to the end of that file:
To make our changes take effect, run this command:
Now it’s time to re-start the Shadowsocks server:
Tip lang: Gamitin nyong pang host ng WordPress site nyo ang Cloud VPS na to. Malaki ang kikitain sa pag blog at the same time may sariling VPN at Shadowsocks din kayo.
This tutorial will help you setup your very own Shadowsocks server on Vultr Cloud VPS.
Signing Up an Account in Vultr
If you don’t have a Vultr account, first you should sign up to get one. For new users, Vultr offers
a FREE $10 credit.
View attachment 311633
Disclaimer: Links to vultr on this tutorial is my affiliate link.
If you sign-up under this link your account will be credited $50 and use it to fund your Vultr account.
Lets Start!...
Create a Server at Vultr
1. After you have logged in your Vultr account,
Click on the blue “+” link on the right side of the interface.
View attachment 316424
Then you will be asked to choose options to Deploy New Instance.
Suggested and recommended options
Server Location: Mas malapit mas OK
Server Type: Ubuntu 16.10
Choose a size: select $5/mo (or the bigger one if you decide to do so)
Leave steps 4, 5, 6, 7
Enter any server and label name of your choice
Then click on the “Deploy Now” button to create your instance.
View attachment 316425
Once it’s done, you will be able to see your newly created instance listed under the Servers section of your
Vultr control panel.
Along with the name of the instance, you will also see an IP address for this.
Click your server to see your external IP address and your SSH Credentials
Connecting to Vultr Server to Setup Shadowsocks
Now that we have a Vultr server running, we need to connect to it and set up Shadowsocks.
You can connect to the server in two ways: using the web-based access console provided by Vultr, or SSH to it using
a terminal on your local computer.
Now, let’s SSH to your Vultr server using a command like this:
(If you are using the View Console Skip this Step and proceed immediately to 3rd Step)
View attachment 316426
1.
Code:
ssh root@{your_instance_IP_address}Once you have SSHed to the server, run the following commands:
First, if your login account is not root:
2.
Code:
$ sudo suThen let’s update our machine:
3. Login Using Your Credentials as shown in the picture
View attachment 316427
Once your logged in as root enter these commands:
Code:
$ apt-get updateThen let’s install shadowsocks using the following two commands:
4.
Code:
$ apt-get install python-pip

$ pip install setuptools

$ pip install shadowsocks
Shadowsocks supports a number of encryption methods.
Below are the commands to setup the aes-256-cfb encryption:
5.
Code:
$ apt-get install python-m2crypto

$ apt-get install build-essential

$ wget https://github.com/jedisct1/libsodium/releases/download/1.0.10/libsodium-1.0.10.tar.gz

$ tar xf libsodium-1.0.10.tar.gz && cd libsodium-1.0.10

$ ./configure && make && make install

$ ldconfig
Now let’s create a config file for Shadowsocks, which should be created as “/etc/shadowsocks.json”. Let’s use the vi editor to do so:
6.
Code:
$ vi /etc/shadowsocks.json(press “i” to edit and ESC then “:x” when your done to save the config)
Add the following contents to the shadowsocks config file:
7.1
Code:
{
    "server":"[COLOR="#FF0000"]your_server_IP_address[/COLOR]",
    "server_port":[COLOR="#FF0000"]8000[/COLOR],
    "local_port":1080,
    "password":"[COLOR="#FF0000"]your_password[/COLOR]",
    "timeout":600,
    "method":"aes-256-cfb"
}
Note that the configuration above only open up one port (8000) for your Shadowsocks server and it only supports one login.
If you want to set up multiple users each with a different passwords, you can do so by setting up multiple ports, each with a different password.
Below is a a config file example for doing that:
7.2
Code:
{
    "server":"[COLOR="#FF0000"]your_server_address[/COLOR]",
    "port_password": {
        "443": "[COLOR="#FF0000"]password1[/COLOR]",
        "8000": "[COLOR="#FF0000"]password2[/COLOR]",
        "8383": "[COLOR="#FF0000"]password3[/COLOR]",
        "8384": "[COLOR="#FF0000"]password4[/COLOR]"
    },
    "local_port":1080,
    "timeout":600,
    "method":"aes-256-cfb"
}Now we are pretty much ready. We can start our new Shadowsocks server using this command:
8.
Code:
$ ssserver -c /etc/shadowsocks.json -d startIf you want to double check if everything is OK, you can check on Shadowsocks’ log file:
9.
Code:
$ less /var/log/shadowsocks.logIf you don’t see any error message in the Shadowsocks log file, then you are fine.
In the future, if you want to stop the Shadowsocks server, use this command: “ssserver -c /etc/shadowsocks.json -d
stop”.
If you want to restart the Shadowsocks server, use this command: “ssserver -c /etc/shadowsocks.json -d restart”.
There’s one more thing we need to set up. We need to make sure every time the server reboots our Shadowsocks
server will be started automatically. To do so, let’s use vi to edit the following file:
10.
Code:
$ vi /etc/rc.localIn the file opened, add the following line to the bottom, before “exit 0”:
/usr/bin/python /usr/local/bin/ssserver -c /etc/shadowsocks.json -d start
Great. Now we have a Shadowsocks server running on Vultr!
If you want to stop here, it’s totally fine. You can now enjoy your newly created Shadowsocks server on Vultr
and use it as you wish.
But let’s continue with some tips for Shadowsocks server optimization.
Shadowsocks Server Optimization
By default, our Shadowsocks server might not be able handle a lot of traffic.
If you want it to be able to handle a large amount of concurrent connections, you need to increase the max number of open file descriptors. Now let’s do so:
11.
Code:
$ vi /etc/security/limits.confAdd the following two lines to that file:
Code:
* soft nofile 51200
* hard nofile 51200
Note: Don’t skip the “*” symbols as they are parts of the lines. After that, let’s temporarily stop the Shadowsocks
server:
Code:
$ ssserver -c /etc/shadowsocks.json -d stopAnd then set the ulimit:
Code:
$ ulimit -n 51200Then let’s tune the kernel parameters by editing the /etc/sysctl.conf file:
Code:
$ vi /etc/sysctl.confAdd the following lines to the end of that file:
Code:
fs.file-max = 51200

net.core.rmem_max = 67108864
net.core.wmem_max = 67108864
net.core.netdev_max_backlog = 250000
net.core.somaxconn = 4096

net.ipv4.tcp_syncookies = 1
net.ipv4.tcp_tw_reuse = 1
net.ipv4.tcp_tw_recycle = 0
net.ipv4.tcp_fin_timeout = 30
net.ipv4.tcp_keepalive_time = 1200
net.ipv4.ip_local_port_range = 10000 65000
net.ipv4.tcp_max_syn_backlog = 8192
net.ipv4.tcp_max_tw_buckets = 5000
net.ipv4.tcp_fastopen = 3
net.ipv4.tcp_mem = 25600 51200 102400
net.ipv4.tcp_rmem = 4096 87380 67108864
net.ipv4.tcp_wmem = 4096 65536 67108864
net.ipv4.tcp_mtu_probing = 1
net.ipv4.tcp_congestion_control = cubic
To make our changes take effect, run this command:
Code:
$ sysctl -pNow it’s time to re-start the Shadowsocks server:
Code:
$ ssserver -c /etc/shadowsocks.json -d startHope This Helped you Somehow. I'll try to help you as much as I can and according to my time vacant time.
Attachments
Last edited:
")
