Symbianize Forum

Most of our features and services are available only to members, so we encourage you to login or register a new account. Registration is free, fast and simple. You only need to provide a valid email. Being a member you'll gain access to all member forums and features, post a message to ask question or provide answer, and share or find resources related to mobile phones, tablets, computers, game consoles, and multimedia.

All that and more, so what are you waiting for, click the register button and join us now! Ito ang website na ginawa ng pinoy para sa pinoy!

Cherry Mobile Android One G1 - Discussion Thread

Arthur Leywin

The Ultimate Symbianizer
Advanced Member
Messages
3,714
Reaction score
525
Points
323
Good Luck
Royal Wisdom
Absolute Peace
Space Stone
Time Stone
Reality Stone
Power Stone
Soul Stone
Mind Stone
androidoneg1.png


Cherry Mobile Android One G1
Google Android One (Seed/Crackling)

Code:
OS: Android 7.0 Nougat - Upgradable through Android One standard
SoC: Qualcomm MSM8916 Snapdragon 410 1.2GHz Quad Core 64-bit ARM Cortex-A53 
GPU: Adreno 306 
Display: 5.0" HD IPS Display with On-Cell Technology (720 x 1280 Pixels, 294 ppi) Dragontail
Internal Storage: 16GB - Expandable Up to 32GB via MicroSD
Memory: 2GB RAM
SIM Slot: Micro SIM (x2)
Main Camera: 13.0 Megapixel Autofocus Main Camera with Dual LED Flash
Front Camera: 5.0 Megapixel Front Camera
Battery: 2,500mAh Li-Po
Other features: 4G LTE, 3G HSPA+, 2G EDGE and GPRS Networks, Wi-Fi and Wi-Fi Hotspot, Bluetooth 4.0 with A2DP, GPS with A-GPS, Micro USB 2.0, 3.5mm Audio Jack, Compass, Accelerometer, Proximity Sensor, Ambient Light Sensor, 140.5 x 69.75 x 9.3 mm @ 135 g
Price: P5,999


Code:
[B][COLOR="#800000"][SIZE=4]GUIDES AND TUTORIALS[/SIZE][/COLOR][/B]
- [url=goo.gl/GLXioK]Setting Up USB, ADB and Fastboot Drivers[/url]
- [url=goo.gl/cta3k8]How to Root your Android One G1[/url]

Code:
[B][color=#800000]Custom ROMs[/color][/b]
(Seed)
- [url=goo.gl/sYBrCW]OmniROM Official 7.1[/url]
- [url=goo.gl/76GWqj]LineageOS Official 14.1[/url]
- [url=goo.gl/J2FbZD]Cyanogenmod 13 Unofficial 6.0.1[/url]

(Crackling)
- [URL="https://www.mobilarian.com/showthread.php?t=1420559&page=2&p=23643411&viewfull=1#post23643411"][ROM][8.1] crDroid Android 4.7[/URL]

Code:
[B][color=#800000]Stock ROMs (Seed)[/color][/b]
- [url=goo.gl/L4PiQP]Nougat Stock ROM TWRP Flashable [7.0][/url]


- - - Updated - - -


Setting Up USB, ADB and Fastboot Drivers Manually

This tutorial will teach you how to set-up ADB and fastboot drivers on your PC manually. I personally use this procedure and consider it foolproof in comparison to installing them via automatic driver installers.

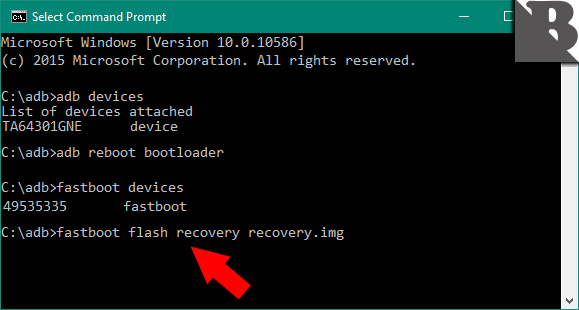
This procedure will be useful in debugging and working on fastboot commands such as unlocking bootloader, flashing partition images, and installing a custom recovery.

What you need: ADB and Fastboot Drivers


Device Drivers setup

* Download the file from the given link and extract it anywhere on your PC (be sure that you know where the directory is.)

* Install the USB drivers via Device Manager. For Windows 8.1 and above users, you have to disable zip signature verification first before you can successfully install the drivers (refer to this link for the tutorial: http://www.howtogeek.com/167723/how...8.1-so-that-you-can-install-unsigned-drivers/)

* On your Desktop, or via the start menu, right click Computer and Select Manage

* Once the Computer Management window opens, select Device Manager under System Tools

* On the right side, right-click the topmost option (usually the name of the PC) and select add legacy hardware. The Add Hardware window will open:

1. Click Next
2. On the next page, select "Install the hardware that I manually select from a list (Advanced)" and click Next
3. Select "Show All Devices" and click Next
4. Click "Have Disk" and the "Install From Disk" Dialog Box opens
5. Click "Browse" and navigate to the Extracted folder (ADB Drivers_Updated > ADB Drivers downloaded from the link above and select the approprate version for your PC (32-/64-bit)
6. Once you have selected the right folder, Click Open
7. You will be taken back to the "Install From Disk" window. Click OK
8. At the "Add Hardware" window, information about the drivers will now be displayed
Manufacturer: Google
Model: Android Original ADB Interface
9. Click Next and the next page will say: "The wizard is ready to install your hardware", Click Next
10. Windows Security dialog box that says "Windows can't verify the publisher of this driver software" will show up, just click "Install this driver anyway". The installation procedure will start.
11. Once the intallation is finished, just click finish.

Congratulations! You have now installed the USB drivers manually.

* Now that you have installed the drivers, the PC will now recognize your device in either USB Debugging or Fastboot mode.

* Navigate to the root of the extracted folder (the one with the adb and fastboot files) and open command window on that directory by pressing Shift while right-clicking inside the folder and selecting "open command window here"


All files and tutorials are credited to the
Android One - Seed & Crackling
(Cherry Mobile G1, General Mobile 4G, etc)
Facebook Group especially Sir Arvin Quilao
 
Last edited:
HOW TO ROOT ANDROID ONE G1

Note: Backup important files on your internal storage because unlocking bootloader will also wipe the internal storage (see Procedure #7).

Requirements:

1. Pre-installed drivers on your pc.
2. TWRP img
3. Magisk zip
4. Allowed OEM unlocking at Developers Option
5. Enabled USB Debugging at Developers Option

Part 1: Installing TWRP

1. Download the TWRP img file and move it inside the ADB drivers folder.

2. Download the SuperSU zip file to your internal/external storage.

3. Put your phone in fastboot mode (hold power and volume down at the same time when turning on the phone) then connect it to PC via usb cable.

4. Open a command window in the updated ADB drivers folder (hold shift then right click on an empty space in the folder’s window) then click Open command window here.

Open-Command-Window-ADB-Folder.png


5. Verify if its connected by typing fastboot devices

fastboot-devices.jpg


6. Remember the exact file name of the twrp img you have. You can rename it to your desire.

7. We will unlock the bootloader to allow flashing of files to your device. This only takes once . You don't have to unlock bootloader everytime you flash zips.

8. In command prompt, type fastboot oem unlock-go

9. Install TWRP by typing fastboot flash recovery nameofyourtwrp.img

54Zzgng.png


10. You now have the option to boot to twrp thru command prompt by typing fastboot reboot and immediately press and hold volume down button.

Congrats! You have now installed TWRP recovery to your device.


Part 2: Rooting your Android One G1

1. Boot to TWRP. (Shutdown phone, Power + Volume Up)
2. Flash Magisk zip
3. Boot to System
 
Last edited:
omnirom-01.jpg


Official website: https://omnirom.org/

Official Weekly Build: http://dl.omnirom.org/seed/

1. Reboot to Recovery mode.
2. Wipe all except Internal and External storage.
3. Install ROM zip.
4. Install GApps zip.
5. Reboot to System.

Note: You can dirty flash this as long your current ROM is OmniROM. Else, full wipe first.
 
Last edited:
Lineage-OS-Feature-Image-Background-Colour.png

Official website: https://lineageos.org/

Download: https://download.lineageos.org/seed

1. Reboot to Recovery mode.
2. Wipe all except Internal and External storage.
3. Install ROM zip.
4. Install GApps zip.
5. Reboot to System.

Note: You can dirty flash latest updates, if and only if you are currently using the same ROM.
 
Last edited:
sino po my kilalang gumagawa ng phone cherry mobile g1 h220
hang logo then charger pin
sa charger pin gumagana lang sa charge pero sa data ayaw
pa pm nalang po ako or sa FB
FB : [email protected]
name : plong plong


thankyou!
 
TS ano ba yong ROM na oreo na parang pang pixel 2 na may tap awake and off pa hingi ng link gusto kong eh try yun sa G1 ko stock ROM lang kase to para di na ako bibili ng bagong android one
 
TS ano ba yong ROM na oreo na parang pang pixel 2 na may tap awake and off pa hingi ng link gusto kong eh try yun sa G1 ko stock ROM lang kase to para di na ako bibili ng bagong android one

Crackling custom rom yun with foxy kernel.
Mag update ako ng ROM, add ko yung crDroid.
Then add ko yung Magisk module na Pixel 2 Experience
 
ok thanks same steps lang ba pag flash?
 
Migrate Files - Seed & Crackling


Files are flashable via TWRP.

Migrate to Seed
- This file contains seed bootloader, twrp and modem. Use this file to migrate from crackling to seed firmware.
Download link: https://drive.google.com/file/d/0BzAW91rYWe8BclRsQlJLZnNjZTA/view?usp=drivesdk


Migrate to Crackling
- This file contains crackling bootloader, twrp, radio files, bootlogo and bootanimation and seed modem. Use this file to migrate from seed to crackling firmware.
Download link: https://drive.google.com/file/d/1imecFZ87VqHWnBRMlfRvf3o7S8djiATb/view?usp=drivesdk
 
Last edited:
may nag uupdate pa ba dito ??? pahingi naman screenshots ng o.s ung lineage tsaka omni rom
 
na try ko na lineage.. mahina ung volume nya tsaka pag mag video ako nag error ung pagplay.. la na bang update ?? latest na o.s ??
 

Attachments

  • crdroid.png
    crdroid.png
    10.8 KB · Views: 1
Back
Top Bottom