Naencounter ko din po yan nailaw na lang ang umiilaw. Follow lang po.
1. Tanggal ang Power Adapter at USB Cable, hayaang nakasaksak ang LAN Cable from your PC/Laptop connected sa 936 Modem.
2. Run Multicast, select nyo yung LAN Card Adapter. Be sure na tama at iload ng 931.BIN, lagyan ng check and "Force Update" then click Start
3. Saksak ang Power Adapter, connected to 936 modem.
4. Bantayan ang modem, after nyan, magiging RED yung ilaw sa modem at click nyo na ang STOP Button sa Multicast at ipress and Power+WPS at wag bibitawan
5. After nyo mapress, huwag bibitawan. Magrereset yung Modem and iilaw ulit ang RED Light, kapag namatay na ang RED Light bitawan ang POWER+WPS
6. IIlaw ang BLUE Light the after 3-5mins. iilaw ang GREEN Light
7. open CID Reader, be sure po na may nakalagay ng "HUAWEI 3G UI Interface" sa inyong Device Manager, if meron it means success and installation ng driver
8. Then, ilagay ang sumusunod na code sa CID Reader, be sure na nakaselect ang proper COM Port sa inyong CID Reader
First -Unang code:
at ^ nvwrex = 8268,0,12,1,0,0,0,2,0,0,0, a, 0,0,0
after sending command you will receive OK delete the OK
Second Pangalawang code:
AT ^ SYSCFGEX = "00", 3FFFFFFF, 1,2,800C5 ,,
after sending command you will receive OK delete the OK
Third Pangatlong code:
AT ^ SYSCFGEX = "0302", 400000,1,2,800C5 ,,
9. Next, exit CID Reader then balik kayo sa Step 1 hanggang 7. except to step 8/9
10. Kapag nasa CID Reader na kayo, ienter and sumusunod na code :
First Code:
at^datalock? ===> Query Datalock Status Value. Default value is “1” (Enabled)
Second Code:
AT ^ NVWREX = 50502,0,128,4A FB 2D 5A 34 74 86 F0 A6 CC AE 46 99 53 83 1D 5C B1 7E 2A EF B2 B0 1A EF 53 03 8E C8 FF 1C 0D 00 00 00 00 00 00 00 00 00 00 00 00 00 00 00 00 00 00 00 00 00 00 00 00 00 00 00 00 00 00 00 00 8B 8C F4 B5 AF 0C F2 2C FE E0 F4 46 9C CF 47 95 36 71 1F 1C BF 05 7F 84 AB A9 F2 92 89 33 3C 01 00 00 12 00 00 00 00 00 00 00 00 00 00 00 00 00 00 00 00 00 00 00 00 00 00 00 00 00 00 00 00 00
Sets The Datalock Value to 12345678
Third Code:
at^datalock="12345678"
Sets Datalock Status value to “0” (Disabled)
Fourth Code:
at^sfm=0
This command will kick your modem out of factory mode
Fifth COde:
AT^reset
Connect your modem to your PC via USB Cable
Under “Network Properties”, Set IP manually as follows:
Tick “Use the Following IP Address”
IP address: 192.168.1.100
Subnet Mask: 255.255.255.0
Gateway: 192.168.1.1
Tick “Use the following DNS Server Adressess”
Preferred DNS: 192.168.1.1
Alternate DNS: (leave blank)
Click OK
Run “Config Updater” and wait for it to complete successfully.
Use the following login details:
Username : admin
Password : admin
or
Username : user
Password : user
Exit “Config Updater” and reboot modem.
Enter USB mode.
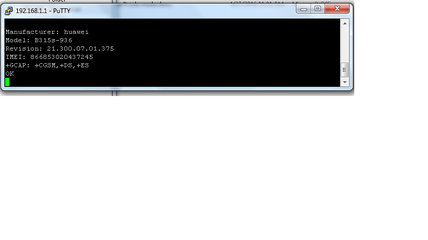
RUn CMD from your computer then enter telnet 192.168.1.1
Code 1:
at^sfm=0
This command will kick your modem out of factory mode
Code 2:
AT^reset
Resets and reboots the modem
After successfully rebooting, go to Network Properties again and Tick “Obtain IP Address Automatically” and “Obtain DNS Address Automatically”. Try to log into the modem’s web interface by typing 192.168.254.254 in your browser.
Enter the Following Information in the boxes provided.
Username: admin
Password: admin


")