- Messages
- 926
- Reaction score
- 4
- Points
- 28
- Thread Starter
- #101
thanks ^ 
Most of our features and services are available only to members, so we encourage you to login or register a new account. Registration is free, fast and simple. You only need to provide a valid email. Being a member you'll gain access to all member forums and features, post a message to ask question or provide answer, and share or find resources related to mobile phones, tablets, computers, game consoles, and multimedia.
All that and more, so what are you waiting for, click the register button and join us now! Ito ang website na ginawa ng pinoy para sa pinoy!
sir baka pedeng makahingi ng php editor mo..
magccmula na sana ako mag aral ng php kaso ndi ko alm kung ano gagamitin ko...
thnx sir..
") bm po muna
bm po munaHello, in this thread I'm gonna show you on how to create a simple login/logout system with registration and display function
using Wamp Server [PHP as PL]
As we all know, login/logout and signup is very important in a system. The main purpose of
it is to secure the system and to recognize a specific user whether admin ba sya or just a
simple user lang who could only see limited areas of the system.
So, let's start!
Step 1:
Make sure you already installed Wamp Server. However, kahit anong tools or apps ang gamit
nyo parepareho lang din naman. Pero in this tutorial version, Wamp server ang ginamit ko
dito.
Step 2:
Go to drive C: -> wamp -> www
Then create a new folder. Dyan tayo mag se save ng mga php and html files later.
Step 3:
First let's create our database!
Go to system tray then click the wamp icon. then go to PHPmyAdmin
http://i256.photobucket.com/albums/hh197/xiruki/1-2.png
Step 4:
PHPmyAdmin will now appear in default browser, similarly to this...
http://i256.photobucket.com/albums/hh197/xiruki/2-1.png
At this point, we will now create a new database.
Sa right side, may makikita kayo na Create a new database so just fill it up. In this
example, pinangalanan ko yung database na: logdb
Step 5:
Go inside the database then click SQL tapos copy and paste this one!
Tapos you may also add a primary key sa email and name.Code:CREATE TABLE `logdb`.`users` ( `id` INT NOT NULL auto_increment , `name` VARCHAR( 20 ) NOT NULL , `password` VARCHAR( 20 ) NOT NULL , `location` VARCHAR( 50 ) NOT NULL, `email` VARCHAR( 20 ) NOT NULL , PRIMARY KEY ( `id` ) )
Well, that's optional.
Step 6:
Open notepad then create the PHP file now of the index page.
Start creating a form with necessary conditions in executing the input/s
From the code above:
error_reporting(E_ALL & ~E_NOTICE); // is used to hide errors/warnings
print "<a href='logout.php'>Logout</a> | <a href='users.php'>Click to proceed</a>";
^ logout.php.. we'll create one later!
But i'm not going to show the code of users.php because it has nothing to do with the login/logout part of the system. That page is available sa mga users lang ng system.
if ($_SESSION[user] =="admin")
{
echo "<meta http-equiv=\"refresh\" content=\"0;URL=administration.php\">";
}
Si $_SESSION[user] --> sya un nagiidentify kung sino yung nakalogin na user at that moment.
^If admin naman, sa ibang page sya mapupunta. Sa administration.php naman. You can create
your own accessible page ng mga admin wherein pwede sila mag modify dito atbp.
Sa part ng code kung nasaan yung loginform(); ibigsabihin po nyan na tinatawag na si loginform function. So after the execution, it will jump to the loginform func.
Step 7:
So we need to continue the code by creating a loginform function.
Isunod nyo lang toh sa code kanina!
So dito naman, papakita na kung paano gumawa ng skeleton or actual form kung saan may
textbox, textfield, radio buttons atbp.
Dito mag iinput yun user ng values.
Sa bottom part ng code na yan, may makikita na register.php daw tapos eto yun gagawin pa
natin later kasi ito yun sa sign up ng new user!
Step 8:
Create the checkpass(); function wherein the number of rows were checked and as well as the
login info na nilagay ng user sa login field.
At this point, eto na yun code ng checkpass natin. Dito, tatawagin na natin yung database
natin para yun values ma recognize from our db.
Step 9:
Add more functions like this 1:
function content(){
print("<b><h1>hi mr.$_SESSION[user]</h1>");
print "<br><h2>only a logged in user can see this</h2>";
}
Step 10:
Then end the statements using ?></form> to avoid errors!
And don't forget to save the file tapos ang name is index.php
Step 11:
Now that we already accomplished the index.php which is the login part,
Now we're ready to do the register.php sa isang separate file.
Open notepad again then add these codes:
Create a form with appropriate method again...
the action will go directly to registration2.php and we'll be creating this one mamaya paraCode:<FORM ACTION="registration2.php" METHOD=get> <h1>welcome to the registration page</h1> please input the registration details to create an account here<br> <table border="2"> <tr> <td>User Name :</td><td><input name="regname" type="text" size"20"></input></td> </tr> <tr> <td>email :</td><td><input name="regemail" type="text" size"20"></input></td> </tr> <tr> <td>password :</td><td><input name="regpass1" type="password" size"20"></input></td> </tr> <tr> <td>retype password :</td><td><input name="regpass2" type="password" size"20"></input></td> </tr> <tr> <td>Location: </td><td><input name="regloc" type="text" size="20"></input></td> </tr> </table> <input type="submit" value="register me!"></input> </FORM>
pag nagcall ng action sa form natoh, may magiging actions.
then save this as register.php
Step 12:
open notepad again then create a new file. Name it: registration2.php
Now for this one, maglalagay tayo ng PHP code para mapost yun mga values na nilagay ng user
sa form natin kanina sa register.php
To do this, we need to execute the MY SQL query using INSERT function
From the code above, as u can see may mga newly defined variables na regname, regemail, regpass1 and regpass2. So ang purpose nun is to temporarily hold the records tapos afterCode:<?php if($_GET["regname"] && $_GET["regemail"] && $_GET["regpass1"] && $_GET["regpass2"] && $_GET["regloc"] ) { if($_GET["regpass1"]==$_GET["regpass2"]) { $servername="localhost"; $username="root"; $conn= mysql_connect($servername,$username)or die(mysql_error()); mysql_select_db("logdb",$conn); $sql="insert into users (name,email,password,location)values('$_GET[regname]','$_GET [regemail]','$_GET[regpass1]','$_GET[regloc]')"; $result=mysql_query($sql,$conn) or die(mysql_error()); print "<h1>you have registered sucessfully</h1>"; print "<a href='index.php'>go to login page</a>"; } else print "<center><b><font size='5px'>passwords doesnt match</font></b></center>"; } else print"invalid data"; ?>
that, officially ng i-iinsert ni MYSQL query yung mga records inside the database using...
insert into users (name,email,password,location)values('$_GET[regname]
Step 13:
After the sign up process, we need to do the logout.php naman para once na maka login un user, pwede rin sya mag log out db?
So this is very simple we just need the session_destroy IF condition
So save the file as logout.php ! Ofcourse separate file sya!Code:<?php session_start(); if(session_destroy()) { print"<h2><B><blink>you have logged out successfully</B></blink></h2>"; print "<h3><a href='index.php'>back to main page</a></h3>"; } ?>
Step 14:
Now, if may mga records na yun database, pwede na tayo gumawa ng display page kung saan
makikita yun mga registered users
Simple lang ang pag print ng records na galing sa ating database! We need to use the correct SELECT query para ma display yung records!
From the code above, yung SELECT statement na ginamit ay...Code:<?php $db="logdb"; $link = mysql_connect('localhost', 'root', ''); if (! $link) die(mysql_error()); mysql_select_db($db , $link) or die("Couldn't open $db: ".mysql_error()); $result = mysql_query( "SELECT email, name, location, password FROM users order by name" ) or die("SELECT Error: ".mysql_error()); $num_rows = mysql_num_rows($result); print "<center><font size='3px'>There are $num_rows members:<br/<br/></font></center>"; print("<br/><br/>"); print "<center><table width=700 border=5>\n <tr><td><B>Email address</B></td><td><B>Name</B></td><td><b>Location</b></td><td><b>password</b></td></tr>"; while ($get_info = mysql_fetch_row($result)){ print "<tr>\n"; foreach ($get_info as $field) print "\t<td>$field</td>\n"; print "</tr>\n</center>"; } print "</table>\n"; mysql_close($link); ?> <br/> <hr> <br/>
SELECT email, name, location, password FROM users order by name
So, you just have to create a table using html para mas organized yung pag display ng
records!
Save this file as members.php
Step 15:
Sa index.php natin, just create a menu wherein nandun yung link natin to members.php para
maaccess at makita ng mga users yung mga registered users.
Step 16:
Testing part na!
Go to system tray again then click the WAMP icon tapos Localhost
http://i256.photobucket.com/albums/hh197/xiruki/3-1.png
it will open sa browser after few seconds...
http://i256.photobucket.com/albums/hh197/xiruki/4-1.png
If tinatamad ka bisitahin si system tray, Copy paste then Go sa address bar ng browser nyo: http://localhost/
Inside the localhost, which is http://localhost/ makikita mo yun mga detailed info about apache version, my sql version, php tools atbp.
Makikita mo din sa bottom part yun Projects part wherein dun natin sinave kanina yung php files natin.
The name of my project folder is library tapos pagkaklik dapat dun, diretso na dapat agad sa index.php
Eto yun laman ni index.php yung LOGIN PART ng system!
http://i256.photobucket.com/albums/hh197/xiruki/5-1.png
Upon logging in, kung may naka save na sa DB nyo na record...
Magiging succesful yung login!
http://i256.photobucket.com/albums/hh197/xiruki/6-1.png
So eto naman yung sa register.php natin kanina!
http://i256.photobucket.com/albums/hh197/xiruki/7-1.png
Same with login, magiging successful din kapag ok ung pagkaka signup ng user!
http://i256.photobucket.com/albums/hh197/xiruki/8-1.png
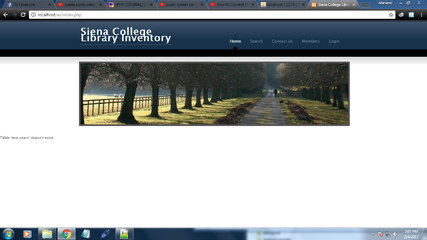
Testing up the members.php to view registered users, You must create a menu sa index.php or anywhere para makapunta sa members.php
Sa example ko, nag create ako ng menu just like this...
http://i256.photobucket.com/albums/hh197/xiruki/9a.png
Inside the members.php, naka display yung mga registered users na naka save sa database na logdb
http://i256.photobucket.com/albums/hh197/xiruki/9-1.png
Last but not the least, using logout.php... upon clicking the logout mapupunta sya dito
http://i256.photobucket.com/albums/hh197/xiruki/10-1.png
well nasasainyo na kung anung gusto nyong idagdag sa logout,php . you can add more styles/designs
You may download the source code/files here. Ini attach ko po sa thread nato.
If you have any questions, feel free to post it here
I'll be posting more tutorials next time pag di na masyado busy hahaa! To be continued pa toh, kasi madami pa pwede idagdag dito tulad ng search function, delete user, update user and more.
Happy coding po
If it's helpful, please hit the THANKS .