- Messages
- 774
- Reaction score
- 1
- Points
- 26
* How to move all your Apps and data ( including system apps and data ) in partitioned SD Card*
#include
/*
* Your warranty is now void.
*
* I am not responsible for bricked devices, dead SD cards,
* thermonuclear war, or you getting fired because the alarm app failed. Please
* do some research if you have any concerns about features included in this ROM
* before flashing it! YOU are choosing to make these modifications, and if
* you point the finger at me for messing up your device, I will laugh at you.
* If you dont like this rom, Stay away from this thread!
* If you have any problem, Contact Forum Moderator. I will only reply to him!
* Keep this thread clean!
*/
* IMPORTANT NOTE: Kung gagawin niyo to, siguraduhing di kayo pala alis/lagay lagi ng SD Card niyo sa Phone niyo para iwas corrupted files and apps. *
>
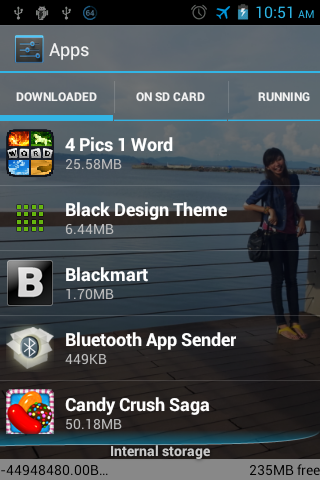
> Screen shot Settings> My Phone and SD card storage
> Kitang kita naman sa SS na to na ang total space ng Device memory ko is 192MB lang pero ang contents niya almost 620MB na tapos yung free storage niya 180MB pa. Okay diba?
>
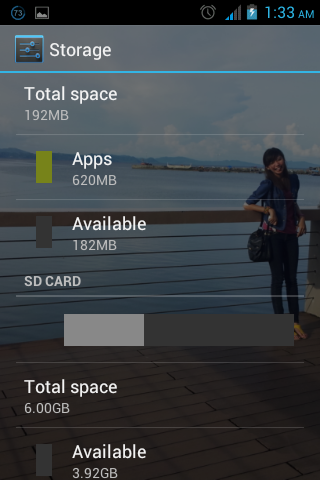
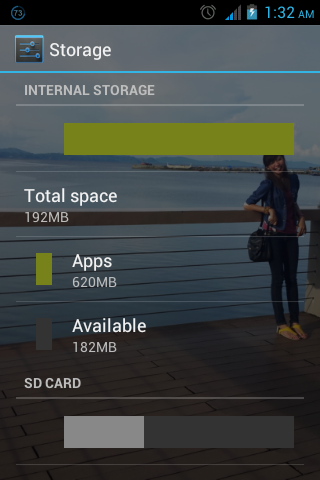
> Screen shot Settings> My Phone and SD card storage part 2
> 8gig po ang SD card ko pero ang totoo 7.1GB lang ang daya
 yung 1.1gig nakapartitioned kaya 6GB nalang anjan.
>
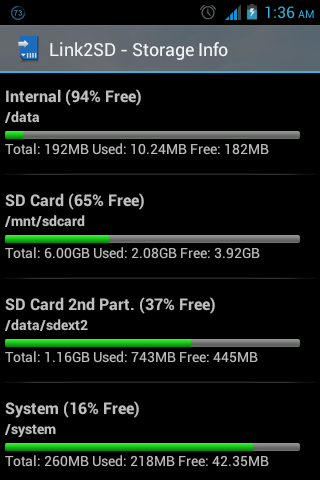
> Screen shot Link2sd > Storage info
>As you can see, compatible siya sa storage info ko sa Setting > Phone and SD card Storage ko.
>*Internal 192MB /10.24MB Used/ 182MB Free.
*SD Card 6GB / 2.08GB Used / 3.92GB Free
*SD Card 2nd Part 1.16GB / 743MB Used / 445MB Free
* These are proofs na working talaga siya.*
>
>
>
>
>
> Safe to kasi wala namang nangyari sa phone ko. Kumbaga, manual procedure to at mas okay kesa sa ibang trick like swapping and etc
> Ginawa ko tong thread na to para sa mga nabibitin sa Device Memory ng Android phone nila
> Tried and tested to sa Android ICS 4.0.4 Cherry Mobile Click ko kasi 190MB+ lang device memory niya so nakakabitin
> Credits to sa youtube video na napanood ko
> Working naman siguro to sa Gingerbread
> MUST BE ROOTED!
( Why? -> Kase need natin ng root rights para sa gagamitin nating apps which is Link2SD and Root Explorer )
>
> Requirements:
> Android Phone running 2.3 and UP
> Link2SD( Older version. After niyo iinstall update niyo nalang sa google play para latest verson na o kaya sa Google play na kayo mag download wag na to )
> Root Explorer -> Root_Explorer_(File_Manager)_v3.0.1_apkmania.com.apk Etong iaattach ko pang ICS lang to. Di ata to gagana sa GB kasi parsing error. Hanap nalang kayo compatible sa Device niyo
> Memory Card atleast 2GB or higher
> Minitool Partition
> Common sense. Kung wala ka nito search mo nalang
> Wag maraming tanong kasi kumpletong tutorial ang ipopost ko okay?
> Recommended ko lang to sa may mga experience na sa pag partition and pag gamit ng link2sd at root explorer.
> May video naman gayahin niyo nalang.
>
> Instructions:
> 1st Part
> Download niyo muna si Minitool partition dito
> Install nyo ang minitool(pwhe8.exe)
> Gamit kayo ng card reader at isaksak ang sdcard nyo,wag nyong irekta sa selpon nyo ang pagpartition,
> Magbackup! kase mafoformat ang sd card nyo
> Open minitool at hanapin ang inyong sdcard.
> I-right click at piliin ang delete.(ingat lang baka iba ang madelete nyo patay kayo!)
> Eto na ang pagpartition, right click ulit sa sdcard at piliin ang create.
> Ngayon, piliin ang "primary" sa Create as. "fat32" for 4GB above SD Card pag 2GB "fat" naman sa File system
-dito nyo mailalagay ang inyong binakap na files nyo, kaya dapat mas malaki to.
-kung meron kang 8gig at gusto mong magkaroon ng partion na 1gig, ilagay mo sa "Unallocated Space After" ang 1000mb. at click ang OK!
> ( recommended partition is between 512mb - 2GB )
> Lalabas ang 1gig na pinartition nyo sa baba, iright click ito at piliin ang create.
> Tulad ng kanina i-primary ito, at sa "File System" piliin ang "ext2".
> Click OK.
> Ngayon i-click ang APPLY,magintay ng sandali.
> Kung success na pwede kana manlibre!,at ibalik mo na ang mga files na binakap mo.(copy paste lang yon!)
> Dito tayo sa selpon mo.
> Ilagay na ang sdcard(syempre!)
> Maginstall ng link2sd, kung meron na, edi mas maganda!.
> Buksan ang link2sd, madedetect nya ang pinartition mo. at syempre yun ang piliin mo!
> Sasabihin nya "mount script created", kaya reboot mo ang selpon mo
> Pagbukas ng selpon mo,pumunta ulit sa settings ng link2sd.
> Check mo ang autolink.
> Scroll down uncheck niyo yung
> After niyan exit niyo na.-Relink lib files at boot
-Relink dex files at boot
>
*Credits sa Original Creator ng Trick na to. Super Useful. Di nako mag memenstion pa isa isa kasi alam ko marami nakaisip nito.*
>
> 2nd Part ( Dito kailangan na natin ng Root Explorer and Utak at pag intindi sa tutorial! )
> Install Root Explorer download here -> Root_Explorer_(File_Manager)_v3.0.1_apkmania.com.apk
> After niyan open niyo change the permission to R/W from R/O
> Punta kayo sa "data" folder
> After niyan hanapin niyo yung folder ng "app", "dalvik cache" and "data" folders. Check the box of those folders nasa right side ang box checkan niyo yan tatlong folder na yan
> Tapos copy niyo yan 3 folders na yan by clicking first option sa baba yung paper na dalawa which is copy ang meaning niyan
> Makikita niyo may "Copy here" kayong makikita sa baba
> Scroll down makikita niyo yung folder ng "sdext2" open niyo then paste niyo yung tatlong folder na kinopya niyo kanina
> After macopy, nasa loob na tayo ng "sdext2" folder diba? Long press niyo yung folder ng app tapos may lalabas na options jan scroll down nasa dulo yung "Link to this folder" na option, click niyo yung tapos click back to "data" folder ( hindi dun sa data folder na kinopya niyo ha. Dun sa unang data folder na pinasuka natin. ) and click "Create Link" may mag pa-pop up jan just click yes.
> Go back to folder of "sdext2" and gawin niyo sa dalvik-cache and data folder yung procedure na ginawa niyo sa app folder.
> Pagkatapos niyan reboot.
> Punta sa Settings>Applications> tigna niyo memory niyo mababa na ang usage niyan kahit madami ng apps ang ininstall niyo. Minsan nga negative payan gaya nitong sa phone ko.
>
Proof na working to.
>
>
>
>
>
>
> Keep updated! Baka sa wed gagawa ako step by step Screen Capture para mas malinawan kayo.

>
>
>
> Alam ko may nalilito, sundan niyo nalang tong Video sa Youtube.
> Tutorial Link2SD and Rootexplorer ( S4 gamit niya pero tried and tested ko na sa Cherry Mobile Click ko.
)>
>
> Ano pang hinihintay niyo? Try na. Safe and Useful

Last edited:
")
 tia!
tia!
")