- Messages
- 3,714
- Reaction score
- 525
- Points
- 323


HELLO ULIT!
Nanggugulo na naman ako sa tahimik na pag aaral nyo sa photoshop.
I have a new tutorial here.
Ever since kasi gusto ko talaga matuto gumawa ng 3D Text.
Kaya lang hirap ako makagawa from scratch.
Nalaman ko na pwede using CS5 Extended pero wala pa kasi akong
own PC para makapag DL at mainstall yon.
Pero sa matiyagang paghahanap, nakagawa ako ng paraan.
Creating a 3D text using Actions")
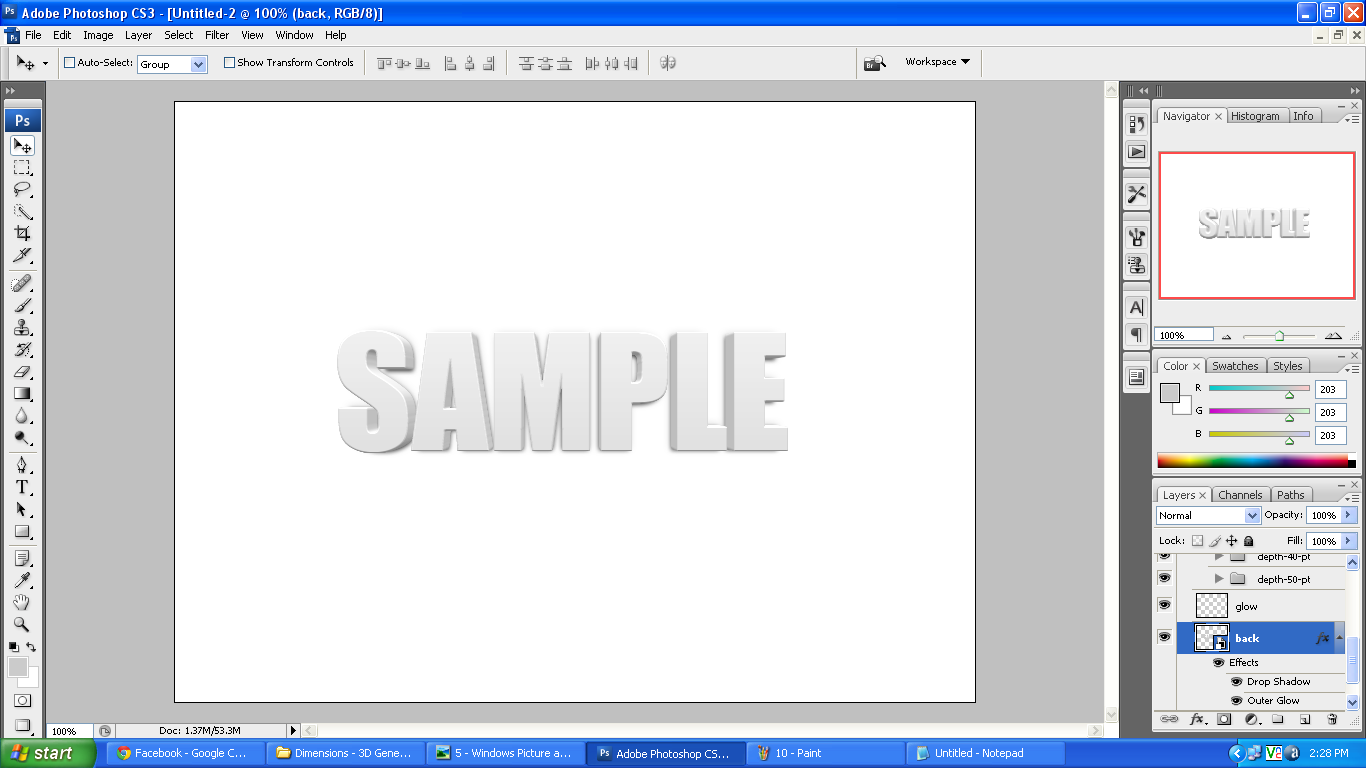
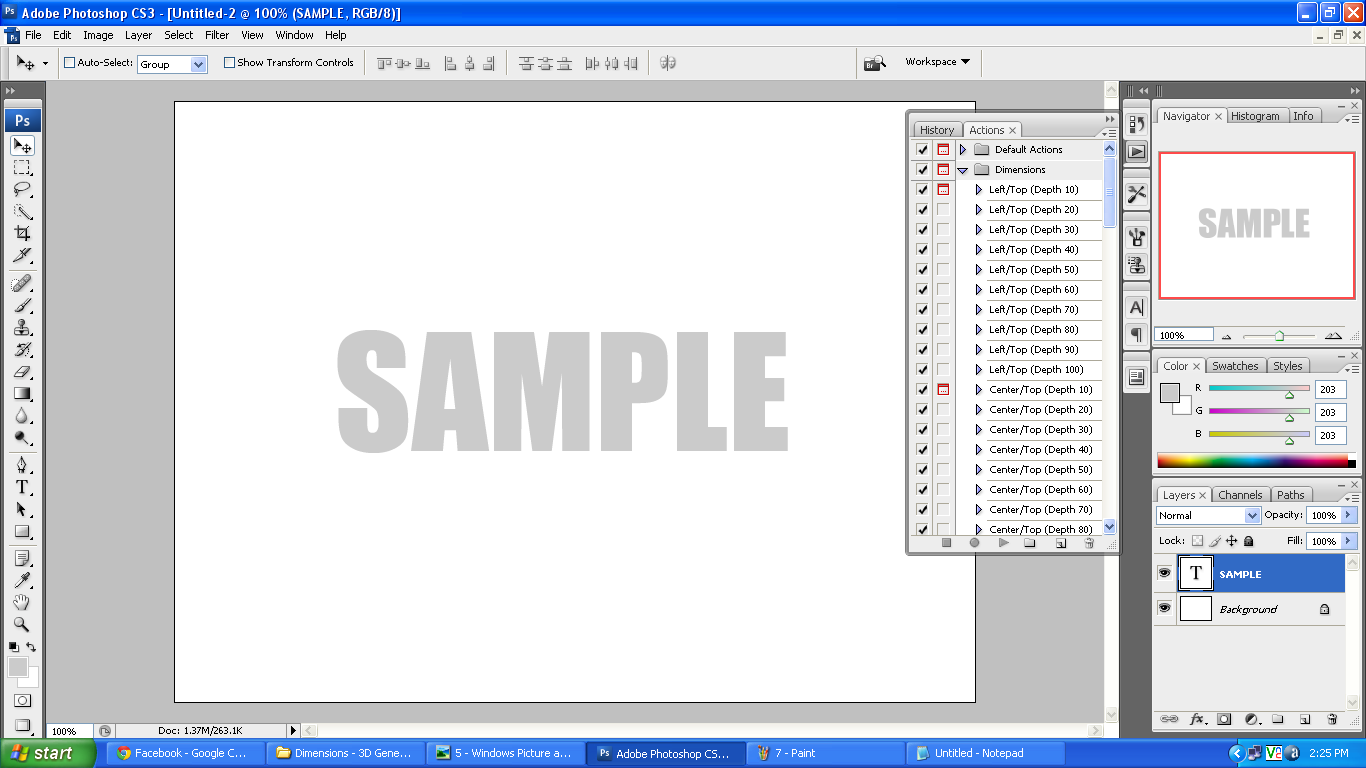
Here a sample
I used Center 50.
Pagitna ung 3D nya.
How to make this work?
Follow these steps.
Pero bago yon, Download mo muna ung Action File. Copy mo ung action file to the Actions folder ng PS mo.
CLICK TO DOWNLOAD
Kailangan install muna natin ung action file.
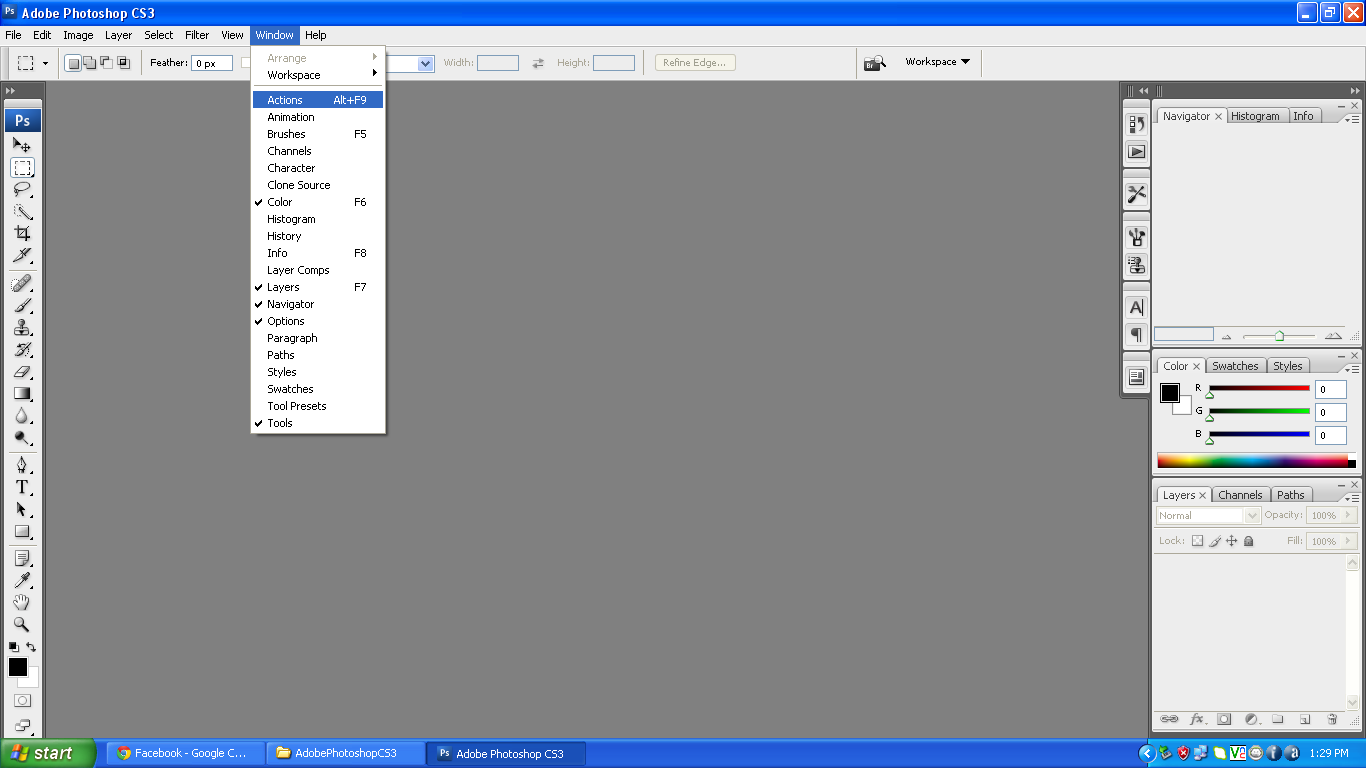
Click WINDOW > ACTIONS (or Alt + F9)
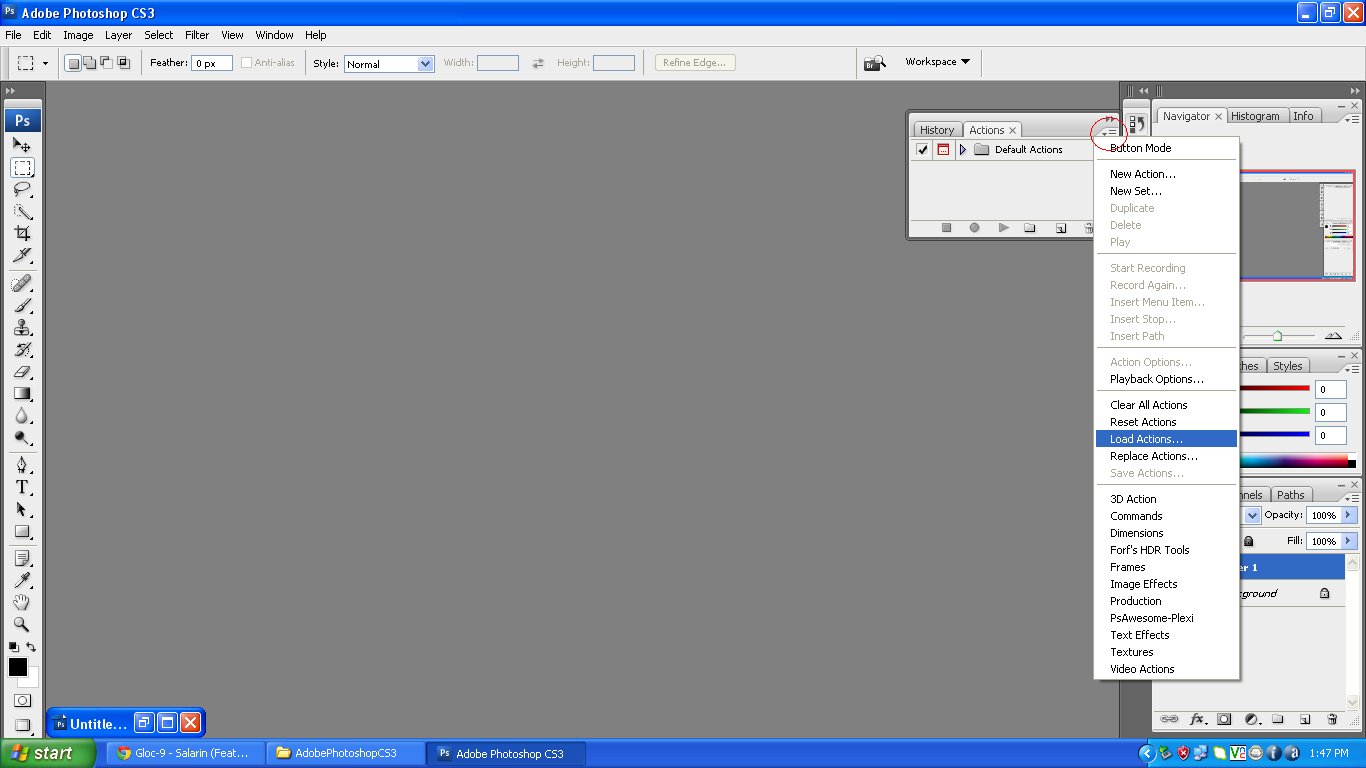
Click mo ung arrow na pababa then click Load Actions.
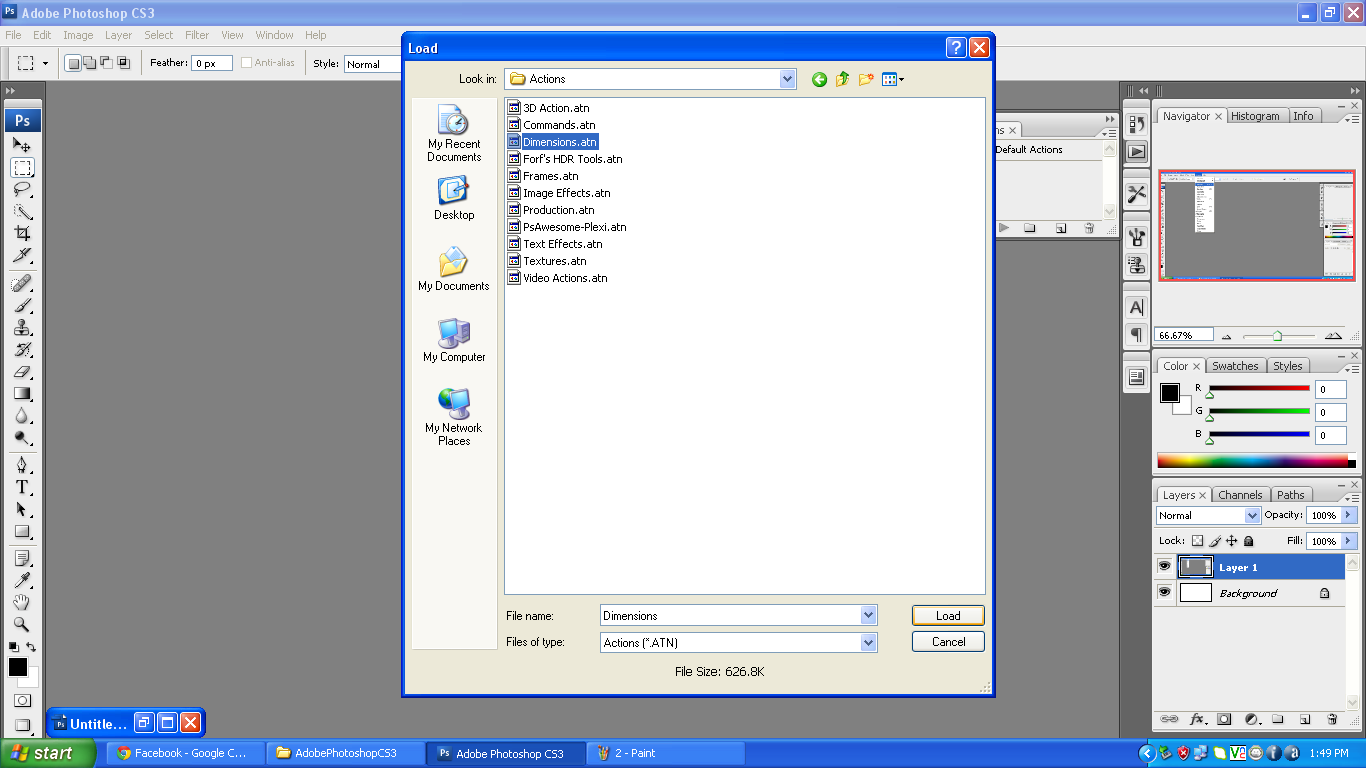
Press on My Computer > Local Disk > Program Files > Adobe > Your photoshop > Presets > Actions
Piliin mo na ngayon ung Dimensions.atn
Irename mo ung folder from "dimensions" to "Dimensions"
Double click mo lang naman para pwede mapalitan
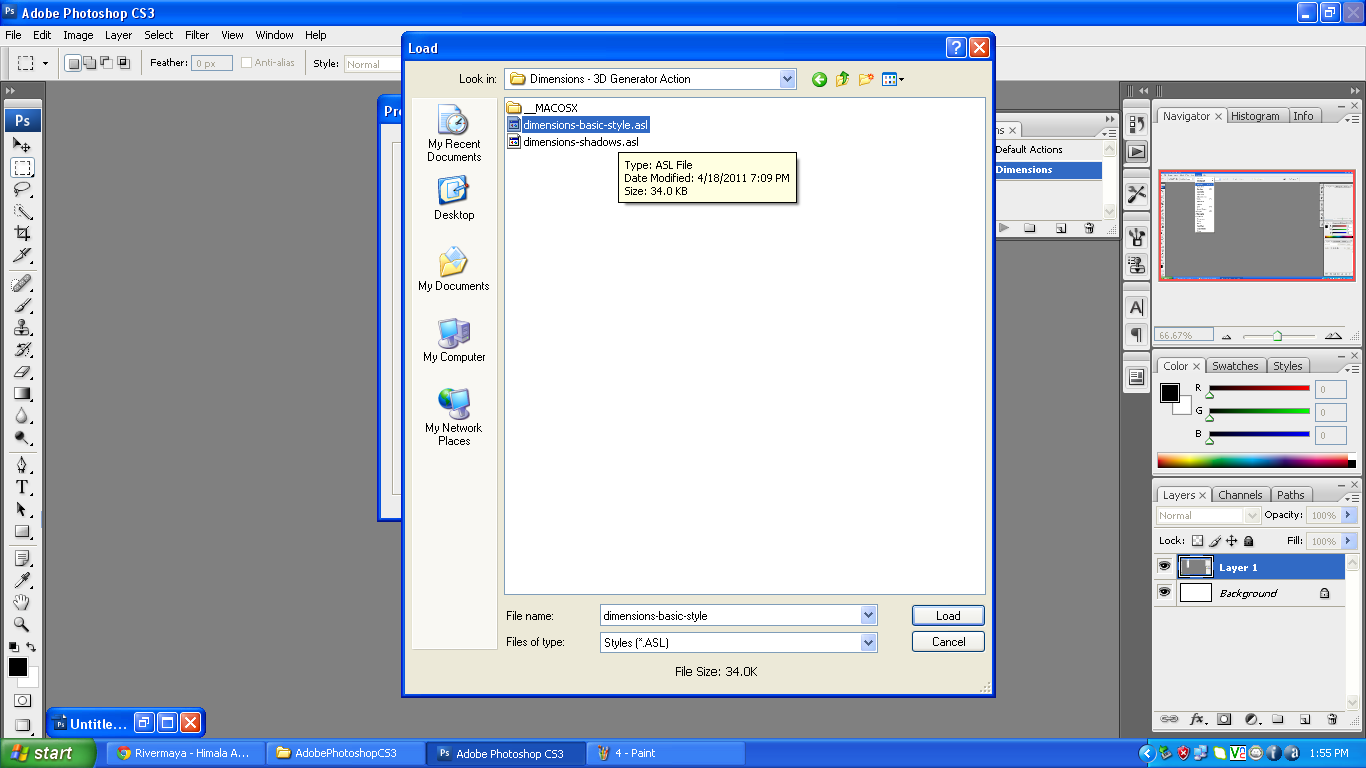
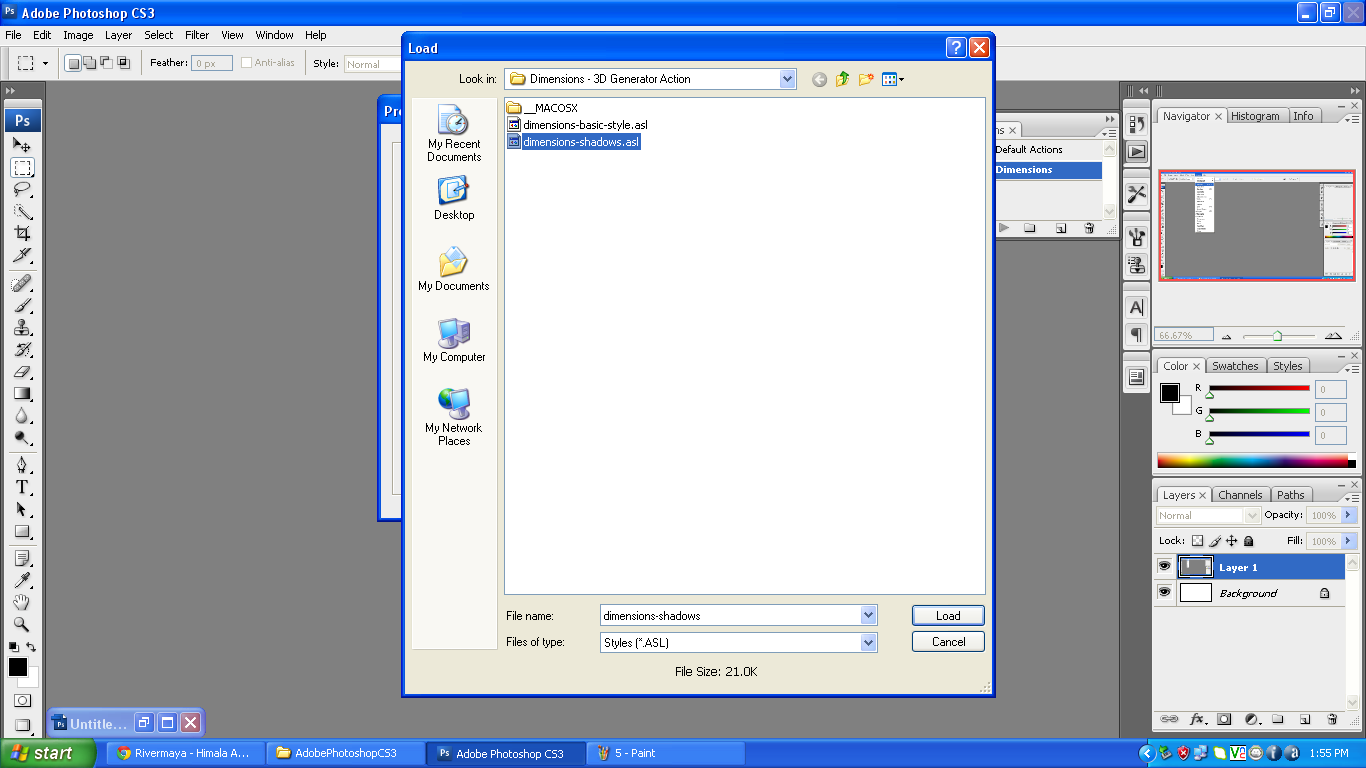
After nyan, install naman natin ung Styles.
Click on EDIT > Presets Manager
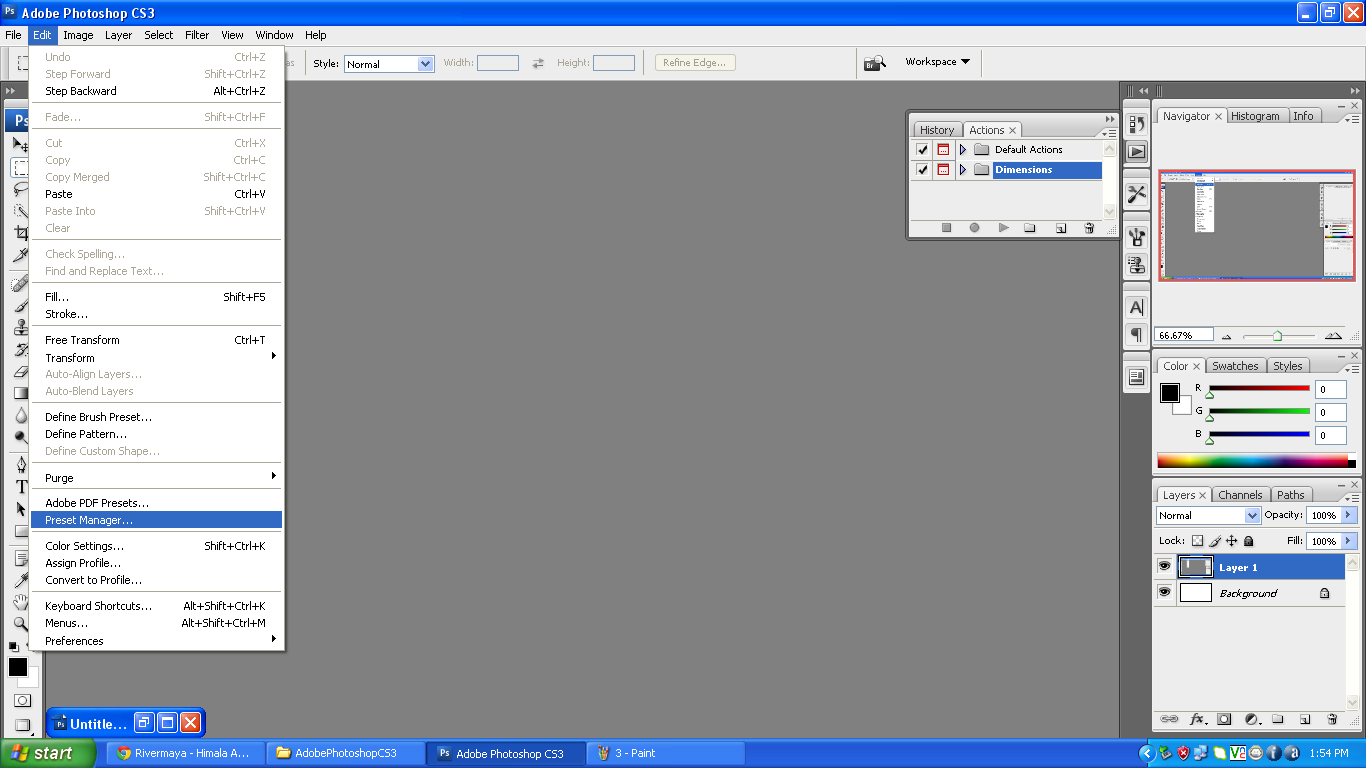
Hanapin mo yung Dinownload mo kanina, yung Dimensions-3D Generator Action
Load mo ung dalawang .asl files, namely "dimensions-basic-style.asl" and "dimensions-shadows.asl"
Isa isa lang ang pagload nyan kaya twice mo gagawin.
THEN SHALL WE START?
Una, gawa ka ng blank na canvass.
Mga nasa 800 x 600 pixels pwede na.
Or depende sayo kung ano ang prefer mo.
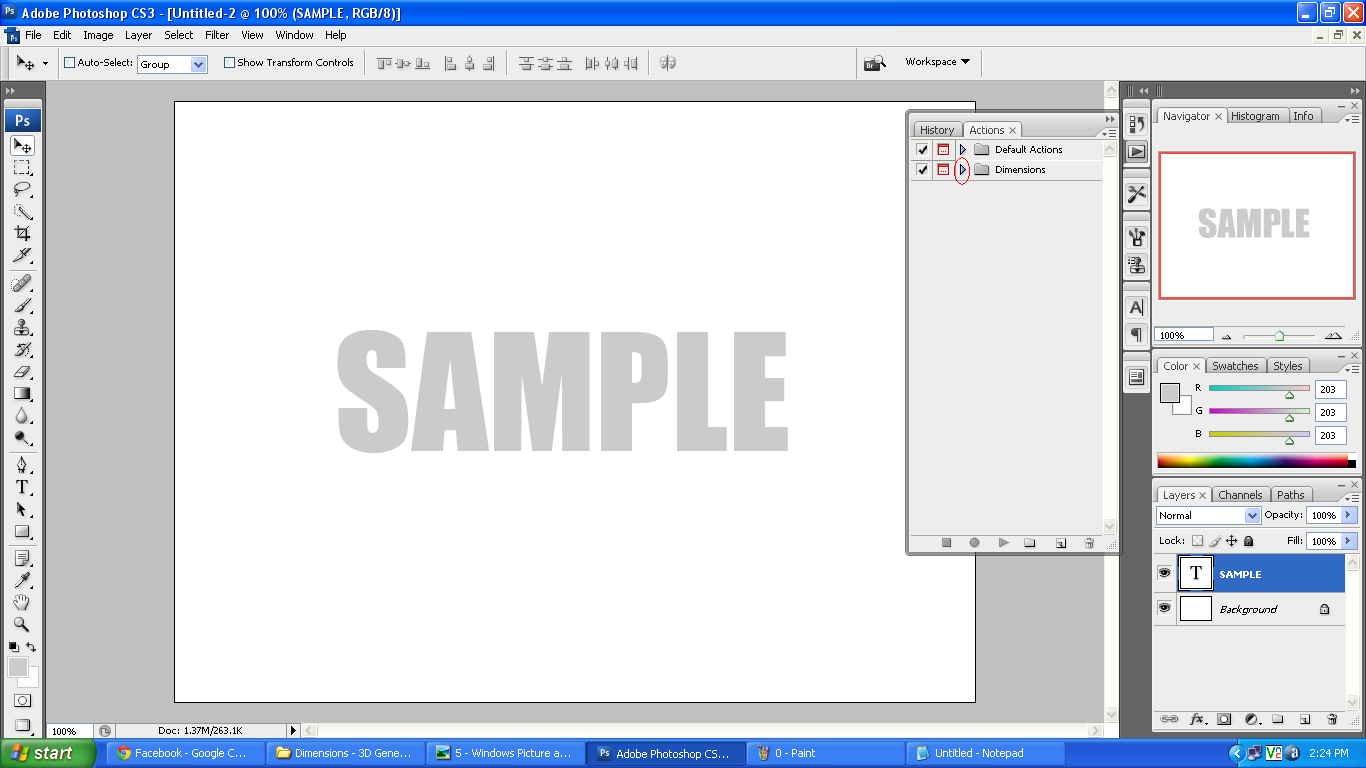
Then, create a text.
Here, I use a word SAMPLE
Kayo na bahala sa size nyan.
For the colors, use any except white and black.
Then click on Window > Actions
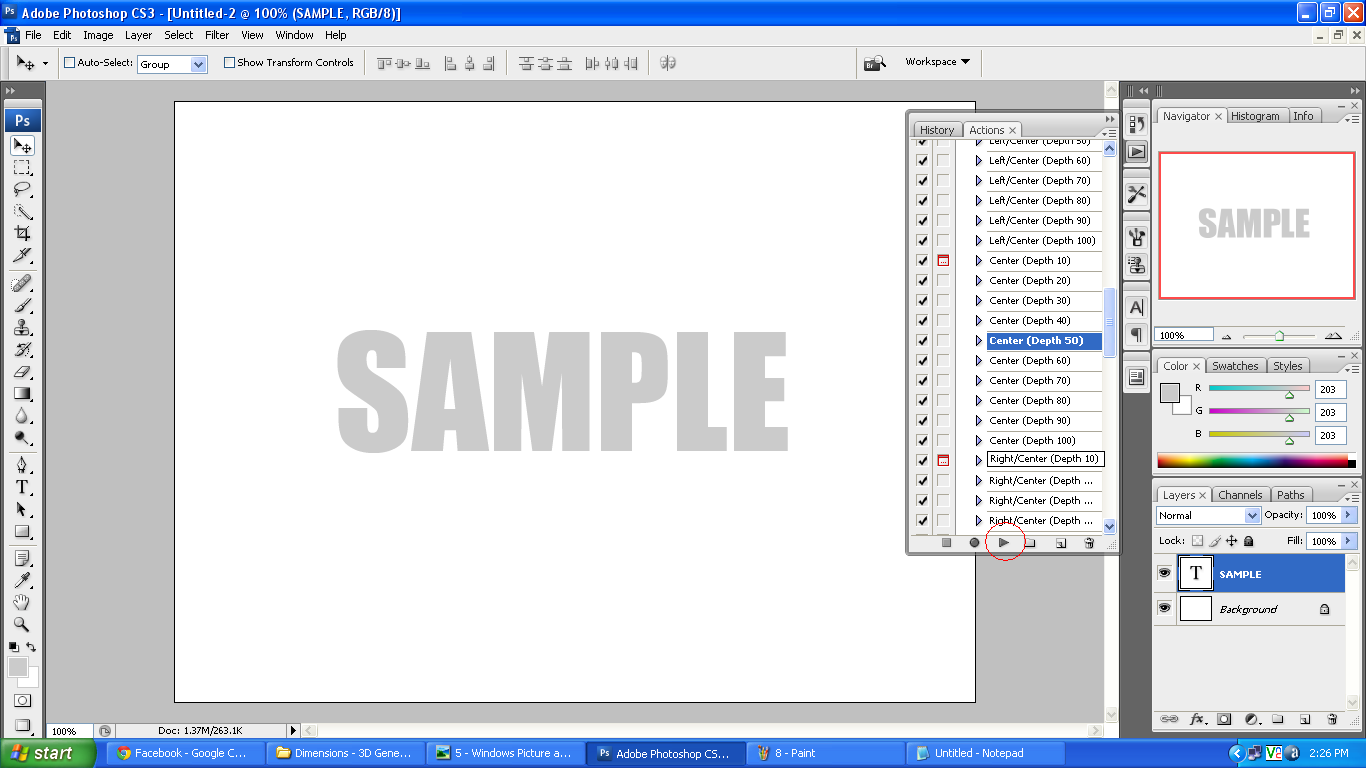
Click mo ngayon ung pakanan na arrow para makapili ng iba't ibang angles ng 3D.
Here I used Center (Depth 50)
Click on the Play button.
Change the angle of global light to 90. Then press Ok.
You may change the angle and altitude if you want.
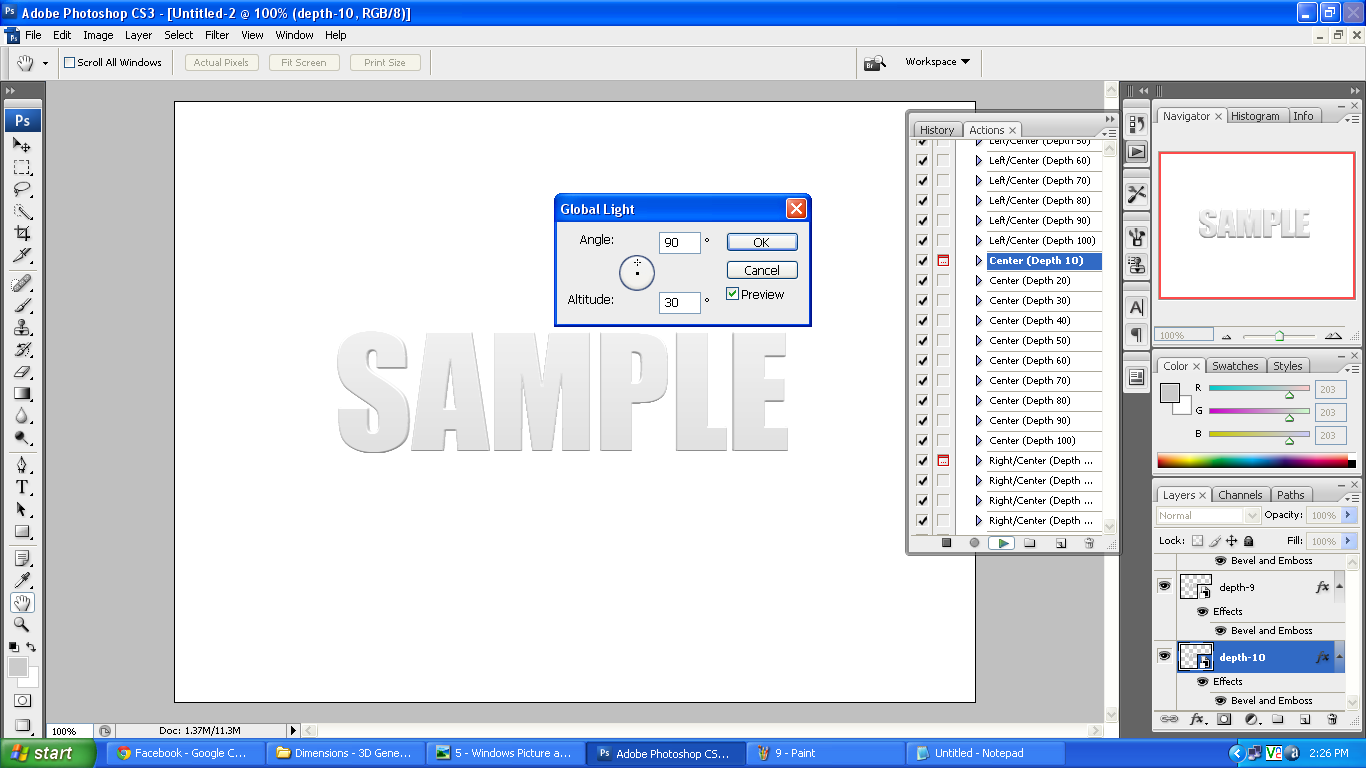
VOILA! Here is our 3D Text using an Action file.
Now let's see how to apply shadow.
You can choose between Multidirectional Shadow or Underneath Shadow.
Multidirectional Shadow adapts to the changes that you make in Smart Object. The
Underneath Shadow doesn't allow for the changes made in Smart Object. Because of
this, it's advisable to apply these shadows at the end of the process.
ETO ANG SAMPLE.
An example of Multidirectional Shadow use.
1. Once the 3D object is generated, double click on the action Shadow: Multidirectional (Depth 10).
2. The window Global Light will appear. Choose the desired light and accept.
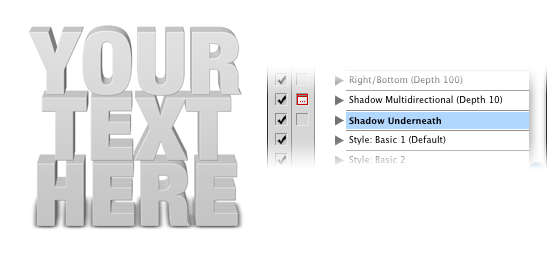
An example of Underneath Shadow use.
1. Once the 3D object is generated, double click on the action "Shadow: Underneath"
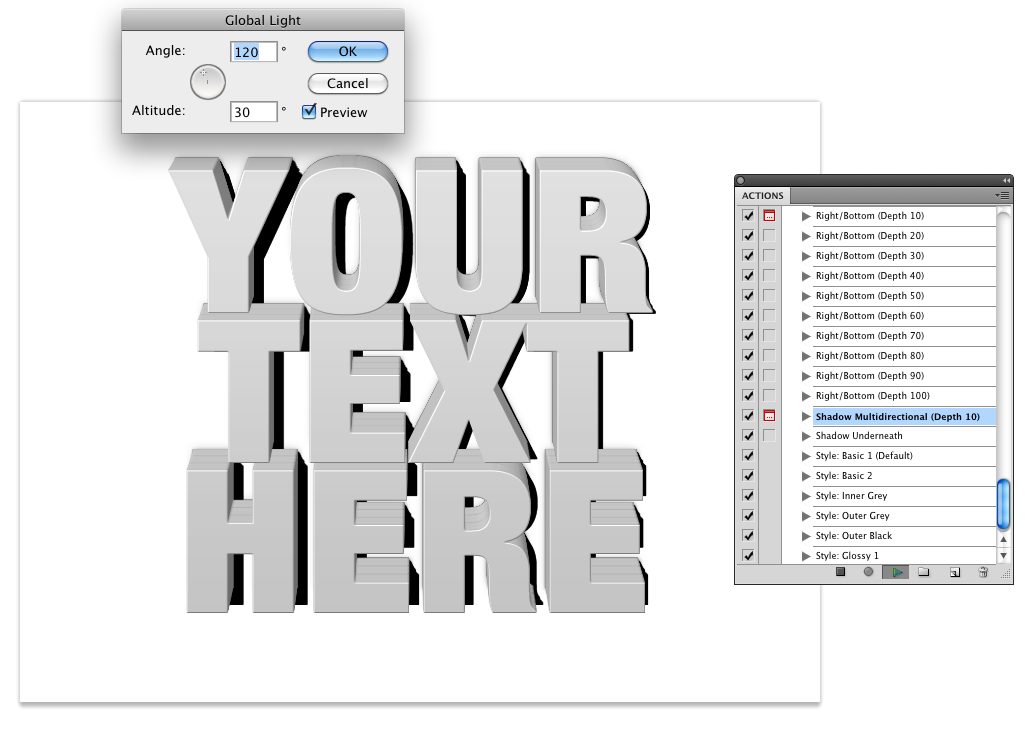
Pwede rin tayong maglagay ng iba't ibang styles sa 3D text natin.
1. Once the 3D object is generated, select the style desired. In the example, I have used Style: Outer Black
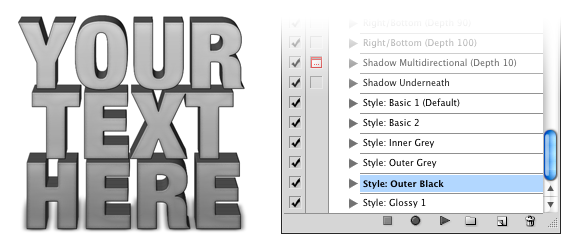
2. Kung may babaguhin kayo, pili na lang ng iba.
Frequently asked questions:
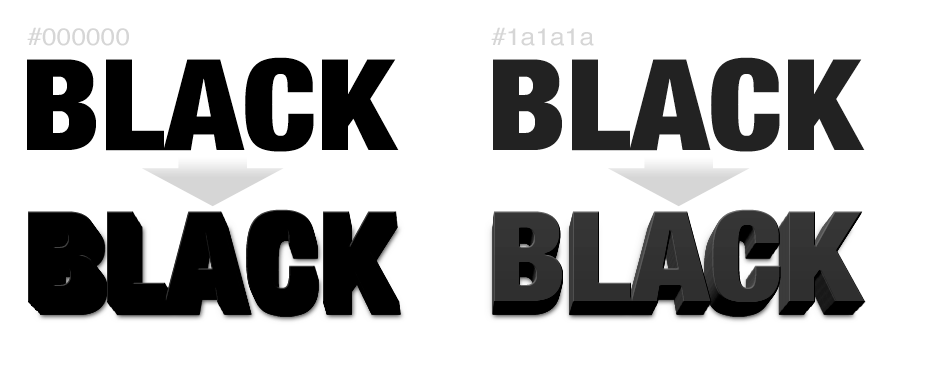
Q: Bakit hindi makita ung 3D image kapag Black color (#000000) or White color (#FFFFFF) ang gamit ko?
R: Black and white are absolute colors. Meaning, kapag ginamit mo ung Dimensions, hindi makikita ung
light and shadows. Para maayos to, use medium tone. Example, instead of white, gawin mong light
gray. Instead of black, use dark gray.
Q: Bakit may lumalabas na The object ‘...’ of set “Dimensions” is not currently available? How can I fix it?
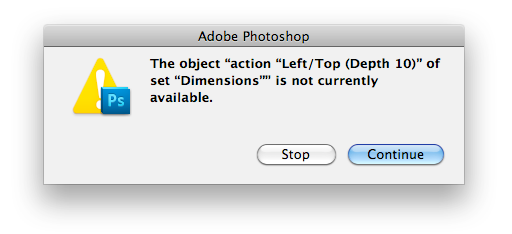
R: The word Dimensions in the folder on the action panel, needs to be in the original format
with a capital “D”. This is because the actions need to find the root and if the format is
slightly changed it wont work.

Irename mo lang ung dimension to Dimension dun mismo sa Action panel.
How? Double click mo lang tas palitan mo then press Enter.
Q: Bakit nung gumawa ako ng 3D, nagkagulo yung layers?
R: If you are using Dimensions in a document with other layers, this will cause problems with
Dimensions. The best thing to do is use the action in a new document and later duplicate
the object in the desired document.
FEEL FREE TO EXPERIMENT GUYS!
Here's mine.

Nanggugulo na naman ako sa tahimik na pag aaral nyo sa photoshop.
I have a new tutorial here.
Ever since kasi gusto ko talaga matuto gumawa ng 3D Text.
Kaya lang hirap ako makagawa from scratch.
Nalaman ko na pwede using CS5 Extended pero wala pa kasi akong
own PC para makapag DL at mainstall yon.
Pero sa matiyagang paghahanap, nakagawa ako ng paraan.
Creating a 3D text using Actions
Code:
An Action is a recording of a series of Commands in Photoshop to which you apply a name.
Later on, you can play that recording back on a different file and have Photoshop do your work for you.
Here a sample
I used Center 50.
Pagitna ung 3D nya.
How to make this work?
Follow these steps.
Pero bago yon, Download mo muna ung Action File. Copy mo ung action file to the Actions folder ng PS mo.
CLICK TO DOWNLOAD
Kailangan install muna natin ung action file.
Click WINDOW > ACTIONS (or Alt + F9)
Click mo ung arrow na pababa then click Load Actions.
Press on My Computer > Local Disk > Program Files > Adobe > Your photoshop > Presets > Actions
Piliin mo na ngayon ung Dimensions.atn
Irename mo ung folder from "dimensions" to "Dimensions"
Double click mo lang naman para pwede mapalitan
After nyan, install naman natin ung Styles.
Click on EDIT > Presets Manager
Hanapin mo yung Dinownload mo kanina, yung Dimensions-3D Generator Action
Load mo ung dalawang .asl files, namely "dimensions-basic-style.asl" and "dimensions-shadows.asl"
Isa isa lang ang pagload nyan kaya twice mo gagawin.
THEN SHALL WE START?
Una, gawa ka ng blank na canvass.
Mga nasa 800 x 600 pixels pwede na.
Or depende sayo kung ano ang prefer mo.
Then, create a text.
Here, I use a word SAMPLE
Kayo na bahala sa size nyan.
For the colors, use any except white and black.
Then click on Window > Actions
Click mo ngayon ung pakanan na arrow para makapili ng iba't ibang angles ng 3D.
Here I used Center (Depth 50)
Click on the Play button.
Change the angle of global light to 90. Then press Ok.
You may change the angle and altitude if you want.
VOILA! Here is our 3D Text using an Action file.
Code:
Note: If you want to make changes, this can be done in Smart Object.
To do this double click on the "front" layer and modify the contents.
Code:
Note 2: If a depth of more than 10pt is chosen the action will continue generating the 3D object for a few
seconds afterwards.
Now let's see how to apply shadow.
You can choose between Multidirectional Shadow or Underneath Shadow.
Multidirectional Shadow adapts to the changes that you make in Smart Object. The
Underneath Shadow doesn't allow for the changes made in Smart Object. Because of
this, it's advisable to apply these shadows at the end of the process.
ETO ANG SAMPLE.
An example of Multidirectional Shadow use.
1. Once the 3D object is generated, double click on the action Shadow: Multidirectional (Depth 10).
2. The window Global Light will appear. Choose the desired light and accept.
An example of Underneath Shadow use.
1. Once the 3D object is generated, double click on the action "Shadow: Underneath"
Pwede rin tayong maglagay ng iba't ibang styles sa 3D text natin.
1. Once the 3D object is generated, select the style desired. In the example, I have used Style: Outer Black
2. Kung may babaguhin kayo, pili na lang ng iba.
Frequently asked questions:
Q: Bakit hindi makita ung 3D image kapag Black color (#000000) or White color (#FFFFFF) ang gamit ko?
R: Black and white are absolute colors. Meaning, kapag ginamit mo ung Dimensions, hindi makikita ung
light and shadows. Para maayos to, use medium tone. Example, instead of white, gawin mong light
gray. Instead of black, use dark gray.
Q: Bakit may lumalabas na The object ‘...’ of set “Dimensions” is not currently available? How can I fix it?
R: The word Dimensions in the folder on the action panel, needs to be in the original format
with a capital “D”. This is because the actions need to find the root and if the format is
slightly changed it wont work.
Irename mo lang ung dimension to Dimension dun mismo sa Action panel.
How? Double click mo lang tas palitan mo then press Enter.
Q: Bakit nung gumawa ako ng 3D, nagkagulo yung layers?
R: If you are using Dimensions in a document with other layers, this will cause problems with
Dimensions. The best thing to do is use the action in a new document and later duplicate
the object in the desired document.
FEEL FREE TO EXPERIMENT GUYS!
Here's mine.
Last edited:
 thanks ts, share pa tol


 boss paturo nmn po kung panu po gumawa ng photoshop action para sa text effect at photo retouching.. sana po matulungan nyu po ako..