Symbianize Forum

Most of our features and services are available only to members, so we encourage you to login or register a new account. Registration is free, fast and simple. You only need to provide a valid email. Being a member you'll gain access to all member forums and features, post a message to ask question or provide answer, and share or find resources related to mobile phones, tablets, computers, game consoles, and multimedia.

All that and more, so what are you waiting for, click the register button and join us now! Ito ang website na ginawa ng pinoy para sa pinoy!

Cyberindo tut

agaxent

Symbianize Angel
Veteran Member
Messages
2,153
Reaction score
94
Points
168
Ultimate Endurance
Divine Faith
Endless Happiness
Good Luck
Power Stone
Reality Stone
Soul Stone
Time Stone
Material materials for making Image Diskless Cyberindo:

1. PC Client that still use hardisk (To Make Image)
2. USB / DVD Installation Windows (Recommended Windows 7 Ultimate 64bit)
3. Active Windows with serial number you have,
For Windows Farmers use the program (Recommended with Removewat 2.2.6)
4. Program / File Installation Cyberindo (Cyberindo Disk)
5. Download each LAN Driver Motherboard,
Download Match Type, Motherboard Type and Match Windows are in use,
For example this time using Windows 64bit
so download the motherboard LAN Driver for windows 64bit.

If Mobo does not support or not available LAN Driver for Windows 7 64bit,
Please Find Lan driver in forum forum Discussions (Google)


In this tutorial make this image PC server I assume already Ready, Hardware and Software

Read Also: Tutorial Installation Updater and Cyberindo Disk on PC Server and Client


Now we go to Image Processing in PC Client:

1. Install Windows 7 Ultimate 64bit as usual,
After the windows installation process is complete, Do not forget to activate Windows via serial number
that you have, or with the Removewat 2.2.6 program
2. Install Cyberindo Disk until finished, restar
3. Do not install other programs or other applications.
4. Check in the lower right corner if the ICON LAN is connected to the internet or not,
(Usually if installing windows 7 ultimate 64bit, pc does not need to install LAN driver anymore)
If not already connected internet or ICON lan cross, install driver lan,
If already connected to the internet does not need to install the driver lan

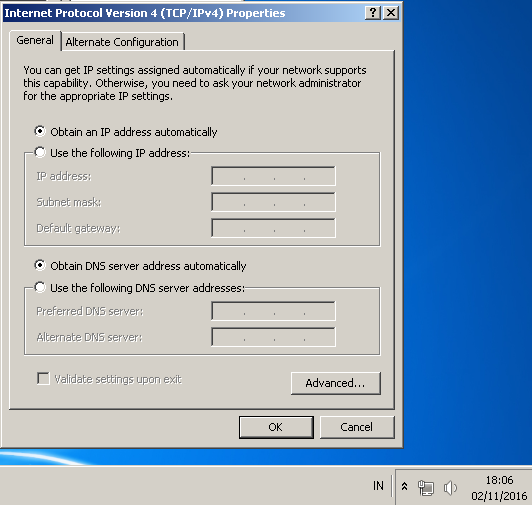
PC Client (who wants to do Upload Image) No need to fill in the IP
let it connect to internet Automatically
Untitled.png


5. UPLOAD IMAGE
Before you make UPLOAD IMAGE to SERVER Do the following:
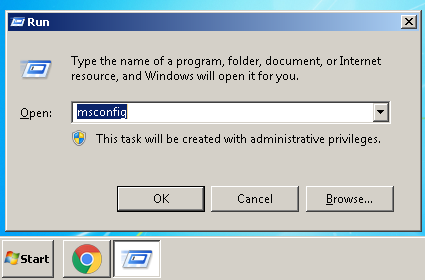
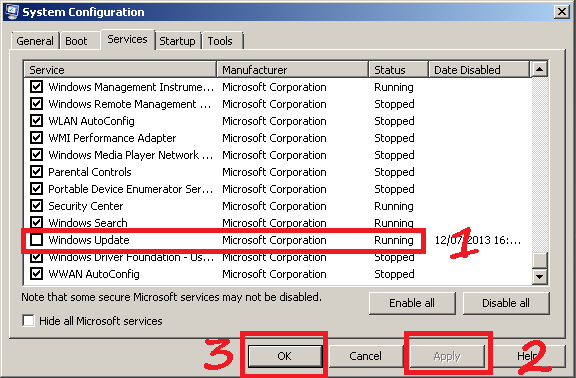
- Turn off Windows Automatic Updates
Click WINDOWS + R on keyboard => Type MSCONFIG will appear System Configuration tab
Click Tab Service => Scroll to bottom, Search Windows Update Posts Eliminate checkers,
Click OK and Restart
Untitled.png
Untitled.png


- Enter Control Panel
System and Security
Click Action Center => Click Change User Account Control Settings => Lower Settings
Until the lowest point (Never Notify) => click OK

RQgyn8QFSiGvQFyVr66xcw.png


Still inside the System and Security tab, now click Windows Firewall
Click Turn Windows Firewall on or off,

In the Home or Work (private) network location setting
Move Checks to Turn off Windows Firewall (not recommended)
On public network location setting
Move Checks to Turn off Windows firewall (not recommended)
Click OK

oCW9pfWSTbumTjszipIjbA.png


Still inside the System and Security tab, now in the Windows Update section =>
Click Turn on automatic updating on or off => Select Never check for updaters (not recommended)
Click OK

Vz99-JGgQO6Dktwk0Z-VvQ.png


If you have completed the above setting process,
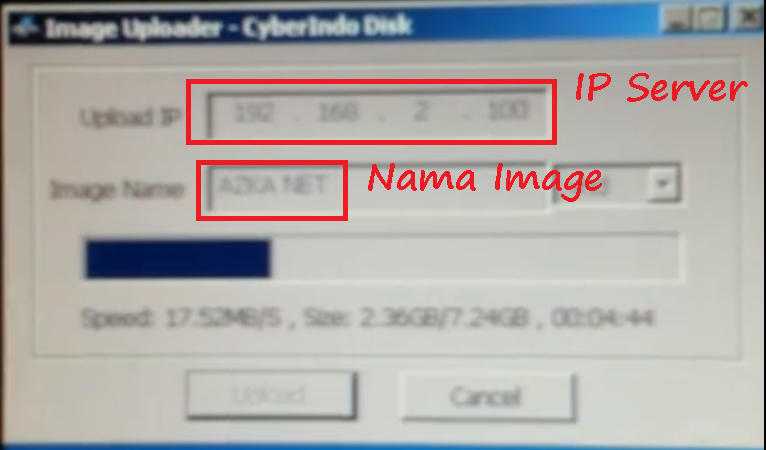
please UPLOAD IMAGE, Wait until the process is Done
Untitled.png


If UPLOAD IMAGE Process is complete, Click OK and exit,
Turn off the PC and unplug or Uninstall the Hardisk

Setting Bios PC Client to boot via LAN

Setting Image Process in PC SERVER

1. Inject LAN PC Client Driver into Image (Vhd)
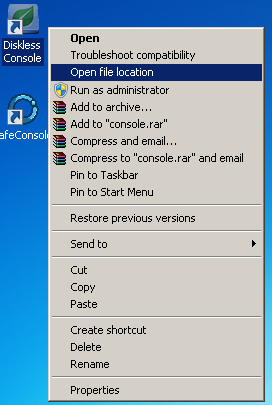
- Right click on ICON Diskless Console on desktop => Open file location
- Open or Open pnptool_server
Untitled.png
Untitled.png


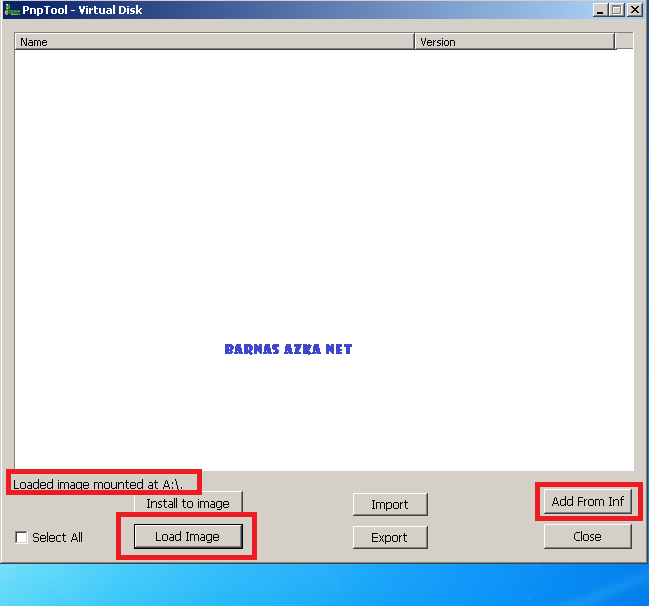
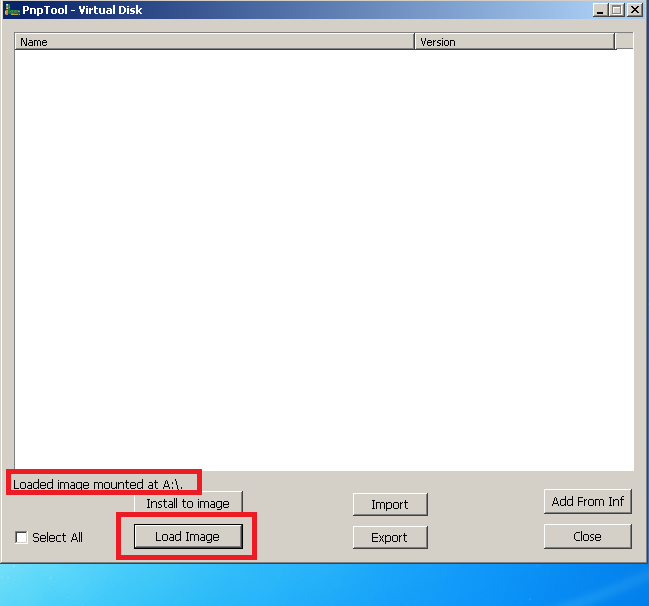
- Enter the Image we want to install or Inject Lan Driver, By clicking Tab Load Image
Untitled.png


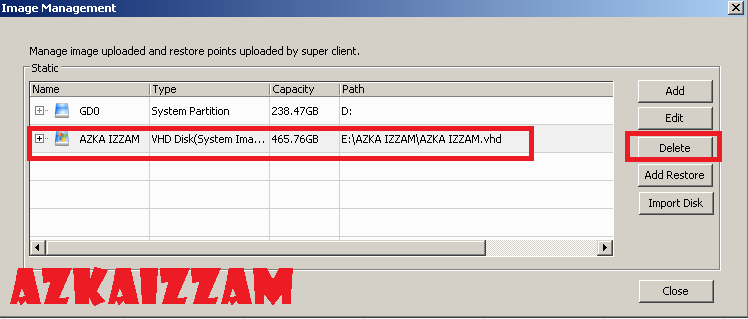
If in the Load Image process an error warning occurs or can not,
Delete or delete the existing Image in Diskles Console


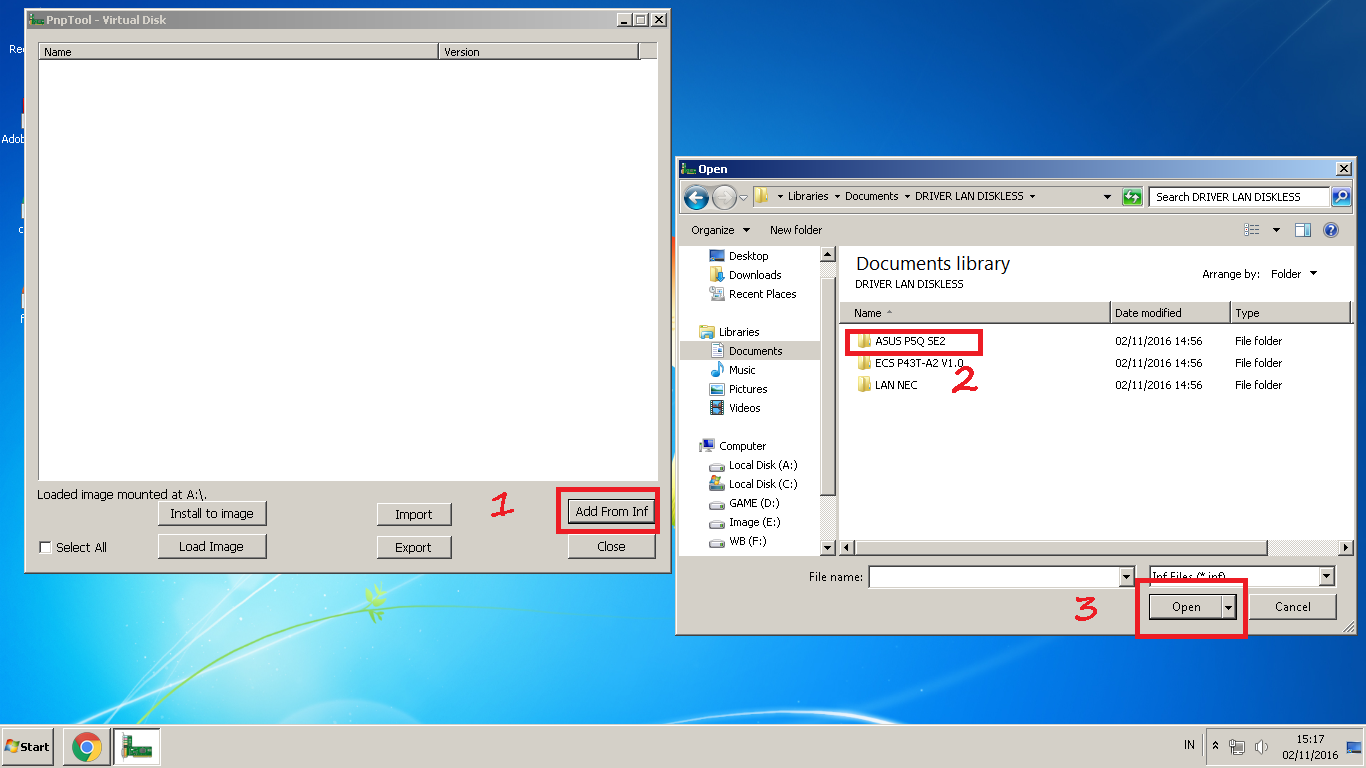
- Enter or select the LAN Driver that you have prepared before By clicking
Add From Inf
Untitled.png


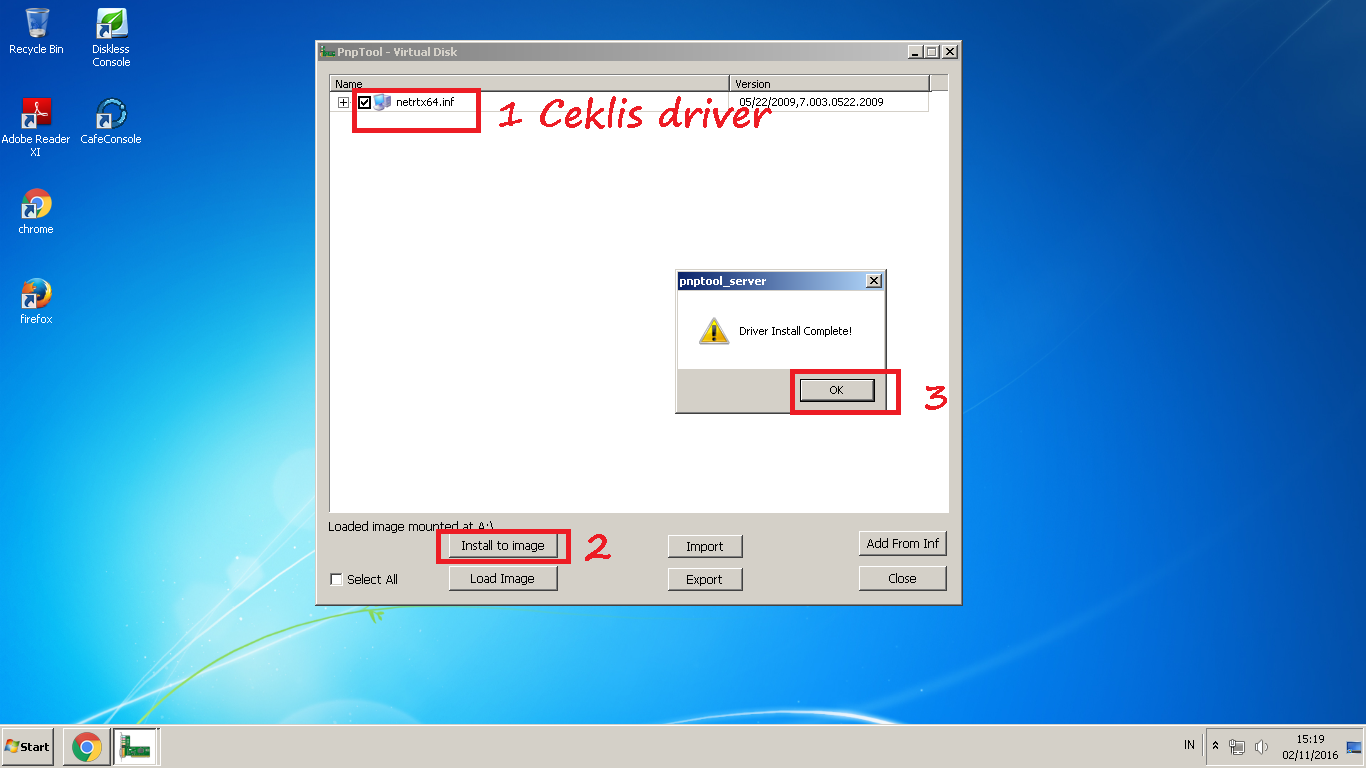
- Install until the information appears successful,
continue the same process if you want to install or
Inject other Lan drivers
Untitled.png


2. Process Add PC Client in Diskless Console

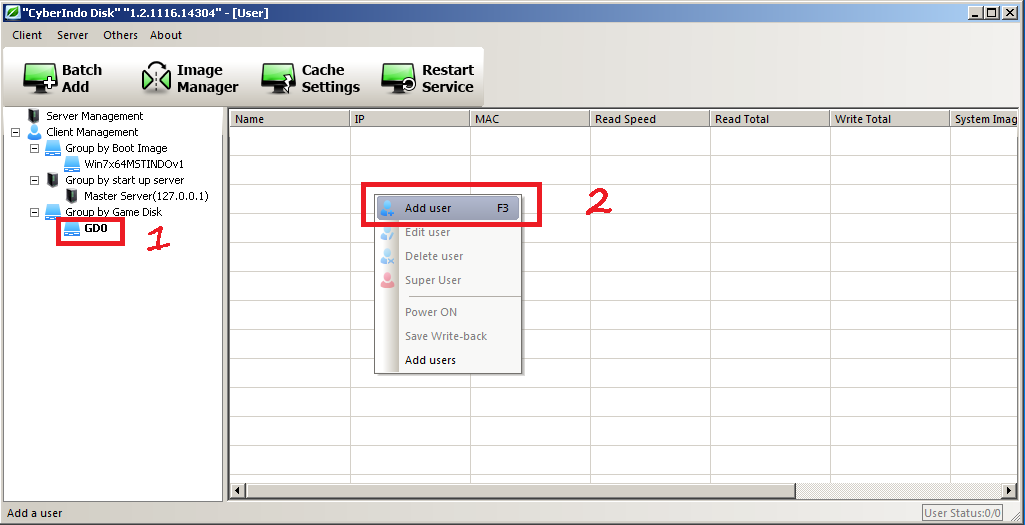
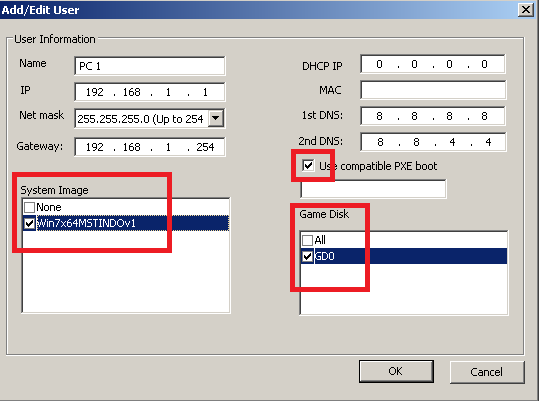
- In the GDO Tab or Game Disk Right-click Add Usser,
IP settings etc (can be seen in the picture)
Untitled.png

Untitled.png


- Test Phase Image on PC Client
Bios settings, Enable Option Lan Boot Room, Boot Position on Network

Nb: If the Image we created earlier has a problem (Mentok in Windows logo)
Please check again, whether the LAN Driver that you Inject already appropriate
with type, type of mobo and OS in use)

If successfully booted windows or entered into windows, now the process or the next stage
(turn off the CLient PC that had been done Testing Image)

Perform Testing On different PC Client types
(Do not forget Inject Lan Driver, same process as above)

If All PC Client Boot successfully or already signed in Windows, Now Continue to the next process

Now back to PC SERVER
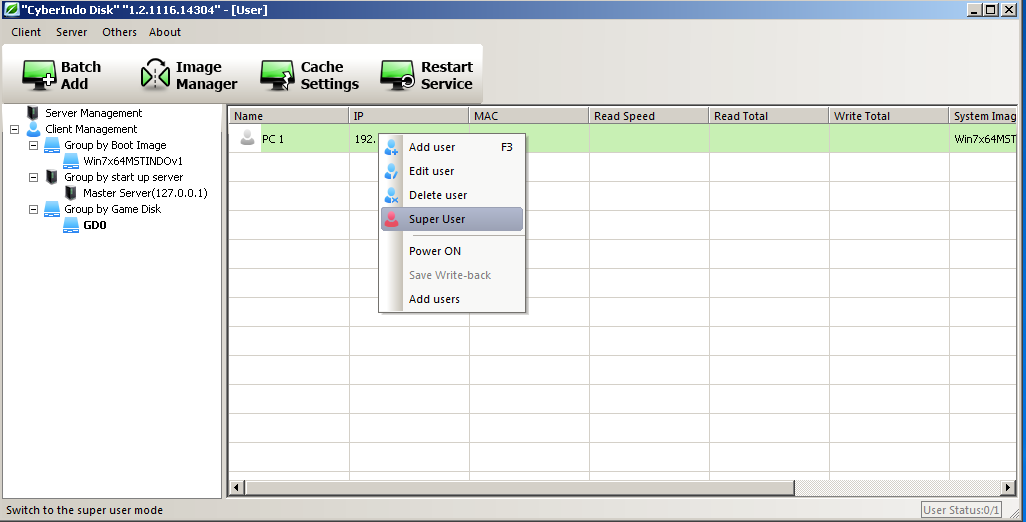
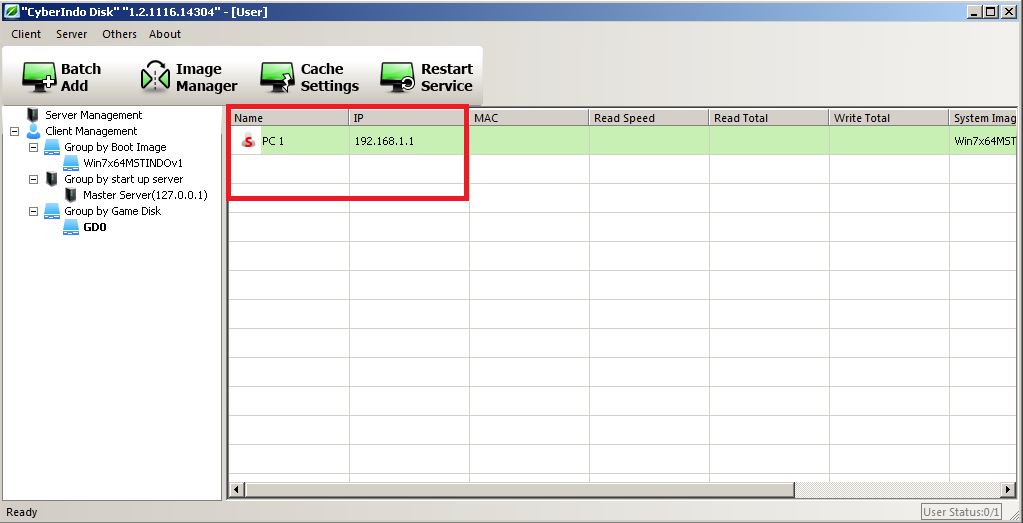
- In the User you just created, Right-click "SUPER USER"
- Blame the PC Client and install an Application support or Program2,
Except for VGA CARD Driver (Do not install first)
Because this time you will make image to suport all mobo and do not want to happen Crash or constraint
Untitled.png
Untitled.png


If you've finished installing programs and applications, turn off PC Client and do "SUPER USER" back,
to save the installed results of programs and applications,

UP HERE IMAGE MASTER MAKING PROCESS FOR ALL MOBO DONE

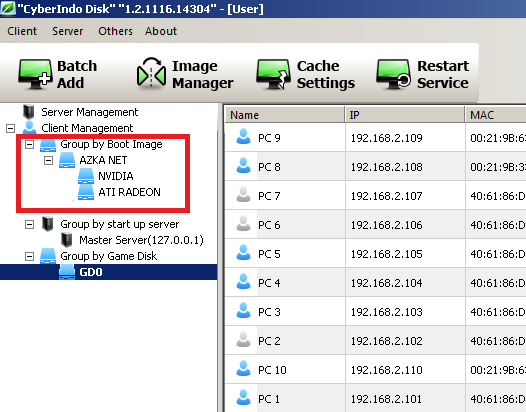
In order not to happen Driver and Program clash, Image master can made some children
or some branch Image,

Example:
Untitled.png


So many tutorials make Image Diskles Cyberindo All Mobo

If any questions suggestions and comments please directly in the comments field :)
thank you


FOR REFERENCE KO LANG FROM THIS SITE :

 
Last edited:
Tutorial Installation Updater and Cyberindo Disk on PC Server and Client

logo.png


On this occasion I will Share Tutorial Installasi Updater, Cyberindo Disk on PC Server and Client

Installation on PC Server:

1. Install CyberIndo Disk Server
Perform Cyberindo Disk install process, Easy to stay Next next time only :)
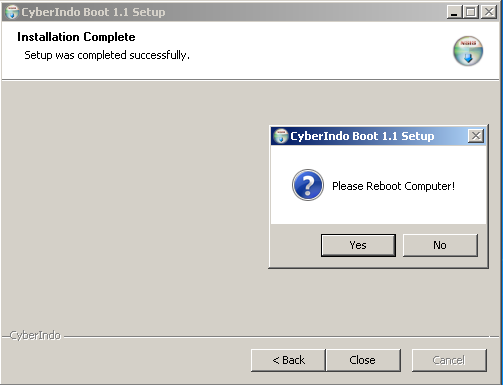
If the Installation process is complete, reboot or restart the computer

Untitled.png


2. Install Cyberindo Updater Server
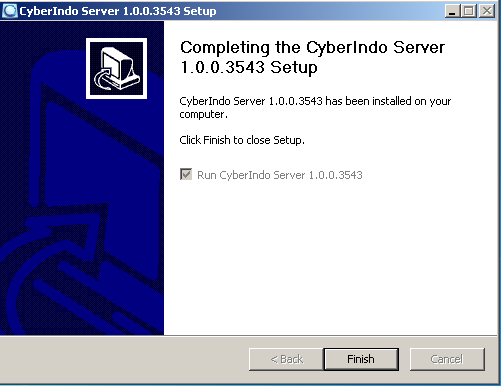
Perform Cyberindo Updater install process, Easy ko stay Next next :)
If the installation process is finished, click Finish

Untitled.png


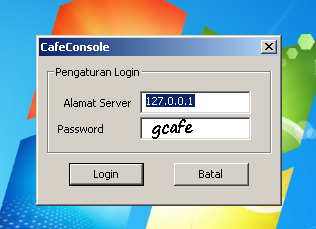
And a Tab will appear like this (Figure below)
To login to the Updater or Cafe Console Password Default its "gcafe"

Untitled.png


Then will Appear Cafe Console Tab, Please Enter ID and Password Every Cafe Warnet Each
To Get ID and Password you can directly contact Cyberindo
or Register To Cyberindo ... Free alias gratis lohhh :)

You can register directly here: http://www.cyberindo.co.id/

Next phases Process Settings CafeConsol (Updater) and DisklesConsole in PC SERVER

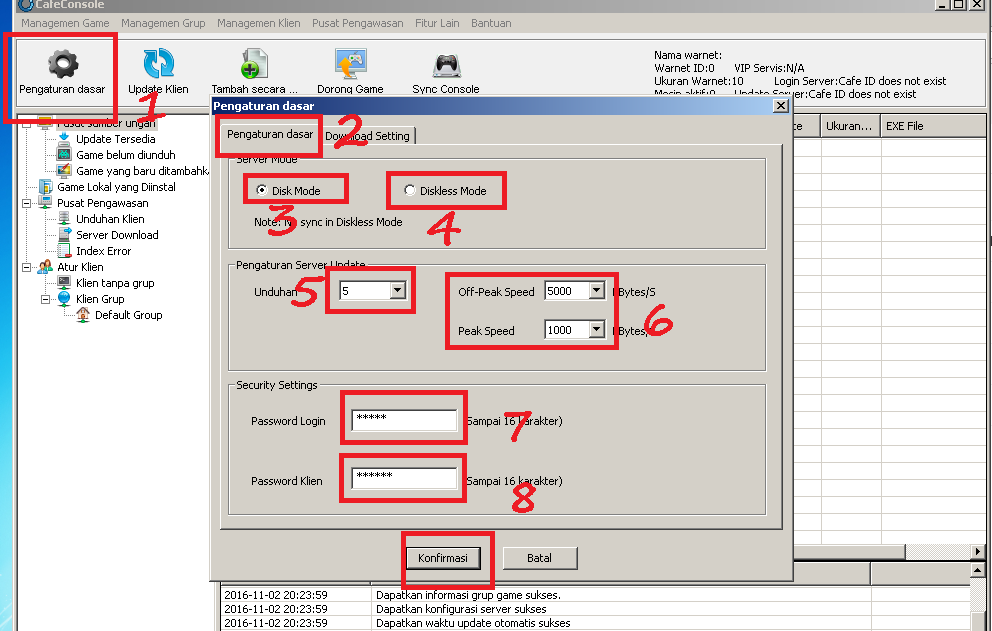
1. Setting or Setting CafeConsole (Updater)
- Open or Open Cafe Console
1. Select Basic Settings Tab (ICON The jagged wheel)
2. Basic Settings tab
3. Select or Check for Local Mode
4. Select or Check for Virtual and Local Mode
5. Many (at a minimum) Downloads (automated) that can run on CafeConsole
6. Speed ​​BW (update or Download Game)
7. Password For Cafe Console on Server
The pasword defauld "gcafe" you can change according to your wishes.
8. Password For Cafe Console Client
(To enable restore and Menon enable restore)
Activation process Restore and Disable restor only for VIRTUAL Mode
9. If all you have changed, click Confirm

Untitled.png


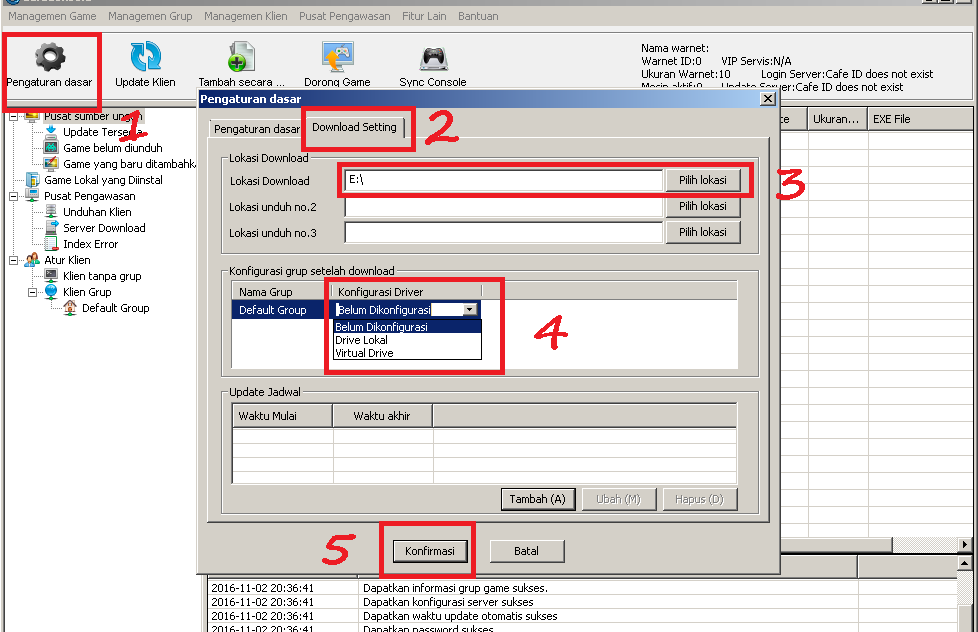
- Open or open Cafe Console
1. Select Basic Settings Tab (ICON The jagged wheel)
2. Download Settings
3. Game Drive (hard drive or SSD where GAME is stored)
4. Defauld Group, Choose according to the system you use
Local Drive, For Local System
Virtual Drive, For Virtual and Diskless System
5. When finished click Confirm,

Untitled.png


- Add Game Disk or Hardisk Game
1. At CafeConsole, click on the Sync Console Tab

Untitled.png


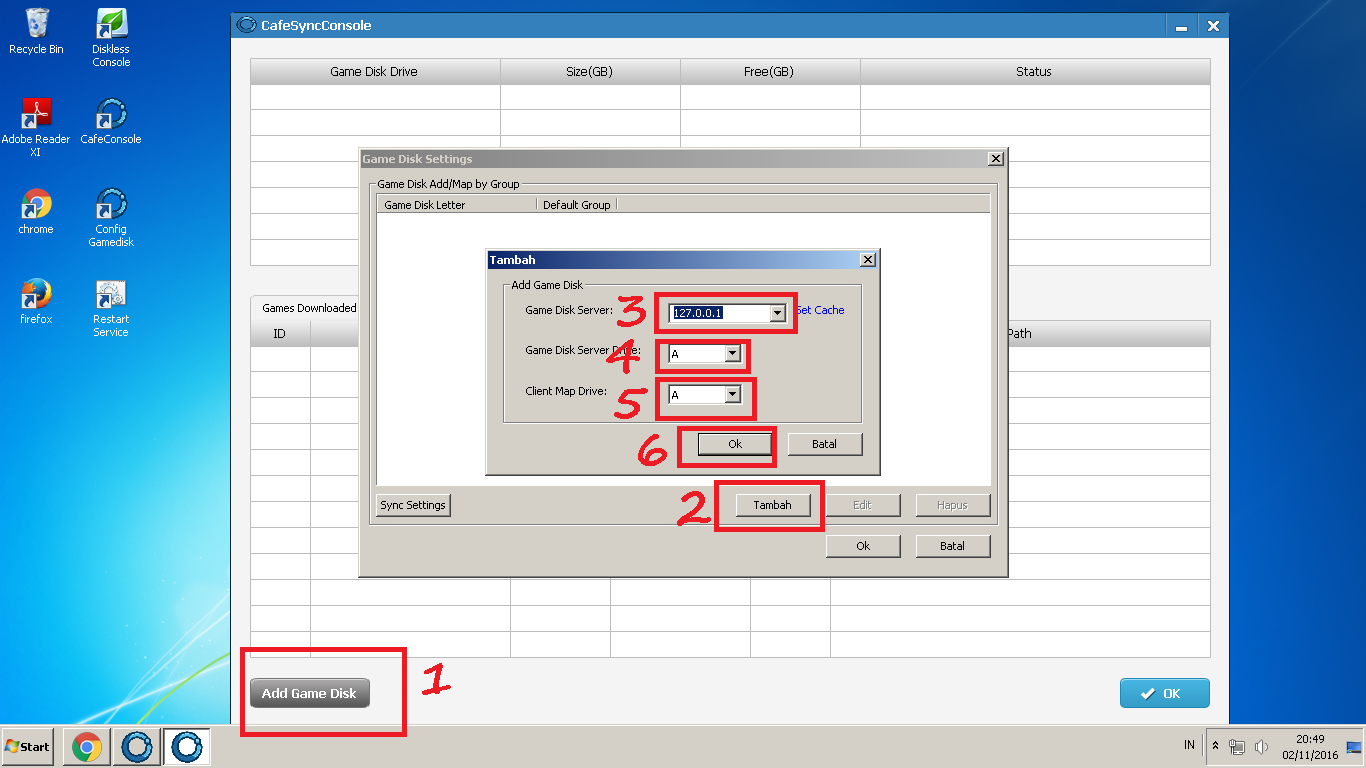
2. After the above process will display a new tab "CafeSyncConsole"
1. Click the Add Game Disk tab
2. Click the Add tab
3. Enter IP PC SERVER
4. Select Hardisk or SSD GAME (Drive GAME)
5. click the drive name eg "X" then Game X drive that will appear in PC Client
6. When finished click OK

Untitled.png


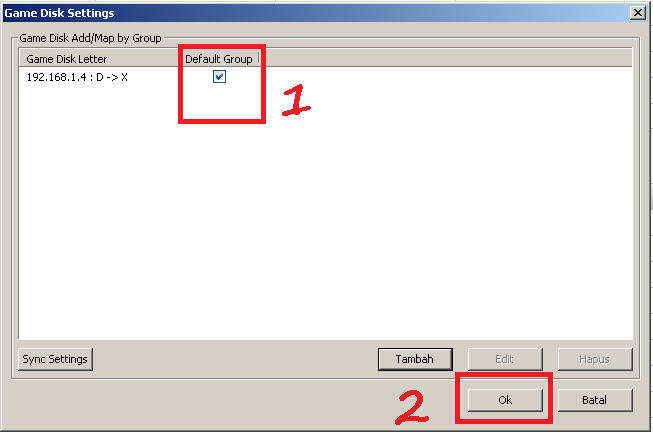
7. Then the tab will appear as shown below
1. Check box Defauld Group
2. Click OK

Untitled.png


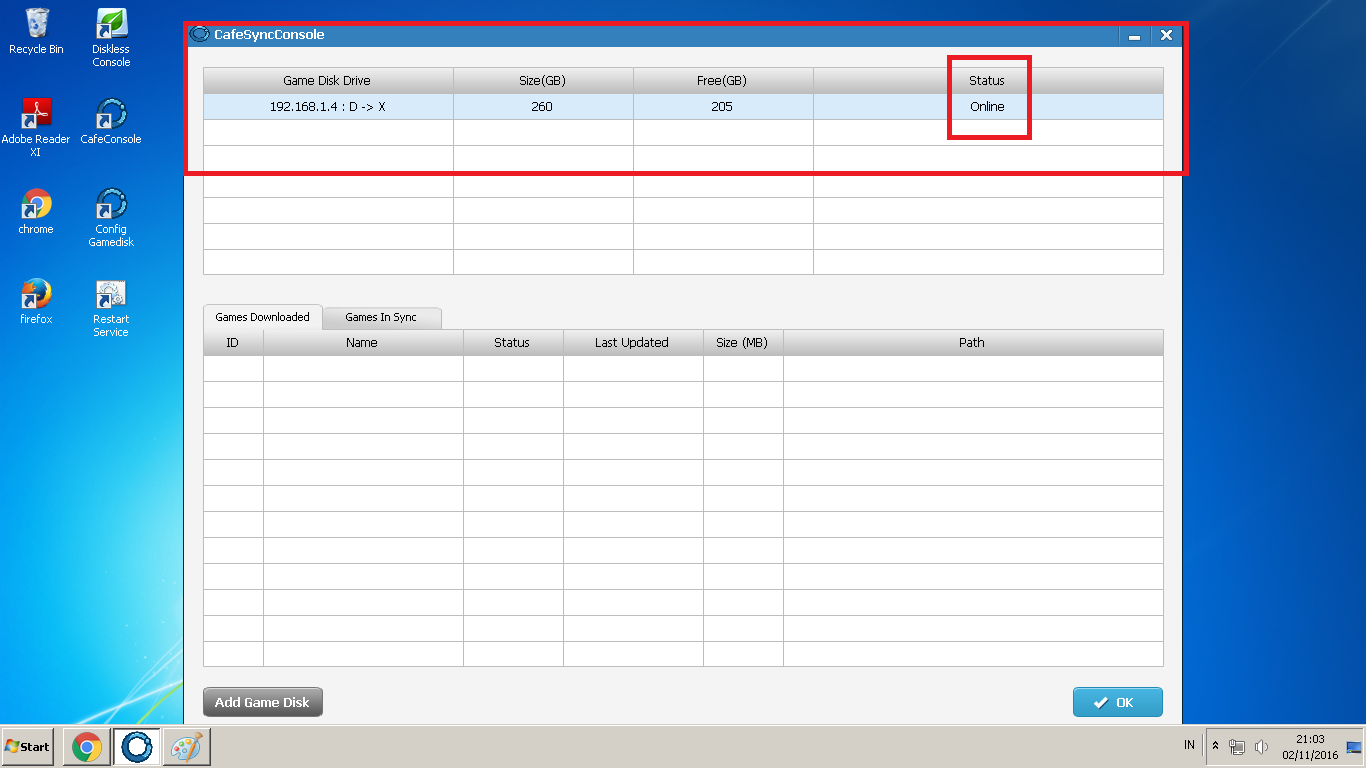
3. Then the results you made earlier will be like the picture below, and make sure
The GAME Drive that you created earlier STATUS ONLINE
If the OFFLINE massive status wait a while until it turns ONLINE
And if status is still in OFLINE position, please do the process of reset from the beginning
There may be some stages to be missed.

Setting stage or setting CafeConsole ENDS

Untitled.png


2. Setting or Disbursement Diskles Console (CyberDisk)

- Open or open DisklesConsole
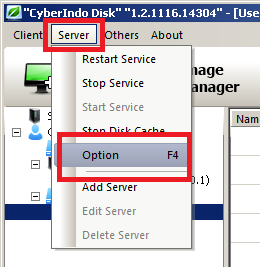
Click Server, Click Options

Untitled.png


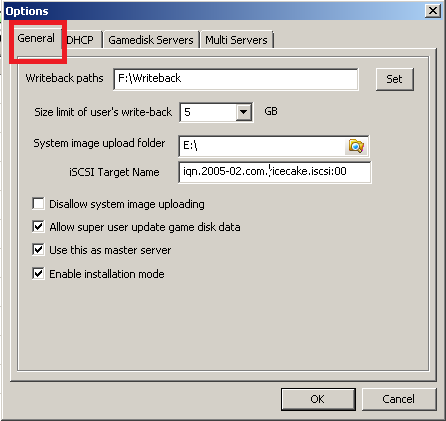
In the "General" tab
- Writeback Path Content column or select Drive Writeback If using Virtual and Diskless system
Clear If Using Local System
- Column Size Limit of user, s write-back select as you wish (Virtual and Diskless System)
Clear If Using Local System
- Column System image Upload Folder select Drive Image If using Virtual and Diskless system
Clear If Using Local System
- iSCSI Field Target Name leave it just like in the picture
- for the checklist below follow the appropriate picture

Untitled.png


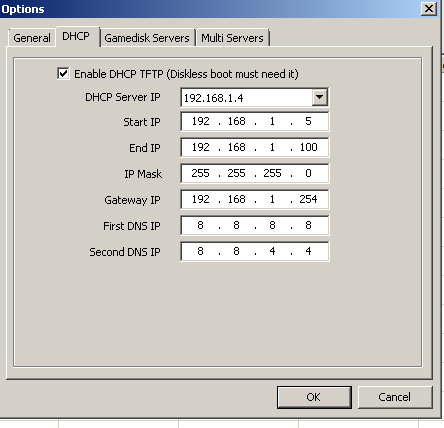
In the "DHCP" Tab
- Checklist on "Enable DHCP TFTP (Diskless boot must need it)
- In the DHCP Server IP field, IP SERVER
- In the IP Start field, for IP Client starts from the first IP pc Client
- In the End IP field, fill in for the last IP PC Client
- the next column let defauld

Untitled.png


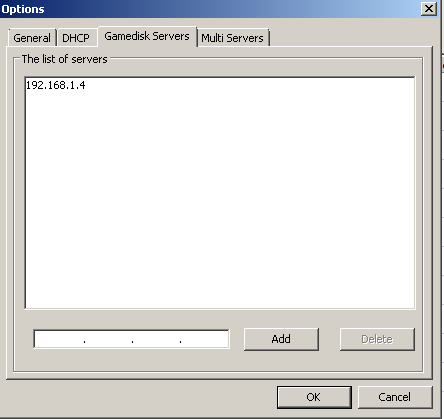
In the "Gamedisk Server" Tab Setting if you use Virtual and Diskless mode
- In the field below, input IP Server, and click Add, OK

Untitled.png


In the "Multi Servers" Tab
- Leave it alone


FINISH, Up here Installation of Updater and Cyberindo Disk on PC server is complete

Installation on PC CLIENT


1. Install CyberIndo Disk
Do the Cyberindo Disk Client install process, Easy to stay Next next time :)
If the Installation process is complete, reboot or restart the computer

2. Install Cyberindo Updater Server
Perform the Cyberindo Updater install process,
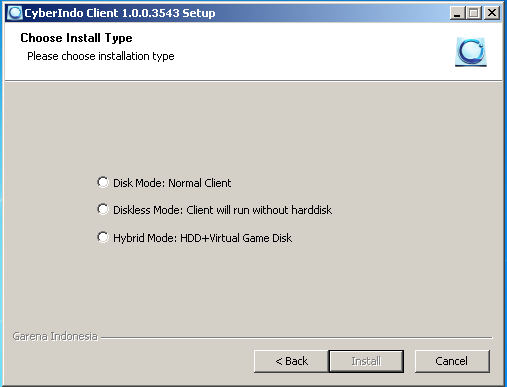
In the Installation Updater process in Pc Client there are 3 options,
1. Disk Mode; Normal Client = For Cyberindo Local Mode
2. Diskless Mode: Client Will run without hardisk = For Cyberindo Mode Diskless
3. Hybrid Mode: HDD + Virtual Game DIsk = For Cyberindo Mode VIRTUAL
Select one Appropriate system you want to use, then continue click Install

Untitled.png


If the install is complete click finish and will automatically run the program
(open cyberindo updater program)
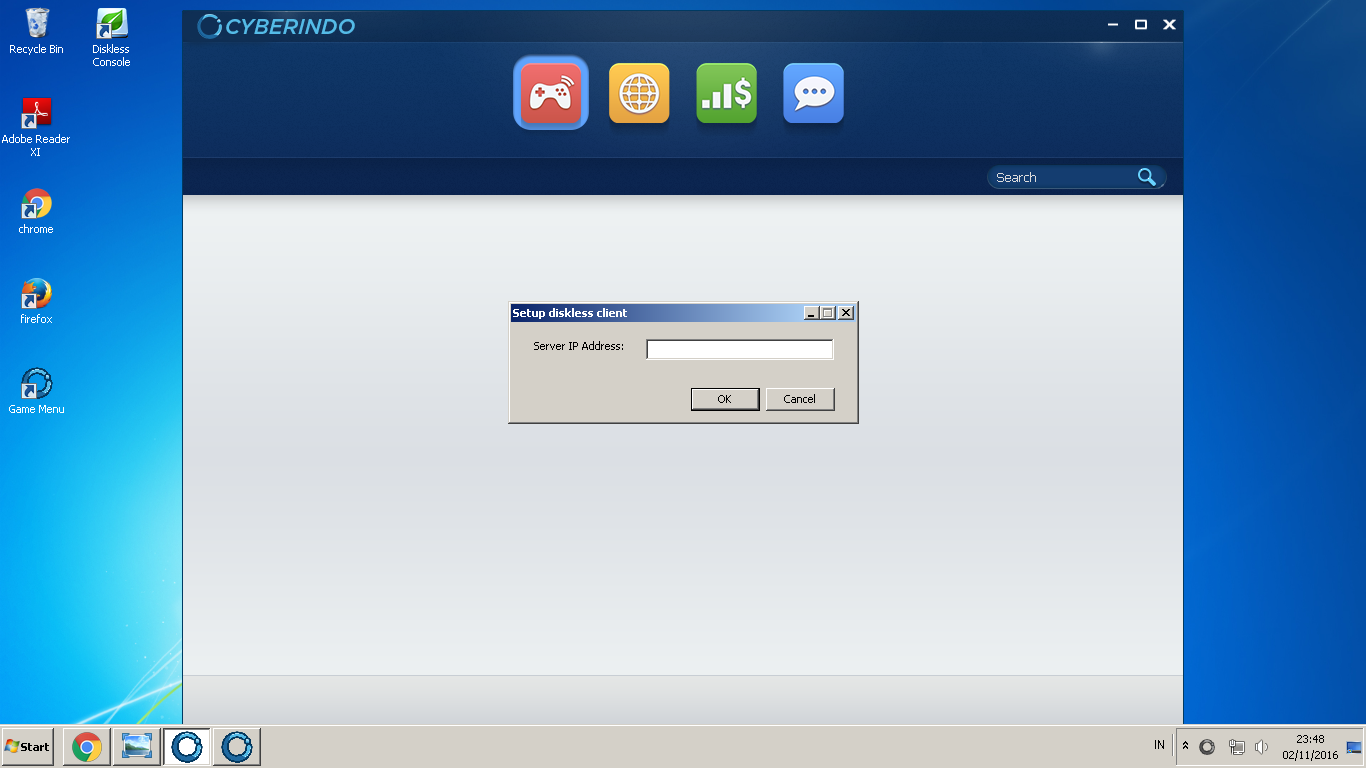
In the SERVER IP ADDRESS column, input or type IP PC SERVER (ex: 192.168.1.100)
and click OK,

Untitled.png


Up here Updater and Cyberindo Disk Updating Process on PC Server and Client END :)

Up here tutorial and share that I can give,
If you have any questions, feedback please comment on the comments field already available,

May be useful,
Thank you


REF SITE LINK HERE:

 
Mandatory Program Installed For PC Server and Cyberindo Client

Programs that must be installed On Computer cafe (Server and Client)

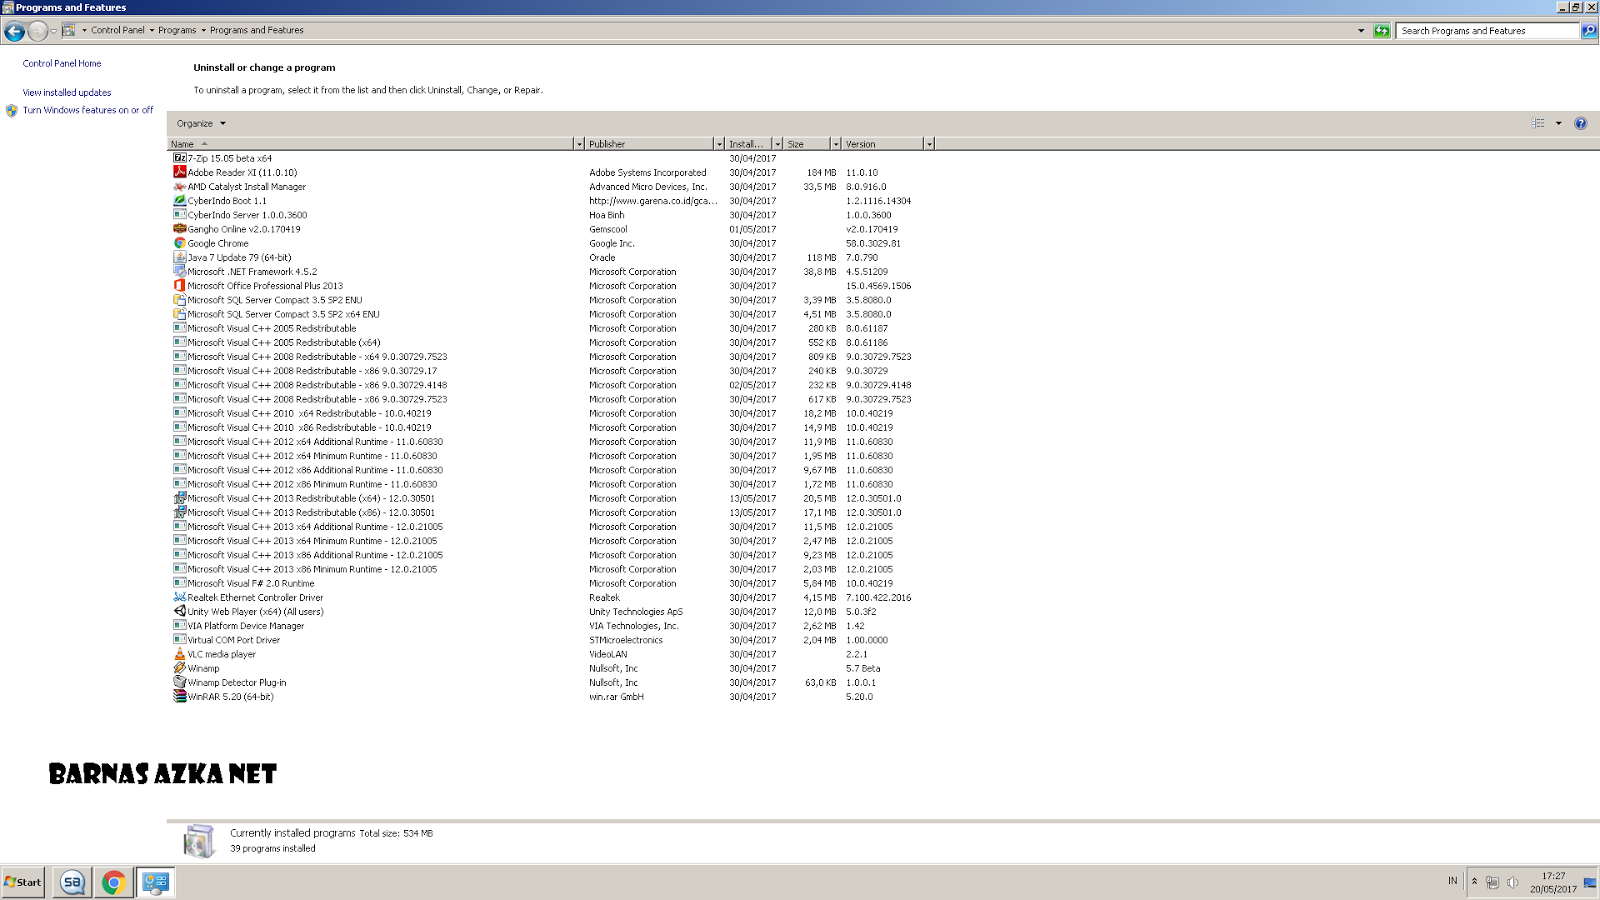
Here are some programs that need or must be installed on the computer Game Online / Offline and Browsing,

Barnas%2BAzka%2Bnet.png


- Microsoft NetFramwork ( sesuaikan dengan OS Windows yang di gunakan
- Microsoft Visual C++ 2005 Redistributable
- Microsoft Visual C++ 2005 Redistributable (x64)
- Microsoft Visual C++ 2008 Redistributable -x64 9.0.30729.7523
- Microsoft Visual C++ 2008 Redistributable -x86 9.0.30729.17
- Microsoft Visual C++ 2008 Redistributable -x86 9.0.30729.4148
- Microsoft Visual C++ 2008 Redistributable -x86 9.0.30729.7523
- Microsoft Visual C++ 2010 x64 Redistributable - 10.0.40219
- Microsoft Visual C++ 2010 x86 Redistributable - 10.0.40219
- Microsoft Visual C++ 2012 x64 Additional Runtime - 11.0.60830
- Microsoft Visual C++ 2012 x64 Minimum Runtime - 11.0.60830
- Microsoft Visual C++ 2012 x86 Additional Runtime - 11.0.60830
- Microsoft Visual C++ 2012 x86 Minimum Runtime - 11.0.60830
- Microsoft Visual C++ 2013 Redistributable (x64) - 12.0.30501
- Microsoft Visual C++ 2013 Redistributable (x86) - 12.0.30501
- Microsoft Visual C++ 2013 x64 Additional Runtime - 12.0.21005
- Microsoft Visual C++ 2013 x64 Minimum Runtime - 12.0.21005
- Microsoft Visual C++ 2013 x86 Additional Runtime - 12.0.21005
- Microsoft Visual C++ 2013 x86 Minimum Runtime - 12.0.21005
- Microsoft Visual F# 2.0 Runtime

- 7-Zip
- WinRar
- Adobe Reader
- Adobe Flash Flayer
- Java Update
- Unity Web Player

- Winamp ( Pemutar Mp3 )
- VLC ( Pemutar Video & Mp3 )
- Google ( Browser )
- Mozilla ( Browser )
- Microsoft Office

- Cyberindo Boot ( Cyberindo Disk Server / Client )
- Cyberindo Server ( CafeConsole Server / Client )
- Billing ( Server / Client )

- Driver LAN ( Server / Client )
- Driver Audio ( Server / Client )
- Driver USB ( Server Client )
- Driver VGA CARD ( Server / Client )
- All Driver System Device ( Server / Client )
- All Driver Universal Serial Bus Controllers


If you have installed the Program or All drivers above,
Then Program, Game and other applications will run Current on PC Server or PC Client,

So my Share this time,
May be useful for me and for all of us.
 
How to Restore a Changed Game Icon in Cafe Console Cyberindo Client

How to Restore a Changed Game Icon in Cafe Console Cyberindo Client

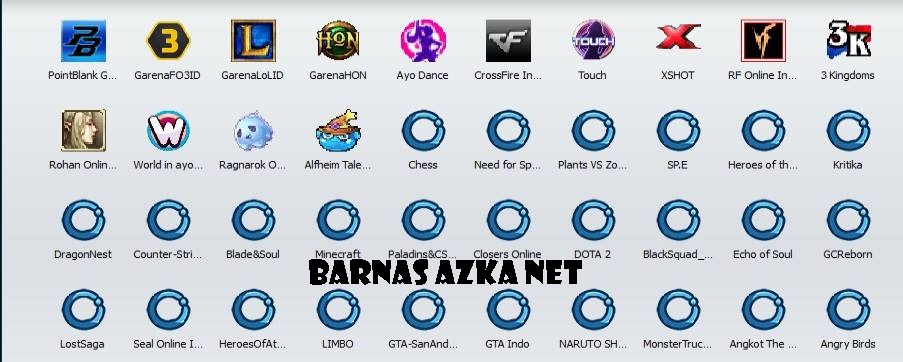
Most Internet cafes have experienced this kind of thing, including In my private cafe,
ICON Game in Menu Cafe Console Client turns into a blue circle,

18556240_10209284608823644_5415643665433399593_n.jpg


Here's how to restore Icon Game in Cafe Console Client:
1. Open Cafe Console on PC Server
2. Click on "Local Game installed"
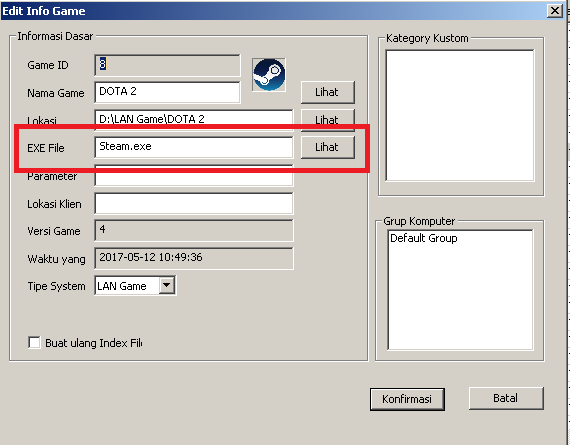
3. Select Game that changed its ICON in cafe console client, Right Click, Edit Game
Then a new tab will appear "Edit Game Info"

Untitled.png


. Click the "View" tab select the game exe / launcher file, confirm, re-index the game
5. Done

Up to this point Icon Game at Cafe Console PC Client is back to normal,

A few tutorials How to Restore Icon Game Changed at Cafe Console Cyberindo
May be useful for me and for all of us,
 
How to Set Menu Cache Cybeindo Disk

How to Set Menu Cache Cybeindo Disk,
On this occasion I will share how the settings / settings Menu Cache on Cyberindo Disk version 1.2 program

This needs to be done if one day you Upgrade RAM or Hardware on PC Server
By setting Cyberindo Disk Cache settings, it is expected that the performance of RAM or hardware change can run as expected,

The following step balustrations Cyberindo Disk Cache menu settings,
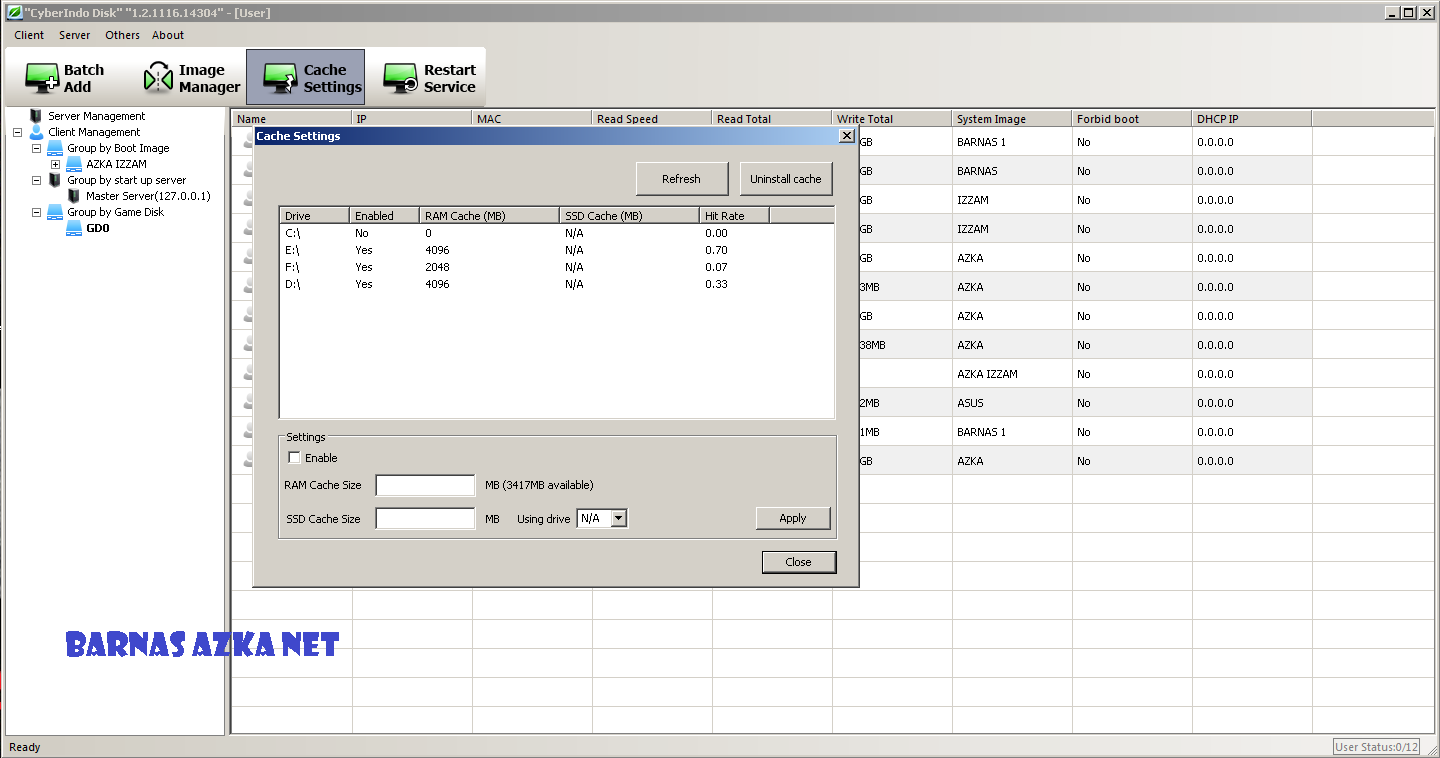
- Open Cyberindo Disk Application on PC Server,
- Click the Cache Settings tab, then the Cache Settings tab will appear

In this case example,
I use Speck Server As follows
- 16Gb of Ram
- 2 Fruit Hardisk (To Drive PC Server OS "Drive / C" and To Drive WriteBack "Drive / F")
- 2 SSD Fruits (For Drive IMAGE "Drive / E" and For Drive Game "Drive / E")

In the Example of Ram Cache Setup, I Allocate As follows
- For Game Drive "/ E" Awarded 4Gb Cache of total 16Gb Ram PC Server
Game Drive provided Cache large enough (4Gb) In order to Run or Loading Game
on the PC Client Faster

- For Drive WriteBack "/ F" Given 2Gb Cache of Total 16Gb Ram PC Server
Drive WriteBack is given a large enough cache (2Gb) Is intended for Data back from PC Client
to a Faster Server PC

- For Drive Image "/ E" Awarded 4Gb Cache from Total 16Gb Ram PC Server
Drive Image is given a large cache (4Gb) In order to Boot Windows PC Client
Faster

- To Drive OS "/ C" Clear

For more details can be seen in Figure below


1.png


From Sample Charging or Ram Charge Cache In Cyberindo Disk Server above,
Do not be confused with the Settings On Your PC Server, In accordance with the Ram that you Use in each PC Server,
 
Cyberindo ID Solution Unchecked after reinstalling

Cyberindo ID Solution Not Available After Reinstallation Process


1. Go to the Cyberindo Updater Installation File
2. Remove Service (Run as administrator_remove_Service.bat)
3. Find and delete all files that berextension ".dmp"
4. Find the file Cafeserver.ini then input the ID and password Cyberindu Updater then Save
5. Install Service (run as administrator_install_service.bat)
6. Reopen Cafe console or Updater Cyberindo
7. Done
 
Loading Point Blank Garena Speeding (Cyberindo)

On this occasion I will share or give Tips for Online Game
Point Blank Garena in System Program Cyberindo,

This applies to all System or modes in the Cyberindo Program
(LOCAL, VIRTUAL and DISKLESS)

The trick is more or less as follows.

1. On a diskless server, make sure the contents of the XignCode folder contain only the following 6 files:

- x3.xem
- xcorona.xem
- xcorona_x64.xem
- xigncode.log
- xmag.xem
- xnina.xem

2. If there is a file xxd-0 delete the file
3. As much as possible never run garena messenger program on the pc server, let the future Not auto launch its gdllhost.exe process, if already already, even once, diligent diligently kill the process on the server pc
4. Make sure garena messenger application on the pc server is always up to date, via console used each
5. For the process xxd-0 will terbantuk if pc is open or run the game process PB garena Indonesia, this will affect sooner or later its loading process hackshield, even the possibility of stuck and detective out will often occur in each pc, krn xxd process -0 aka wacthdogh every pc is different depending on spec and system os used.
considering the spec pc server is certainly different from the client pc.

So share and Tips this time,
May be useful for Me and for all of us,
Thanks.
 
Problems and Solutions Cyberindo

1. Error 10061 can not login

Solution # 1
Please remove and install the CyberIndo service again
If you still can not, please restart the PC and re-do step a)
Solution # 2
Please delete the file extension .dmp in the folder CyberIndo
Please reinstall CyberIndo Update


2. Download paused / stuck

Solution # 1
Please remove stuck downloads from the server download list
Close the CyberIndo update program (CafeConsole.exe) and make sure that the program is not active in taskmanager
Remove and reinstall the CyberIndo update service
Please re-download the game
Solution # 2
Please remove stuck downloads from the server download list
Make sure that no exe ato service of the game is running on the computer
Please re-download the game
Solution # 3
Please remove stuck downloads from the server download list
Copy the gcafepro folder from the tech support computer into the game folder on the problem PC
Please re-download the game
Solution # 4
Please download other games from the list of games not yet downloaded
When the game is starting to download please me-pause download


3. Drag both games (which are related and newly added) then please select update updateLupa Password Café Console

Solution # 1
Please open the cafeserver.ini file in the CyberIndo folder
Delete the "LoginLicense" line in the file and save the file
Please restart the PC again

4. Push not path (local method)

Solution # 1
Please check in the Supervisory Center -> Index error and see if the game is on the index error list
If the game is on the index error list please right click and select correct
Please try to push the game again
Solution # 2
Please remove the _gcafepro folder inside the problematic game folder on the client side
Try pushing the game back into the client
Solution # 3
Please remove the game folder from the client computer that stuck
Try pushing the game back into the client


5. PC client is not detected

Solution # 1
Check the server connection - client, test with ping.
Check if the IP settings in the client is correct and the server IP address is appropriate
Solution # 2
Please uninstall CyberIndo from the problematic client
Try to reinstall Client CyberIndo on that PC
Solution # 3
Please uninstall CyberIndo from the problematic client
Delete partition containing CyberIndo program files (Regular partition E :)
Reformat the partition and reinstall Client CyberIndo

6. All downloaded games are paused. This is the first setup

Solution # 1
Check Cafe Console configuration
Make sure that the game drive location is correct
Restart the café console

7. Game updates are not detected in the Client

Solution # 1
Try re-indexing the game on the server
Please restart the problematic PC client
If using Virtual mode please check the e partition, if there is Online Game folder and inside there is the same game file, delete the game contained in partisi e

8. PointBlank mentally from the game

Solution # 1
This case is common due to obstacles with mikrotik used cafe
Please login to internet explorer -> Internet Options
Go to connections -> LAN Settings -> uncheck "Automatically Detect Settings"

9. PointBlank requested re-check

Solution # 1
(Virtual & Diskless)
Please run first PB on server until finished check
Do re-index for the game
Please restart the client again

Solution # 2
(Local)
Turn off restore from PC in question
Run PB until finished check
Restart the restore on the PC

10. Game updates do not appear on the server

Solution # 1
Make sure that the café console is closed and the program is not running in the task manager
Remove and install service again
Please re-run Café console, then the latest game updates will appear

11.Games Garena plus stuck in "waiting" when downloaded from RDC

Solution # 1
Try to close the garena messenger program on the server side. Make sure that there is no running process in the task manager
Make sure that the "ggdllhost.exe * 32" process is turned off in the task manager
Try to re-download the problematic game

12. Game menu does not show at all

Solution # 1
Try checking the "Client without group" section in the cafe console
If the PC is in the "Clients without groups" section, move to the default group
Solution # 2
Make sure that the client is properly connected to the server
Check that the IP settings in the client is correct

13. Restore Client can not be enabled / disable from the server

Solution # 1
please delete the CyberIndo client folder, then reinstall.

14. Can not install CyberIndo client / server

Solution # 1
make sure that the partition where CyberIndo installs is really Example: the default partition on CyberIndo v298 is on the e partition.

15. Service CafeConsole will not run

Solution # 1
Make sure that there is no security program that prevents CyberIndo service, such as Antivirus / Deepfreeze etc. Give whitelist exclusion if it turns out to exist.
reinstall CyberIndo cafe console
reinstall windows, re-note the installation procedure if it is correct.
What to do if it is updating the game (autoupdate) via RDC, the internet connection is suddenly slow and the online game has a lot of lag?

Open Cafe Console (CyberIndo) Server
Go to Basic Settings
Set the number of update queues and update speed limits.
What to do when running CyberIndo server, an error message appears: the connection to the server failed?

Go to the directory where Cafe console is installed (Default: C: \ Program Files (x86) \ CyberIndoServer)
Find the bat file named "_remove_service.bat" run the file and wait until it says "press any key" and press enter
Find the bat file named "_install_service.bat" then run the file and wait for it to finish
Reopen Café Console.
What to do if a Point Blank (PB) game always asks for a check before it can run?

disable restore protect
make sure the game is up to date between client and server
run the game PB
click check and wait for it to finish
enable restore protect
Why LAN server traffic is only 10% in task manager when it is gigabit, switch is gigabit, gigabit client?

Usually this problem occurs in the cafe / game center that uses switch / hub more than 1. if lancard server has been detected 1Gbps, lan client has also been detected 1Gbps, then make sure the cable from one switch to another switch also been installed properly
 
Driver All Lan Lan (Inject via PNP Tools Cyberindo Disk)

On this occasion I will Share
Driver All Lan Lan (Inject via PNP Tools Cyberindo Disk)

Untitled.png


Lan driver that I share this time is not a lan driver that needs to be installed,
but Specifically for Diskless Cyberindo Image, the Install Process also requires the default program Cyberindo (PNP Tool Server)
That is Just take the INF file from Lan driver,

How to Inject Lan Driver you can read here: http://azkaizzam.blogspot.co.id/2016/11/tutorial-lengkap-membuat-image-diskless.html

This Lan Driver Suport for 32bit and 64bit Windows OS
Some Lan Cipset Drivers in the file:

- 3COM
- Accton
- ADMtek
- Agere
- Allied
- Altima
- AMD
- Aquantia
- ASIX
- Aten
- Atheros
- Attansic
- Bellcara
- Broadcom
- Buffalo
- CardBus
- Chelsio
- Corechip
- Corega
- Davicom
- D-Link
- Emulex
- HP
- ICPlus
- Infineon
- Intel
- JMicron
- Lenovo
- Linksys
- Madge
- Marvell
- Mellanox
- Microchip
- Microsoft
- MosChip
- Myson
- NDC
- NeatGear
- NetXen
- NSC
- NVIDIA
- QLogic
- Realtek
- River
- Sis
- SmartBridges
- SMC
- Superal
- Surecom
- Tehuti
- TP-LINK
- Uli
- VIA
- VMware
- Xircom
- ZyXELL

Download Driver LAN : DRIVER LAN
Download PNP Tool Server : PNP Tool
Pasword : barnasazkanet

If in your cafe there is a Mobo that can not boot windows, can in karnakan unsuitable LAN Driver, you can use or Inject LAN driver Corresponding type, type, Cipset Lan, and OS in use
 
Backup Image Diskless Cyberindo

Computers are not always normal, Unexpected sometimes occasional problems that are not in want,
Hardware broken, Corrup and other Software,
Very Dangerous if it happens in your PC Cafe Cafe, Moreover many programs, data, and other important things stored on the Computer,

So to anticipate things that are not in want, Backuplah Program, Data and important things you on a separate drive, can use DVD, Flasdisk, External Hardisk,
If at any time there is a problem on the server computer, you no longer worry about important data data in it,

This time I will discuss how to backup Disky Image Cyberindo.
If the Image has been backed up on another drive, and Corrup or damage to the image, you just replace it with the Image backup that you previously saved on a separate drive,

Here's the steps of Backup Image Cyberindo:
1. Open the Cyberdisk app on the server computer, click on the "Image Manager" menu Delete Image The cyberdisk (this is done when all client computers are off), after you dellete the Image, Enter the drive where the image is located, add image into the file RAR (to be safe from viruses, and damage), after you add image to rar file, Move the rar file to drive you have prepared before (DVD, Flasdisk, External Hardisk)

Untitled.png


2. Add the image back to cyberindoDisk
open CyberindoDisk, click the Image Manager menu, click Import Disk, select the drive where the image,
select image, if it is click close, Setting back System image according to Computer Client respectively.

Now you are not was was again if there is Corrup or error on the image in your cafe, because you already anticipate by way of backing up the image,

A few Backup Image Diskless Cyberindo tutorials, May be useful for all of us.
 
How to add Game Dota 2 Into Cyberindo Updater

On this occasion I will share How to add Game Dota 2 Into Cyberindo Updater

Untitled.png


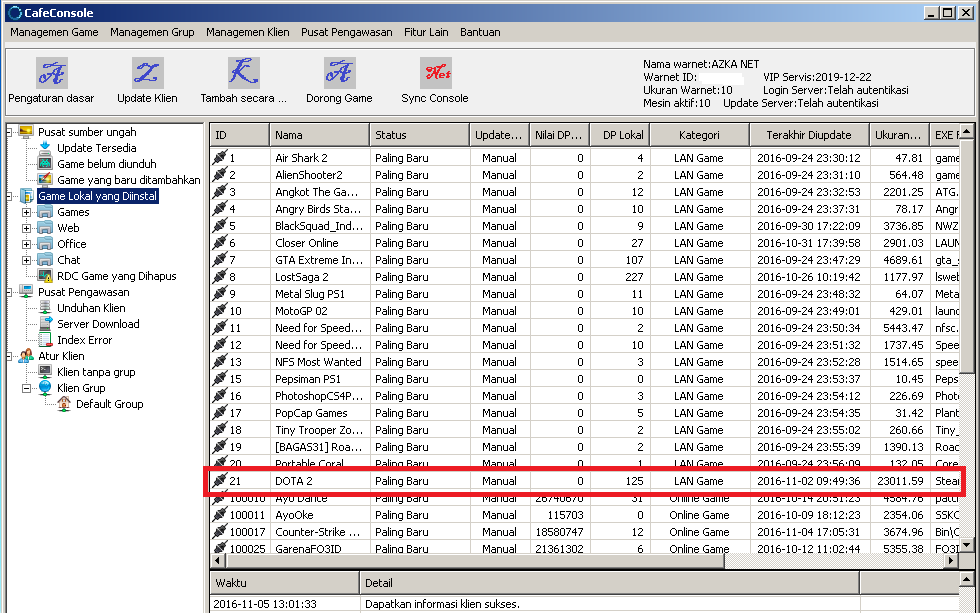
In karonakan Game Dota 2 Already no longer in the List Download or List Game Cafe Console,
then this time I will share how to enter Game Dota 2 into Cafe Console Cyberindo (MANUAL)

The following Add Game Dota 2 to Cafe Console:
1. Install Game Dota 2 on PC Server,
After the install process finish try the test and run game Dota 2,
Update to finish and can be played,
If it's out of the game to continue the next process

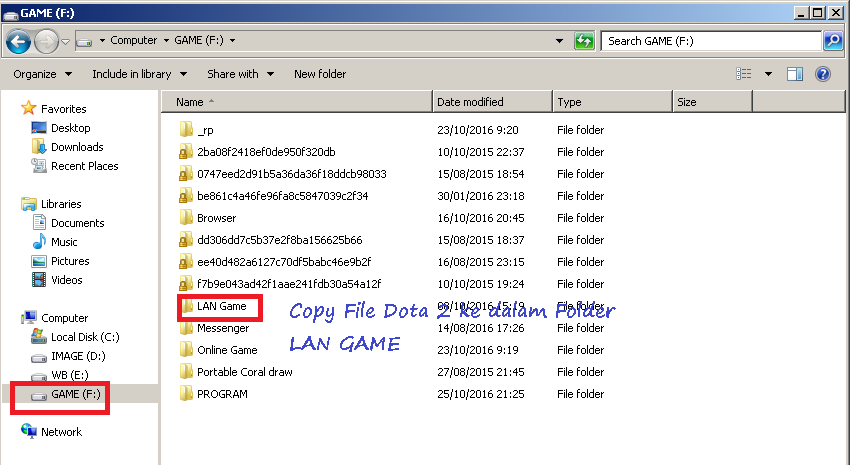
Place All Installation files or Dota 2 Folders inside GAME DISK
Enter All Dota 2 Game Folders in Game Drive (LAN GAME)

Untitled.png


2. Open Cafe Console
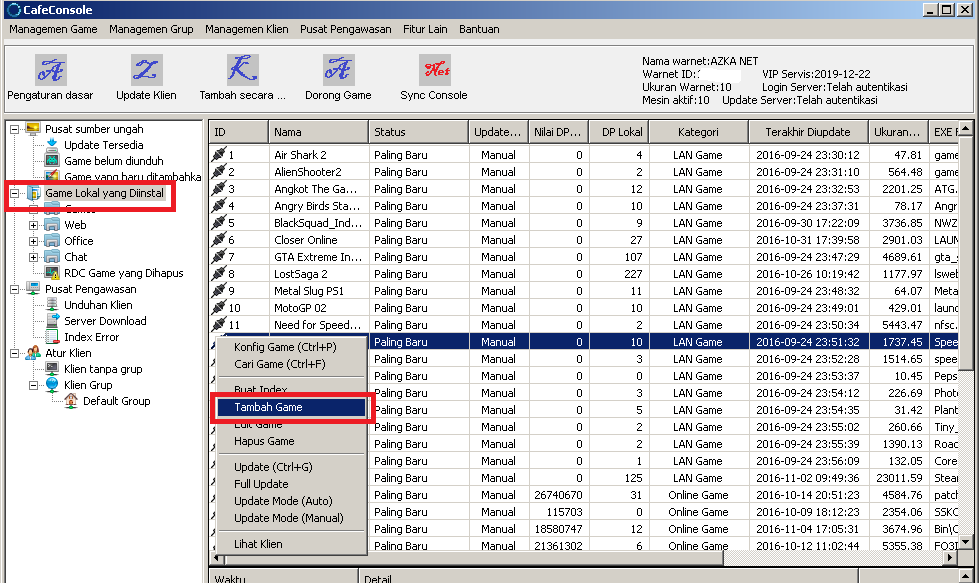
Right-click in the game list and select Add Game

Untitled.png


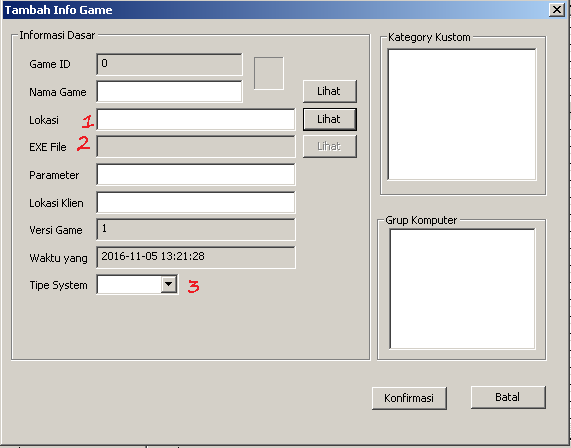
Then a new Tab will appear, then add game configuration process
1. In the Location field, Select Game Drive Find Folder LAN GAME and select Dota 2 Game Folder
2. In the EXE File field, (For Other Games Choose Launcer)
Karna this time We discuss Game dota 2, Then select File Steam in the game folder Dota 2
3. In the Type System Column, select LAN Game and click on the Confirm Tab

Untitled.png


3. After All Process (Process No.1 and No.2 above finish) Game Dota 2 can not be played
In PC Client, In order to be played on PC Client we do the next process.
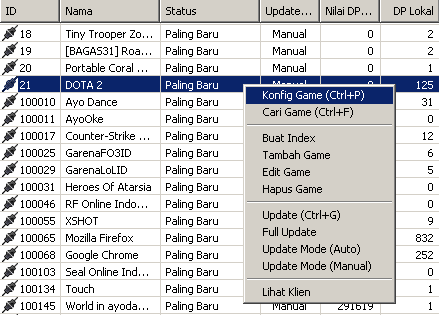
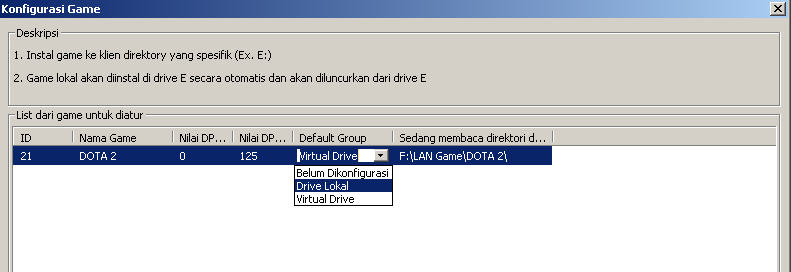
- Right-click Game Dota 2 (inside Cafe Console) Select Config Game (Ctrl + P)
Select Default Group according to System you Use,

Default Local Drive Group, For Who uses Local System
Default Virtual Drive Group, For Who uses Virtual and Dyskless System

When you're done click the Confirm tab,

Untitled.png

Untitled.png


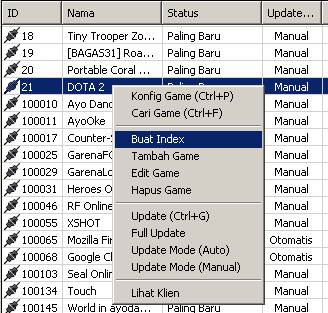
4. Create Index
The Next Process is Dota 2 Game Game,
Right click on Game List Dota 2 select Create Index, continue the index process until finished and click OK

Untitled.png


5. Done, game Dota 2 Already in the List Game Cafe Console,
If the Client position is On when you enter the game Dota 2 In PC Server do Restar
First on the client PC.


UPDATE Game Dota 2
- Karna Game Dota 2 Can not Automatic Update in Cafe Console,
then when there is an update on the Game, you are required for the Update manual for the client to follow updated,
- How to update game manual Dota 2
Dota 2 game on PC Server, do the update process until finished,
- After the update finish Play Game Dota 2 to enter into the game.
When finished COMPLETE Close (Log out) from Game
The intention of MANDATORY Log out of Game is, Facebook Account or your game ID is not stuck in Game.
- Perform Game Index Process, same way As process No.4
So the game Dota 2 in PC Client will terbatematis ter update,
If Game In PC Client has not been updated can do the restar on Pc client.
 
Disadvantages and Advantages Using Diskless System For Online Game Cafe

Disadvantages and Advantages Using Diskless System For Online Game Cafe and Browsing


Diskless ,,, For those of you who jump in the field of cafe business, surely familiar with the word or term Diskless, Yes Disklesss. Warnet (Computer) Without Hardisk.
Not bearti all computers in the cafe without a hard drive, For computer server still have to use hardisk / SSD.

Many of the cafe entrepreneurs who change the system in the cafe becomes Diskless,
Some think more cost-effective, more time-saving ...
It is not wrong if anyone thinks that way.

READ ALSO: Understanding Diskless System

I personally have changed the system in my cafe into disklesss .. pretty cost-effective spending to buy a hard drive, Save time.

The following Advantages and Disadvantages of using System Diskles,

Advantages of Using Diskless System:
1. More cost-effective,
The purpose of cost-effective here is intended to expenditure in purchasing hardware (Hardisk), Imagine if you have internet cafe with 100 client computer, bearti you have to spend money to buy hardisk counted 100 unit,
this is for those of you who use computer assemblies, if you use a computer buildup, surely in the computer there is a hard drive (you can not buy buildup computer without the hard drive, except the second buildup computer, and that too depending on the seller, may or may not buy a computer without a hard drive) ,
And if your computer in the cafe you still use the hard drive, then you also must memepersiapkan budget if a time the hard drive is damaged, it is not too felt the excess on the diskless system, because the hardware must be damaged, not just the hard drive.

2. More Save time,
If in the cafe you already use diskless system, then the most felt the advantages are time saving (Save for software maintenance, if your hardware still must to the client computer), Save time for program updates, game updates etc, because all you can do through the server computer without the need to do it to client computers one by one,
try to imagine if you have not used system diskles, if there is an online game update, then you must update the game one by one to the client computer, klo there are 100 computers in your cafe and have to update the game to one by one computer then it will feel tired and time consuming which is used to do just that. not to mention other programs and applications other than online games,

For diskless systems all software problems and applications you can do only through a server computer, such as game updates in a day can be 2 or 3 types of game updates simultaneously.

Disadvantages of Using Diskless System,
1. You can not save the results you do on the client computer (files, notes etc.),
for example you download a program and want to save it on the client computer and use in the tomorrow the downloaded program and not save it on the external drive, then the downloaded file will be lost because after the computer restar, then all will return as before, your download will disappear,
Unless you have a program or a special way to download the file is not lost even if the computer is in the restar.

2. If the server computer is damaged (error, dead etc) then the Client computer can not work, because all programs are on the server computer.

Those are some advantages and disadvantages of using diskless programs for internet cafes,
if you have a separate response to the advantages and disadvantages of using diskless system, please share in the commentar field already available below.

For those of you who have not used the diskless system in the cafe, the advantages and disadvantages that I write above is according to my experience in using diskless system in the cafe, and according to some cafe owners I know. may be useful as a matter of consideration you choose the best system for the cafe business that you manage.
 
Regarding the Problem - Diskless

Diskless - SAN Device Error

1 Solusi #1
Coba pastikan bahwa image sudah tercentang di setting diskless console
Solusi #2
Silahkan centang use compatible pxe boot di diskless console
Cobalah melakukan boot kembali
Bila masih bermasalah, coba hilangkan huruf "kk" di kotak dibawah use compatible pxe boot (Sebelumnya ipxe.kkpxe menjadi ipxe.pxe)
Lakukan percobaan boot kembali


2 BSOD (Blue Screen Of Death)

Note the code that appears on blue screen error, some of them

# 1 0X000007B (Lan Card Driver)
remove then make sure to install the appropriate lan card driver,
if using an additional lancard, remove and clean the lancard brass with the eraser, then please plug it in again and try booting again.
# 2 0X0000004E (Graphic Card / VGA)
reinstall the VGA driver, use the appropriate / default vga driver
# 3 if Code change, try check ram on client, change psu, check power voltage on cpu

3 Diskless - Stuck booting on windows logo

Solution # 1
Try to make sure that the LAN driver is already installed into the image used
If the driver is not installed, use the PNP tool to install the LAN driver into the image
Solution # 2
Make sure that the image size on the server is the same as the size that appears during the upload process
If the size is not the same, please re-upload the image to the server

4 Diskless - Client often restarts itself

Solution # 1
Take a look at disk cache settings for diskless
Add the cache disk size to be larger
make sure the WB Partition is not full, this usually happens in the cafe that operates 24/7 Solution: please add partition to writeback or restrict writeback client files.
Generally SSD / HD120GB can only be for 25 PC Client.

5 Diskless - Only booting 5 PCs

Solution # 1
Make sure that the CyberIndo Update program is already installed
Make sure that the user has entered a valid license into CyberIndo Update
Make sure Cafe Console is installed first before installing diskless console.

6 Why when Reinstall, upgrade / downgrade cafe console version failed to boot (PXE-M0F Connection reset)?

disklessDiskless license on diskless console is lost when uninstall CyberIndo client in super user mode, because if reinstall CyberIndo server usually with purpose to change version, automatic must open super user and re-install its cafe client. While this is the solution with reinstall diskless server console.

7 Why on boot boot from san device 0x80Q in diskless mode?

PC Client has not been given image or image used there is corrupt file. Solution: use master image or do image injection by yourself.

8 Why boot stuck in the windows logo?

Common causes are incorrect LANcard Driver, Windows Loader (Image windows 7), Lancard which does not support ROM (PXE) boot, and License. The solution is as follows:

Incompatible LANcard driver: Import lan driver using pnp tools server, for driver please download from official website of each motherboard
Windows Loader: please search other version of loader in google or can use remove wat, or do not need to be given loader, every 30 days re-upload image
Lancard that does not support boot ROM (PXE): replace lancardnya or can boot with ipxe, please googling with keyword ipxe for tutorial and requirement toolsnya
License: reinstall diskless server console.

9 What to do if it fails to boot (Pxe-m0f no bootable device)?

Make sure the image has been uploaded / imported
Make sure the DHCP scan on the server is already running
Make sure DHCP scans on the server do not conflict with other diskless DHCP servers (if any). Also make sure the DHCP range does not include the IP of the server itself.
If TFTP service still fails running, can try mac input client client manually on diskless server.

10 What should I do if I fail to boot (pxe-m0f media test failure)?

check cable condition and lancard
make sure the onboard LAN is enabled
make sure UTP cable is connected properly.
 
Re: Driver All Lan Lan (Inject via PNP Tools Cyberindo Disk)

pa tambay idol...gusto ko ring matoto nito.. :thumbsup:
 
Re: Driver All Lan Lan (Inject via PNP Tools Cyberindo Disk)

Many thanks TS!!! :clap: Galing nyo po :salute:
 
Re: Driver All Lan Lan (Inject via PNP Tools Cyberindo Disk)

:10: taob yung nag post dati kulang years yata inabot d pa tapos ito isang bagsak :salute:
 
Re: Driver All Lan Lan (Inject via PNP Tools Cyberindo Disk)

easiest way na eto ... grabe 10/10 d2 muntik na mahulog utak ko nito... :praise: salaamt d2
 
Re: Driver All Lan Lan (Inject via PNP Tools Cyberindo Disk)

TS? pano po ba masosolusyonan tong limited to 5 clients lang boss? CyberIndo din to akin eh i have 10 units pero after 5 months naging 5 clients na lang ang nagagamit ts eh. Pano po ba to masosolusyonan boss ts?
 
Re: Driver All Lan Lan (Inject via PNP Tools Cyberindo Disk)

TS? pano po ba masosolusyonan tong limited to 5 clients lang boss? CyberIndo din to akin eh i have 10 units pero after 5 months naging 5 clients na lang ang nagagamit ts eh. Pano po ba to masosolusyonan boss ts?

Pagpasensyahan na po
hindi ko po masasagot yan as a said po sa 1st page for Reference ko muna ito , dahil pinag aaralan ko din po sa ngaun po ang CYBERINDO . try nio po ung download ung CYBERINDO FILES na nandito na din sa Thread pakihanap nalang po.

nasa 1st page din po ung link na pinanggalingan nung INFO na ito kaso in BAHASA INDONESIA Language na tinaranslate ko lamang po sa ENGLISH for better understanding..

and or future REF at makatulong din sa mga gustong subukan ang DISKLESS .. marami din po kasi akong hinanapan na mga THREADS and POST kung paano mag STart sa Diskless kaso almost hindi rin naman detalyado kung mag bigay ng TULONG or TIPS sa iba..

dito po kasi kinuha ko na ung mga FILES or TUT na sa tingin ko makakatulong upang magamay po natin ang DISKLESS.. a
 
Last edited:
Back
Top Bottom