- Messages
- 2,153
- Reaction score
- 94
- Points
- 168


Material materials for making Image Diskless Cyberindo:
1. PC Client that still use hardisk (To Make Image)
2. USB / DVD Installation Windows (Recommended Windows 7 Ultimate 64bit)
3. Active Windows with serial number you have,
For Windows Farmers use the program (Recommended with Removewat 2.2.6)
4. Program / File Installation Cyberindo (Cyberindo Disk)
5. Download each LAN Driver Motherboard,
Download Match Type, Motherboard Type and Match Windows are in use,
For example this time using Windows 64bit
so download the motherboard LAN Driver for windows 64bit.
If Mobo does not support or not available LAN Driver for Windows 7 64bit,
Please Find Lan driver in forum forum Discussions (Google)
In this tutorial make this image PC server I assume already Ready, Hardware and Software
Read Also: Tutorial Installation Updater and Cyberindo Disk on PC Server and Client
Now we go to Image Processing in PC Client:
1. Install Windows 7 Ultimate 64bit as usual,
After the windows installation process is complete, Do not forget to activate Windows via serial number
that you have, or with the Removewat 2.2.6 program
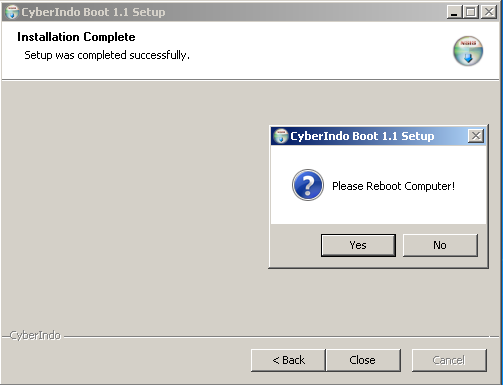
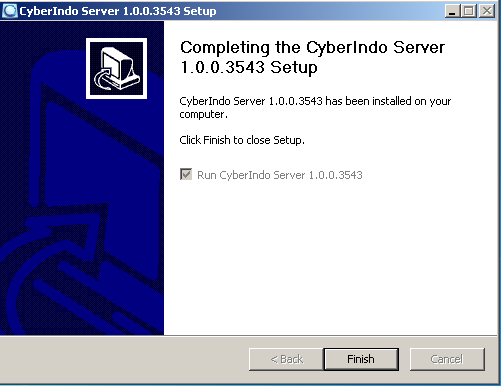
2. Install Cyberindo Disk until finished, restar
3. Do not install other programs or other applications.
4. Check in the lower right corner if the ICON LAN is connected to the internet or not,
(Usually if installing windows 7 ultimate 64bit, pc does not need to install LAN driver anymore)
If not already connected internet or ICON lan cross, install driver lan,
If already connected to the internet does not need to install the driver lan
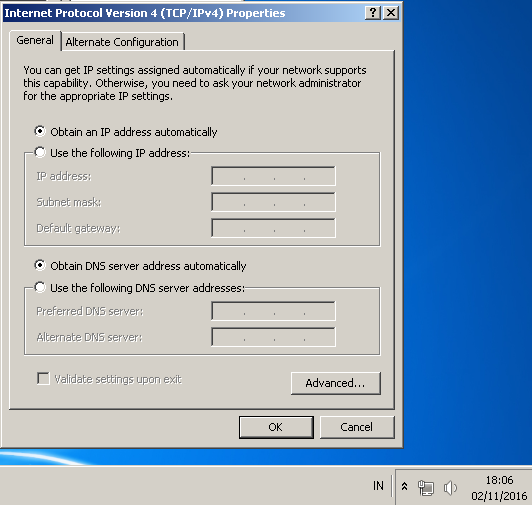
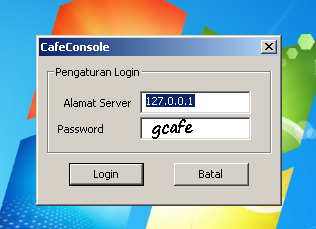
PC Client (who wants to do Upload Image) No need to fill in the IP
let it connect to internet Automatically
5. UPLOAD IMAGE
Before you make UPLOAD IMAGE to SERVER Do the following:
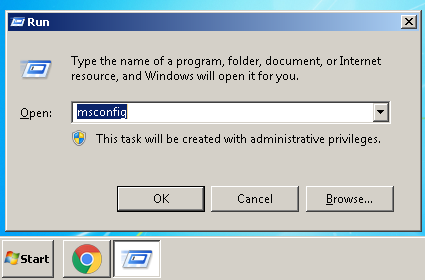
- Turn off Windows Automatic Updates
Click WINDOWS + R on keyboard => Type MSCONFIG will appear System Configuration tab
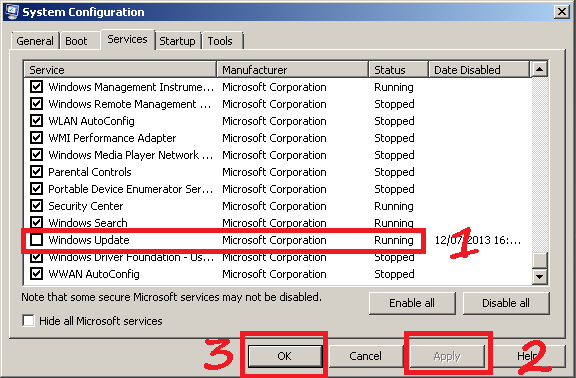
Click Tab Service => Scroll to bottom, Search Windows Update Posts Eliminate checkers,
Click OK and Restart
- Enter Control Panel
System and Security
Click Action Center => Click Change User Account Control Settings => Lower Settings
Until the lowest point (Never Notify) => click OK

Still inside the System and Security tab, now click Windows Firewall
Click Turn Windows Firewall on or off,
In the Home or Work (private) network location setting
Move Checks to Turn off Windows Firewall (not recommended)
On public network location setting
Move Checks to Turn off Windows firewall (not recommended)
Click OK

Still inside the System and Security tab, now in the Windows Update section =>
Click Turn on automatic updating on or off => Select Never check for updaters (not recommended)
Click OK

If you have completed the above setting process,
please UPLOAD IMAGE, Wait until the process is Done
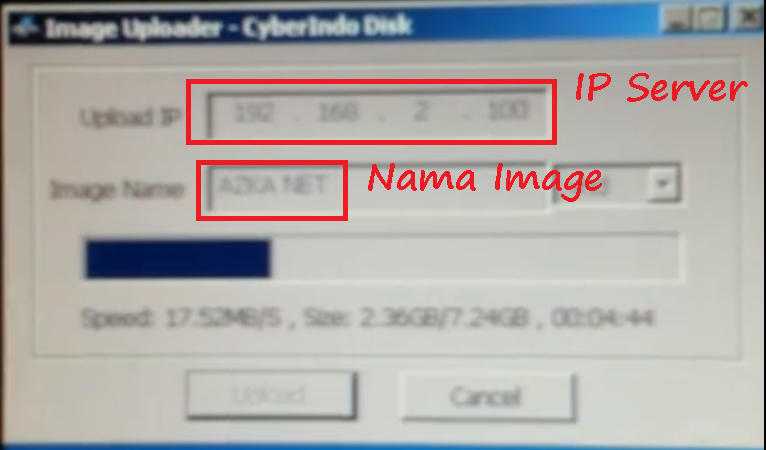
If UPLOAD IMAGE Process is complete, Click OK and exit,
Turn off the PC and unplug or Uninstall the Hardisk
Setting Bios PC Client to boot via LAN
Setting Image Process in PC SERVER
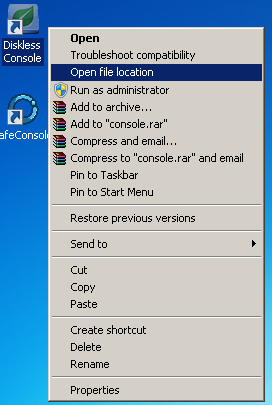
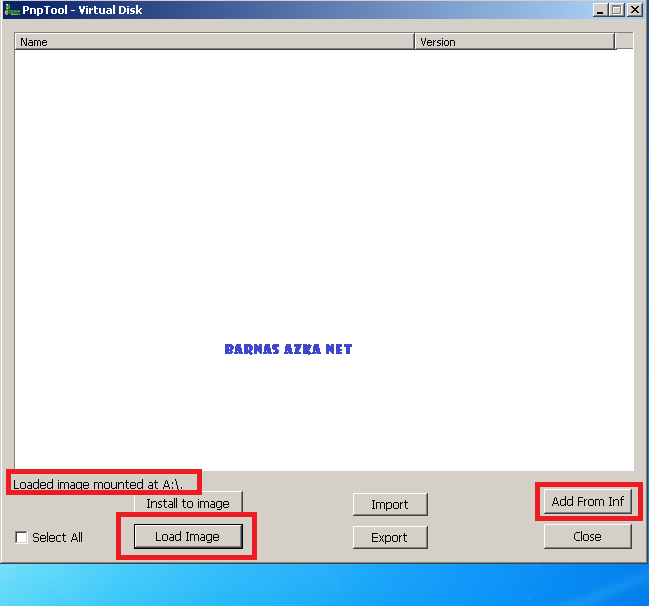
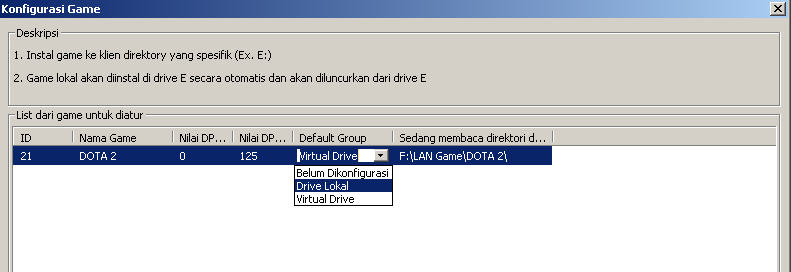
1. Inject LAN PC Client Driver into Image (Vhd)
- Right click on ICON Diskless Console on desktop => Open file location
- Open or Open pnptool_server

- Enter the Image we want to install or Inject Lan Driver, By clicking Tab Load Image
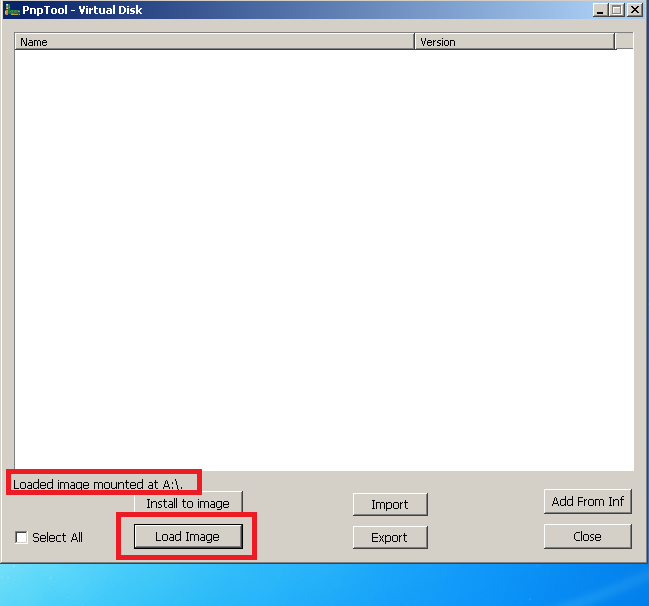
If in the Load Image process an error warning occurs or can not,
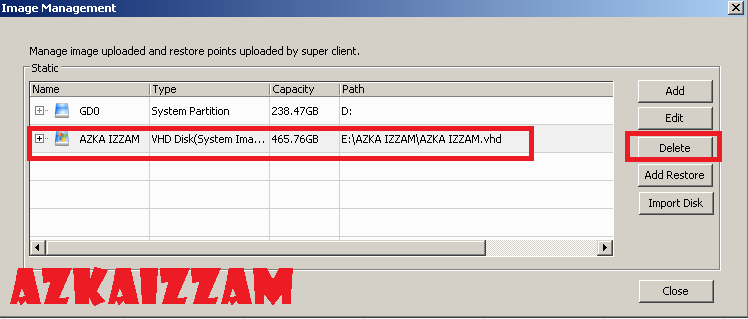
Delete or delete the existing Image in Diskles Console
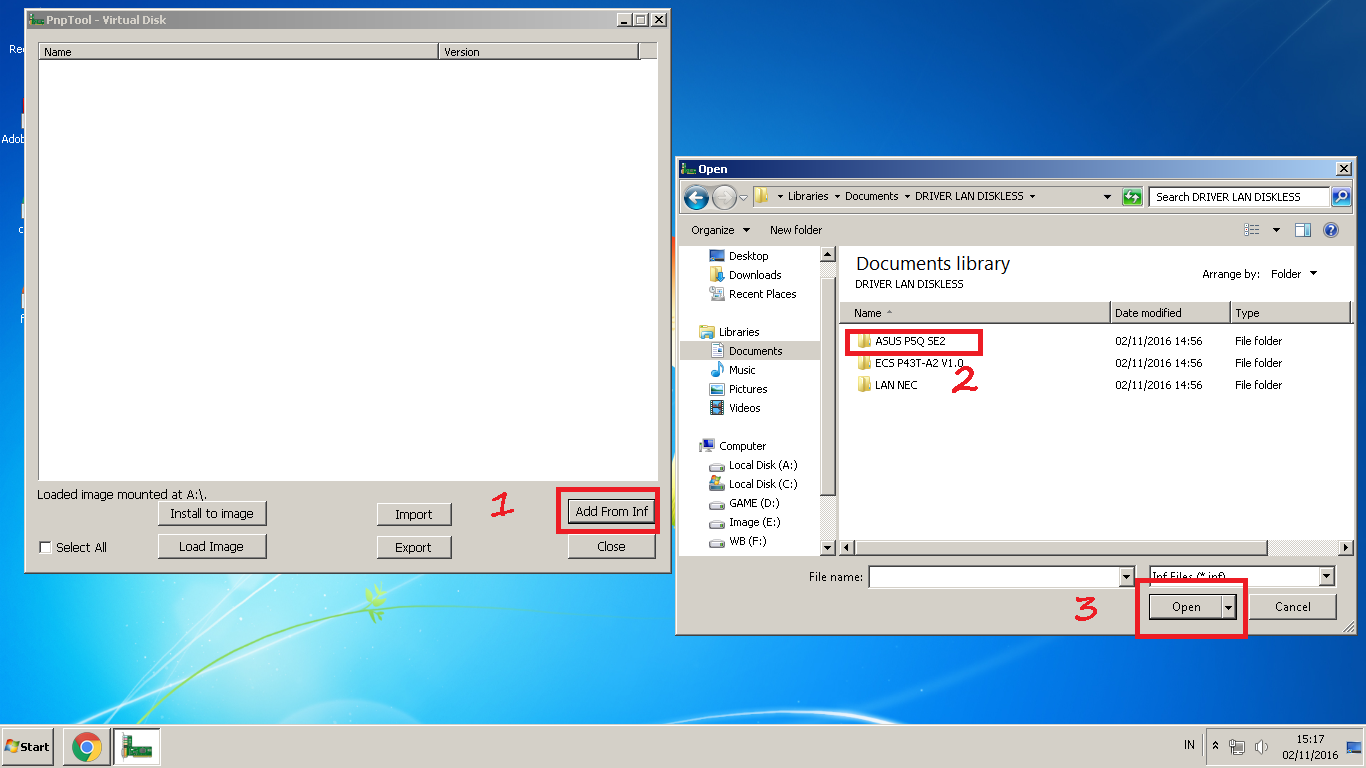
- Enter or select the LAN Driver that you have prepared before By clicking
Add From Inf
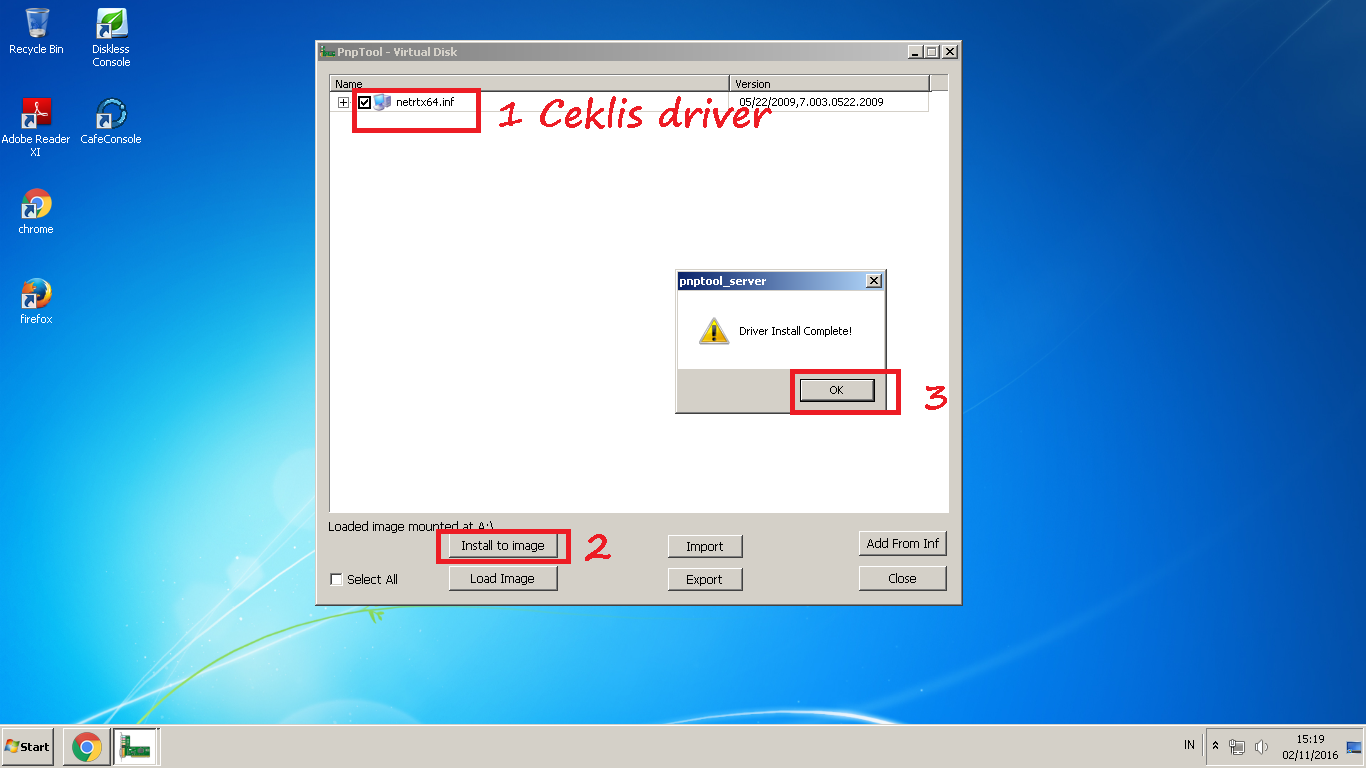
- Install until the information appears successful,
continue the same process if you want to install or
Inject other Lan drivers
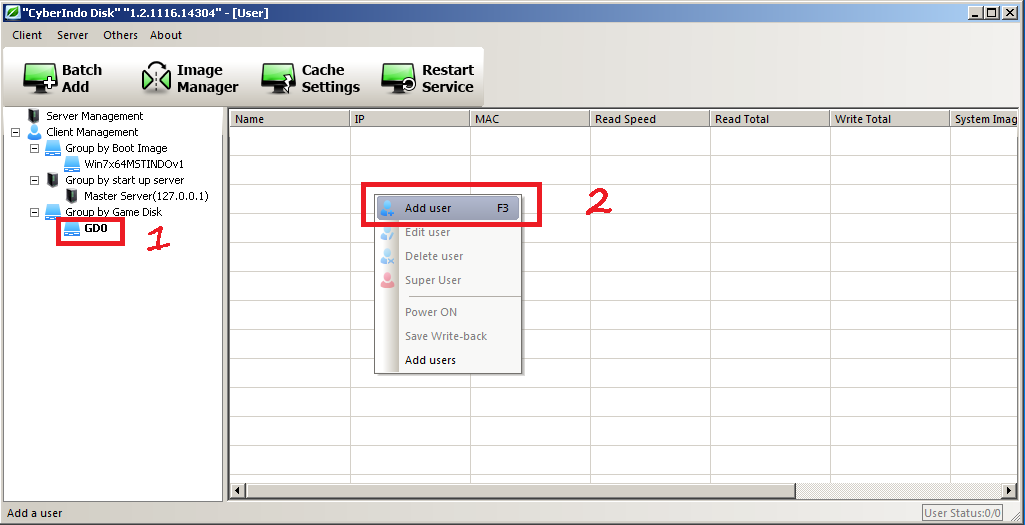
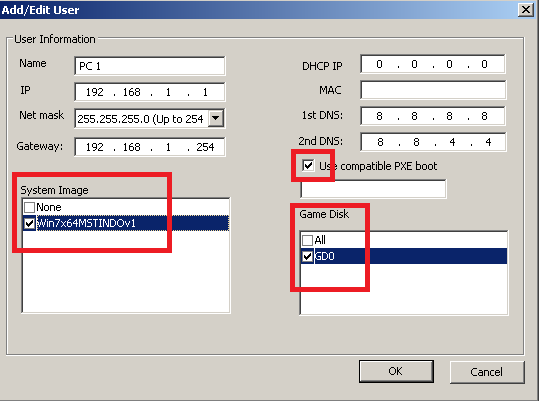
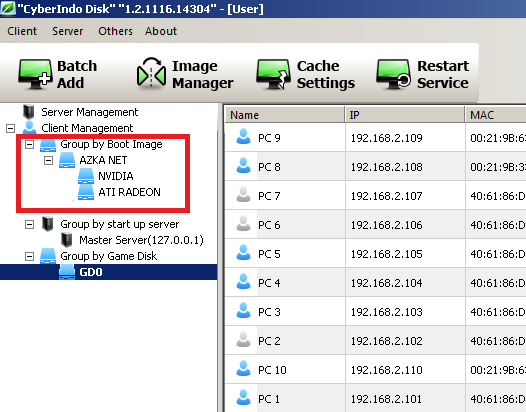
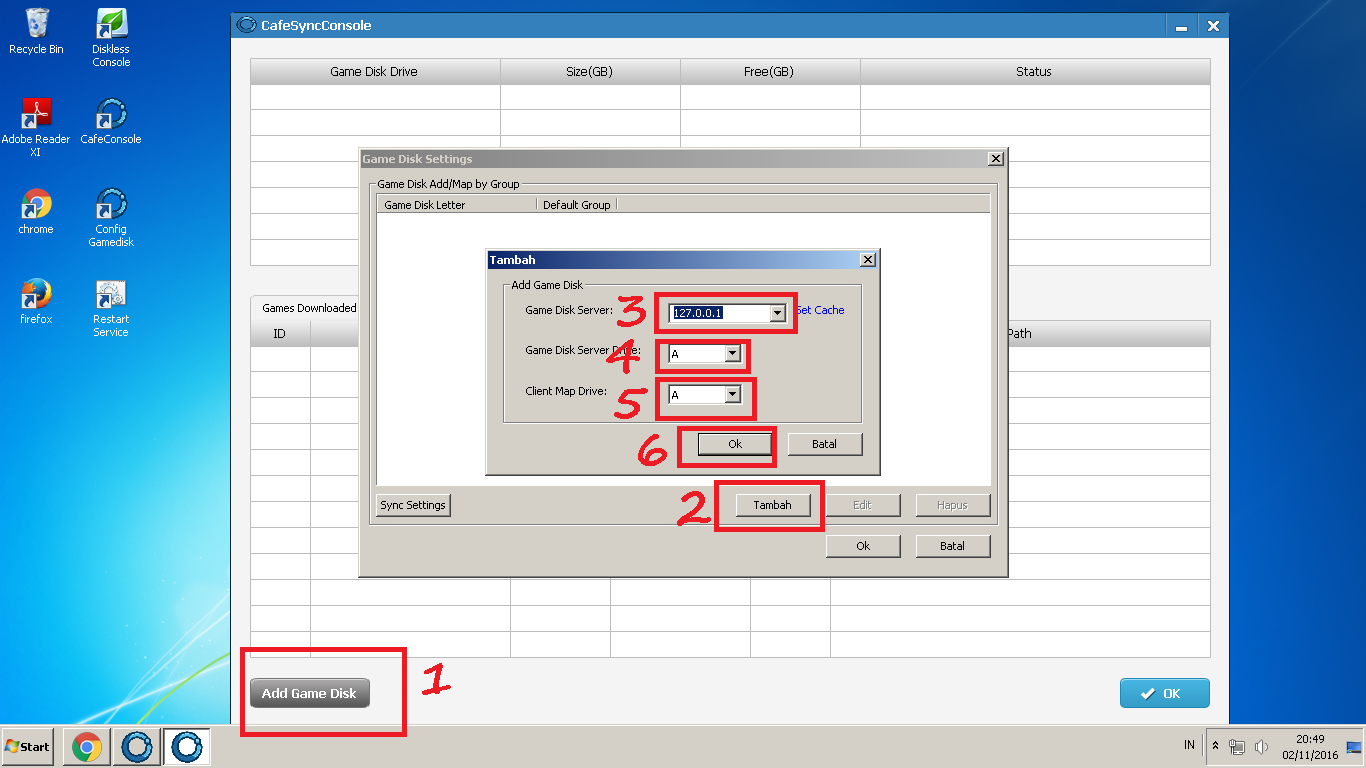
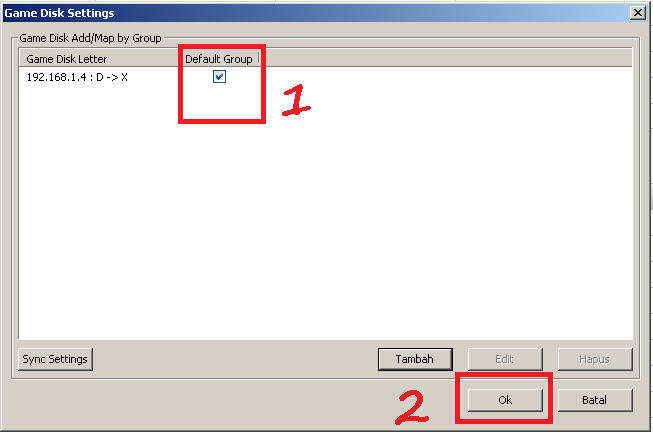
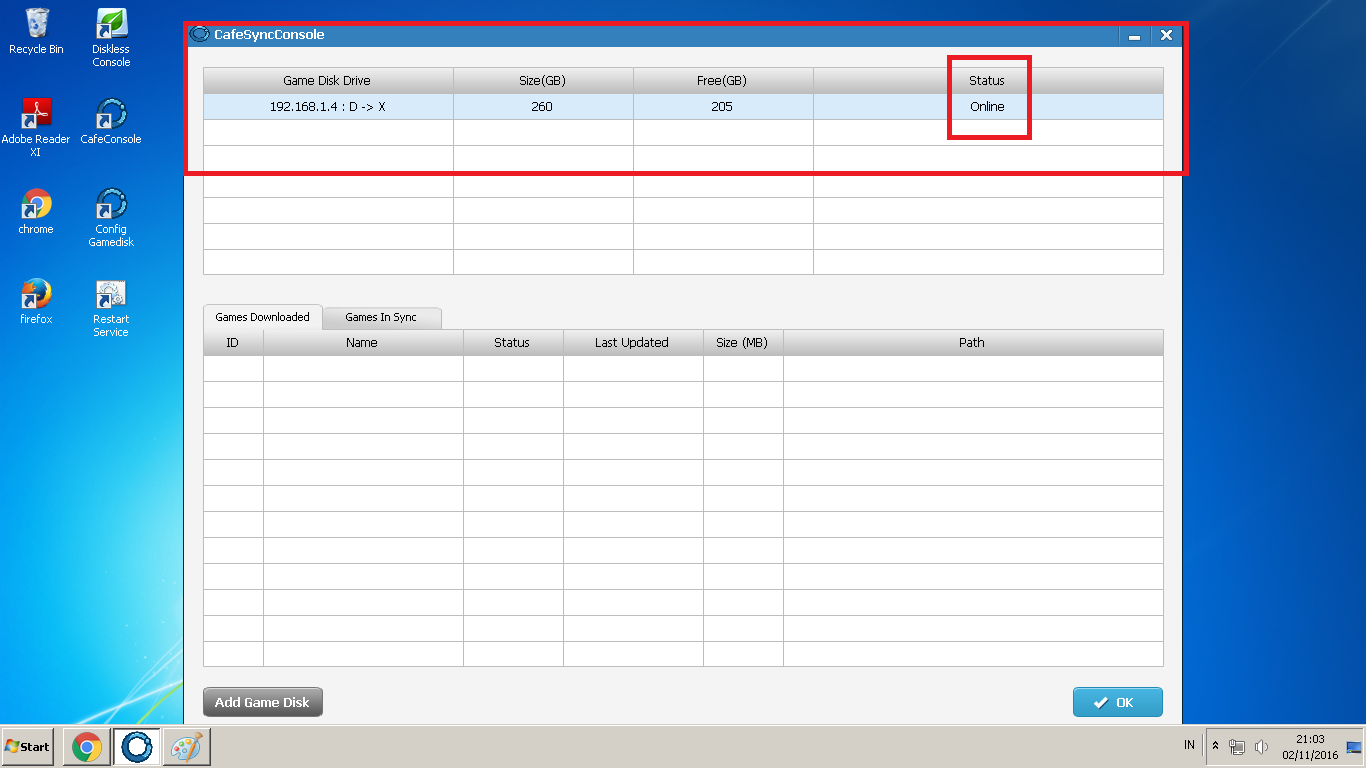
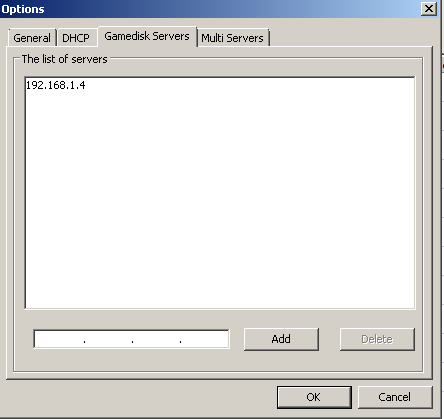
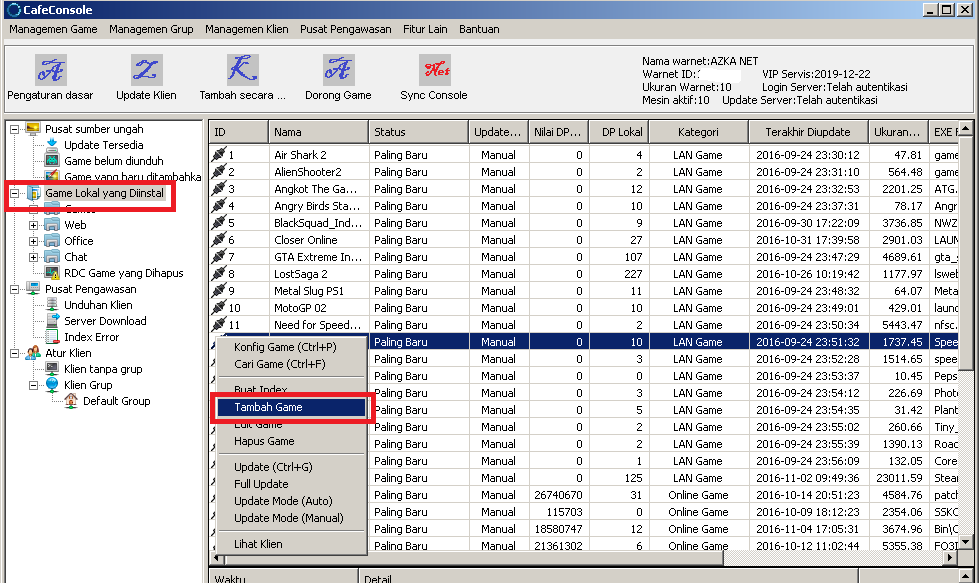
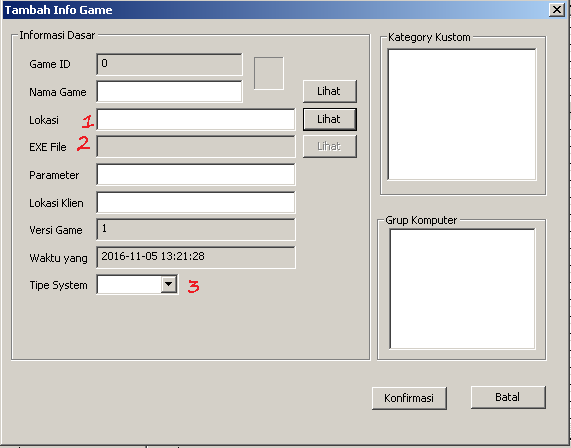
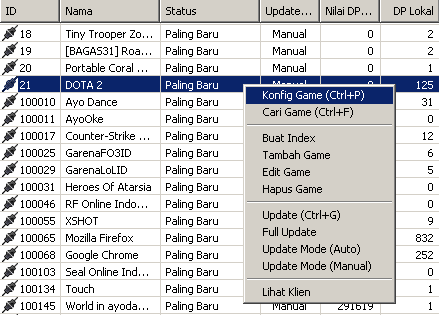
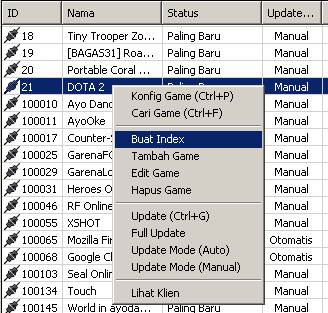
2. Process Add PC Client in Diskless Console
- In the GDO Tab or Game Disk Right-click Add Usser,
IP settings etc (can be seen in the picture)
- Test Phase Image on PC Client
Bios settings, Enable Option Lan Boot Room, Boot Position on Network
Nb: If the Image we created earlier has a problem (Mentok in Windows logo)
Please check again, whether the LAN Driver that you Inject already appropriate
with type, type of mobo and OS in use)
If successfully booted windows or entered into windows, now the process or the next stage
(turn off the CLient PC that had been done Testing Image)
Perform Testing On different PC Client types
(Do not forget Inject Lan Driver, same process as above)
If All PC Client Boot successfully or already signed in Windows, Now Continue to the next process
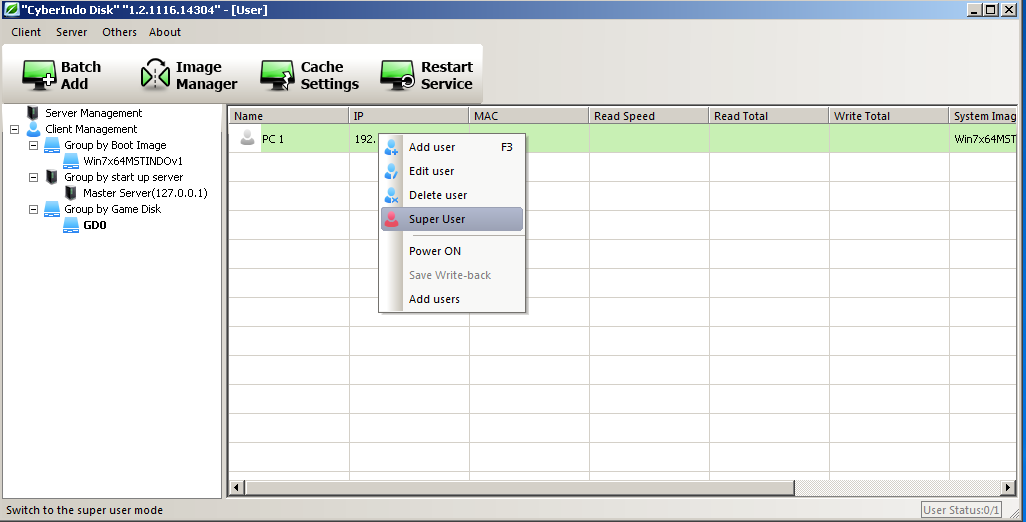
Now back to PC SERVER
- In the User you just created, Right-click "SUPER USER"
- Blame the PC Client and install an Application support or Program2,
Except for VGA CARD Driver (Do not install first)
Because this time you will make image to suport all mobo and do not want to happen Crash or constraint
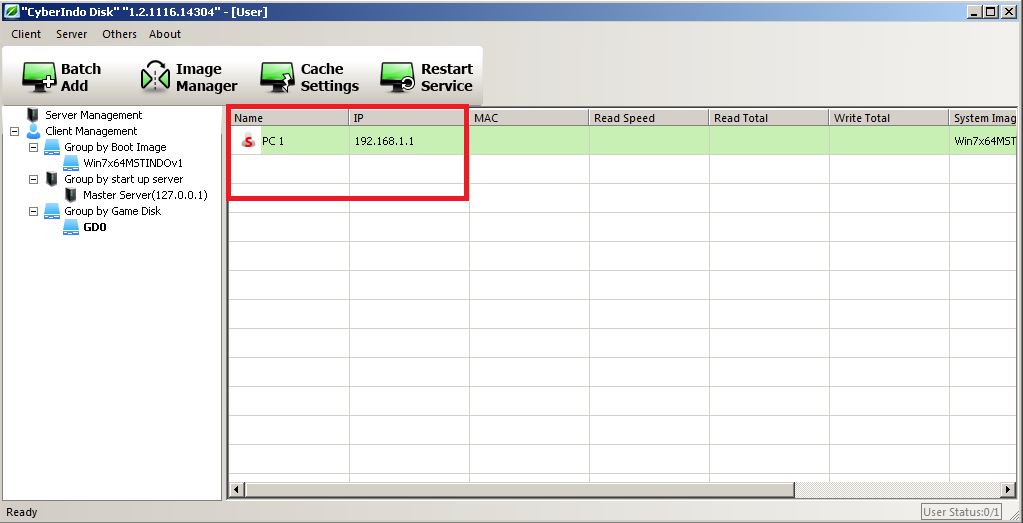
If you've finished installing programs and applications, turn off PC Client and do "SUPER USER" back,
to save the installed results of programs and applications,
UP HERE IMAGE MASTER MAKING PROCESS FOR ALL MOBO DONE
In order not to happen Driver and Program clash, Image master can made some children
or some branch Image,
Example:
So many tutorials make Image Diskles Cyberindo All Mobo
If any questions suggestions and comments please directly in the comments field")
thank you
FOR REFERENCE KO LANG FROM THIS SITE :
1. PC Client that still use hardisk (To Make Image)
2. USB / DVD Installation Windows (Recommended Windows 7 Ultimate 64bit)
3. Active Windows with serial number you have,
For Windows Farmers use the program (Recommended with Removewat 2.2.6)
4. Program / File Installation Cyberindo (Cyberindo Disk)
5. Download each LAN Driver Motherboard,
Download Match Type, Motherboard Type and Match Windows are in use,
For example this time using Windows 64bit
so download the motherboard LAN Driver for windows 64bit.
If Mobo does not support or not available LAN Driver for Windows 7 64bit,
Please Find Lan driver in forum forum Discussions (Google)
In this tutorial make this image PC server I assume already Ready, Hardware and Software
Read Also: Tutorial Installation Updater and Cyberindo Disk on PC Server and Client
Now we go to Image Processing in PC Client:
1. Install Windows 7 Ultimate 64bit as usual,
After the windows installation process is complete, Do not forget to activate Windows via serial number
that you have, or with the Removewat 2.2.6 program
2. Install Cyberindo Disk until finished, restar
3. Do not install other programs or other applications.
4. Check in the lower right corner if the ICON LAN is connected to the internet or not,
(Usually if installing windows 7 ultimate 64bit, pc does not need to install LAN driver anymore)
If not already connected internet or ICON lan cross, install driver lan,
If already connected to the internet does not need to install the driver lan
PC Client (who wants to do Upload Image) No need to fill in the IP
let it connect to internet Automatically
5. UPLOAD IMAGE
Before you make UPLOAD IMAGE to SERVER Do the following:
- Turn off Windows Automatic Updates
Click WINDOWS + R on keyboard => Type MSCONFIG will appear System Configuration tab
Click Tab Service => Scroll to bottom, Search Windows Update Posts Eliminate checkers,
Click OK and Restart
- Enter Control Panel
System and Security
Click Action Center => Click Change User Account Control Settings => Lower Settings
Until the lowest point (Never Notify) => click OK
Still inside the System and Security tab, now click Windows Firewall
Click Turn Windows Firewall on or off,
In the Home or Work (private) network location setting
Move Checks to Turn off Windows Firewall (not recommended)
On public network location setting
Move Checks to Turn off Windows firewall (not recommended)
Click OK
Still inside the System and Security tab, now in the Windows Update section =>
Click Turn on automatic updating on or off => Select Never check for updaters (not recommended)
Click OK
If you have completed the above setting process,
please UPLOAD IMAGE, Wait until the process is Done
If UPLOAD IMAGE Process is complete, Click OK and exit,
Turn off the PC and unplug or Uninstall the Hardisk
Setting Bios PC Client to boot via LAN
Setting Image Process in PC SERVER
1. Inject LAN PC Client Driver into Image (Vhd)
- Right click on ICON Diskless Console on desktop => Open file location
- Open or Open pnptool_server
- Enter the Image we want to install or Inject Lan Driver, By clicking Tab Load Image
If in the Load Image process an error warning occurs or can not,
Delete or delete the existing Image in Diskles Console
- Enter or select the LAN Driver that you have prepared before By clicking
Add From Inf
- Install until the information appears successful,
continue the same process if you want to install or
Inject other Lan drivers
2. Process Add PC Client in Diskless Console
- In the GDO Tab or Game Disk Right-click Add Usser,
IP settings etc (can be seen in the picture)
- Test Phase Image on PC Client
Bios settings, Enable Option Lan Boot Room, Boot Position on Network
Nb: If the Image we created earlier has a problem (Mentok in Windows logo)
Please check again, whether the LAN Driver that you Inject already appropriate
with type, type of mobo and OS in use)
If successfully booted windows or entered into windows, now the process or the next stage
(turn off the CLient PC that had been done Testing Image)
Perform Testing On different PC Client types
(Do not forget Inject Lan Driver, same process as above)
If All PC Client Boot successfully or already signed in Windows, Now Continue to the next process
Now back to PC SERVER
- In the User you just created, Right-click "SUPER USER"
- Blame the PC Client and install an Application support or Program2,
Except for VGA CARD Driver (Do not install first)
Because this time you will make image to suport all mobo and do not want to happen Crash or constraint
If you've finished installing programs and applications, turn off PC Client and do "SUPER USER" back,
to save the installed results of programs and applications,
UP HERE IMAGE MASTER MAKING PROCESS FOR ALL MOBO DONE
In order not to happen Driver and Program clash, Image master can made some children
or some branch Image,
Example:
So many tutorials make Image Diskles Cyberindo All Mobo
If any questions suggestions and comments please directly in the comments field
thank you
FOR REFERENCE KO LANG FROM THIS SITE :
Last edited:


 Galing nyo po
 taob yung nag post dati kulang years yata inabot d pa tapos ito isang bagsak
  salaamt d2