Hi,
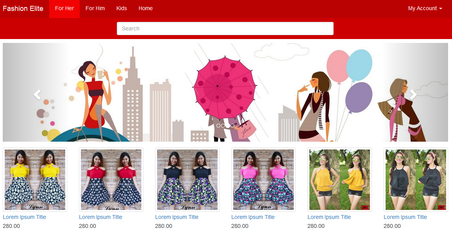
I'm planning to create a simple E-Commerce website for our (my wife's) "online" shop. Nag-start kasi sya kumuha ng supplier at pino-post ang mga items sa facebook (planning to integrate facebook to the site). So siyempre, kahit sabihing may FB page na yung mga items, hindi pa din ganun ka-organized di katulad kung talagang dedicated site yun para sa selling and advertising ng mga items. About sa mga items, technically parang yung mga usual online shops ngayon (bags, shoes, shorts, shirts, blouses). Wala naman ako plano mag-integrate ng payment gateways dun sa site, pero siyempre may shopping cart function pa din yung site, pero hindi "Payment" ang last step dun sa "purchase" process.
Dun sa provided process sa taas, walang payment transactions na manggagaling sa site.
Currently, nagpa-plot na ako ng database structure para sa contents ng site. Medyo magiging mabusisi lang yung mga table relationships since item-oriented and e-commerce site, madaming details ang kailangan. For example, iba ang details ng shoes (shoe sizes, US - 6.5, Euro - 37) compared sa shirts (S, M, L, XL), iba sa men's pants (waist sizes), iba pa sa women's pants (waist and hip sizes), tapos may electronics pa. Siyempre may mga color variants pa ang mga clothing items at spec variants ang mga electronics (powerbanks - 5000mAh, 10000mAh). Magi-include din ako ng pricing discounts, bulk quantity discounts, free delivery promo, and/or vourcher codes.
I won't be using any blogging platforms (wordspress / drupal / joomla). Di rin po ako gagamit ng CMS. Mostly, from scratch ang codes. But I'll try to use CSS frameworks (most probably Bootstrap, pero baka mag-check ako ng iba). I'll be using PHP, MySQL, jQuery (di ko pa alam kung ano anong libraries ang kailanganin ko), AJAX (para sa pag-load ng mga items, pati na din sa iba pang transactions), mapipilitan din ako mag-Photoshop (hindi ako magaling sa designs, so good luck na lang sakin).
I am open to suggestions and comments, para na din mas madaming idea pa ang mapaglaruan ko sa paggawa ko nito. Also, I'll be posting updates para mai-track ko na din ang progress nitong project na ito.
Sa may mga similar projects, pwede kayo sumabay / magtanong. I'll provide suggestions or even help you.
Thanks
2016-09-05 - Start of the Project (Project Planning)
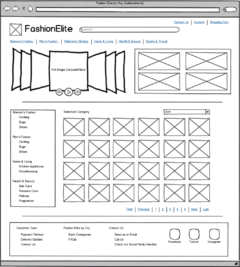
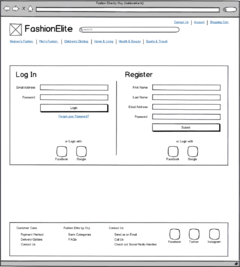
2016-09-06 - Wireframing
2016-09-12 - Setting up the server (local)
Next - Setting up the domain name
Next - Setting up the hosting site
Next - Pointing the domain name to the host
I'm planning to create a simple E-Commerce website for our (my wife's) "online" shop. Nag-start kasi sya kumuha ng supplier at pino-post ang mga items sa facebook (planning to integrate facebook to the site). So siyempre, kahit sabihing may FB page na yung mga items, hindi pa din ganun ka-organized di katulad kung talagang dedicated site yun para sa selling and advertising ng mga items. About sa mga items, technically parang yung mga usual online shops ngayon (bags, shoes, shorts, shirts, blouses). Wala naman ako plano mag-integrate ng payment gateways dun sa site, pero siyempre may shopping cart function pa din yung site, pero hindi "Payment" ang last step dun sa "purchase" process.
- Main Item Catalog
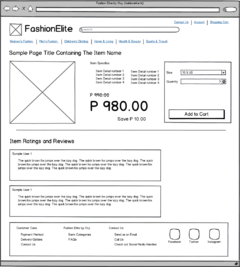
- Select item, a page will show the item details
- Item Specifics (Size selection, Quantity, etc.)
- Include item to shopping cart
- If they want to continue "shopping", back to #1
- If they are done, proceed to "checkout"
- Provide delivery option (meetup / delivery)
- Meetup - select predefined meetup points
- Delivery - provide exact delivery name and address
- Provide payment Option
- COD (Meetup)
- Bank Deposit (send deposit slip screenshot to FB, website, email)
- If done, proceed to finish checkout process
Dun sa provided process sa taas, walang payment transactions na manggagaling sa site.
Currently, nagpa-plot na ako ng database structure para sa contents ng site. Medyo magiging mabusisi lang yung mga table relationships since item-oriented and e-commerce site, madaming details ang kailangan. For example, iba ang details ng shoes (shoe sizes, US - 6.5, Euro - 37) compared sa shirts (S, M, L, XL), iba sa men's pants (waist sizes), iba pa sa women's pants (waist and hip sizes), tapos may electronics pa. Siyempre may mga color variants pa ang mga clothing items at spec variants ang mga electronics (powerbanks - 5000mAh, 10000mAh). Magi-include din ako ng pricing discounts, bulk quantity discounts, free delivery promo, and/or vourcher codes.
I won't be using any blogging platforms (wordspress / drupal / joomla). Di rin po ako gagamit ng CMS. Mostly, from scratch ang codes. But I'll try to use CSS frameworks (most probably Bootstrap, pero baka mag-check ako ng iba). I'll be using PHP, MySQL, jQuery (di ko pa alam kung ano anong libraries ang kailanganin ko), AJAX (para sa pag-load ng mga items, pati na din sa iba pang transactions), mapipilitan din ako mag-Photoshop (hindi ako magaling sa designs, so good luck na lang sakin).
I am open to suggestions and comments, para na din mas madaming idea pa ang mapaglaruan ko sa paggawa ko nito. Also, I'll be posting updates para mai-track ko na din ang progress nitong project na ito.
Sa may mga similar projects, pwede kayo sumabay / magtanong. I'll provide suggestions or even help you.
Thanks
2016-09-05 - Start of the Project (Project Planning)
2016-09-06 - Wireframing
2016-09-12 - Setting up the server (local)
Next - Setting up the domain name
Next - Setting up the hosting site
Next - Pointing the domain name to the host
Last edited: