- Messages
- 20
- Reaction score
- 0
- Points
- 26
View attachment 292883
Needs / Gerekenler :
16 GB+ USB Flash Disk
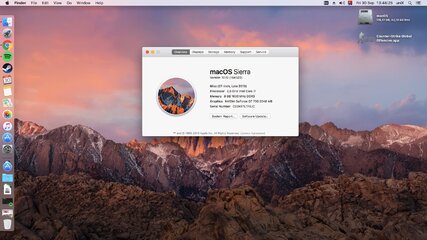
macOS Sierra 10.12.x
Clover <<==
Kexts & Configs <<==
Steps / Aşamalar :
Insert the USB drive | USB diski takın
Open /Applications/Utilities/Disk Utility | Uygulamalar --> İzlencler --> Disk İzlencesi'ni açın
Highlight the USB drive in left column | Sol taraftan USB diskinize tıklayın
Click on the Partition tab | Bölümleme sekmesine tıklayın
Click Current and choose 1 Partition | Şimdi'ye tıklayıp 1 bölüntüyü seçin
Click Options... | Seçeneklere tıklayın
Choose GUID Partition Table | GUID Bölümleme tablosunu seçin
Under Name: type USB (You can rename it later) | Flash Diskin İsmini USB yapın
Under Format: choose Mac OS Extended (Journaled) | Format türünü Mac OS Genişletilmiş (Günlüklü) seçin
Click Apply then Partition | Uygula butonuna basınız
Open /Applications/Utilities/Terminal |
Uygulamalar --> İzlencler --> Terminal'i açın
Note/Not: copy and paste this code/command and press enter from keyboard | aşağıdaki kodu/komutu kopyalayıp & yapıştırın ve enter'a basın klavyenizden
sudo /Applications/Install\ macOS\ Sierra.app/Contents/Resources/createinstallmedia --volume /Volumes/USB --applicationpath /Applications/Install\ macOS\ Sierra.app --nointeraction
Install Clover to select your created installer usb drive | USB diski seçerek cloverı kurun
UEFI :
View attachment 292884
Navigate to /EFI/CLOVER/ and replace default config.plist with one of the attached config.plist examples | İndirdiğiniz config.plist dosyalarından size uygun olanı /EFI/CLOVER/ konumundakiconfig.plist ile değiştiriniz.
Downloaded kexts to copy /EFI/CLOVER/kexts/other/ paste | İndirdiğiniz kextleri /EFI/CLOVER/kexts/other/ kopyalayın
Needs / Gerekenler :
16 GB+ USB Flash Disk
macOS Sierra 10.12.x
Clover <<==
Kexts & Configs <<==
Steps / Aşamalar :
Insert the USB drive | USB diski takın
Open /Applications/Utilities/Disk Utility | Uygulamalar --> İzlencler --> Disk İzlencesi'ni açın
Highlight the USB drive in left column | Sol taraftan USB diskinize tıklayın
Click on the Partition tab | Bölümleme sekmesine tıklayın
Click Current and choose 1 Partition | Şimdi'ye tıklayıp 1 bölüntüyü seçin
Click Options... | Seçeneklere tıklayın
Choose GUID Partition Table | GUID Bölümleme tablosunu seçin
Under Name: type USB (You can rename it later) | Flash Diskin İsmini USB yapın
Under Format: choose Mac OS Extended (Journaled) | Format türünü Mac OS Genişletilmiş (Günlüklü) seçin
Click Apply then Partition | Uygula butonuna basınız
Open /Applications/Utilities/Terminal |
Uygulamalar --> İzlencler --> Terminal'i açın
Note/Not: copy and paste this code/command and press enter from keyboard | aşağıdaki kodu/komutu kopyalayıp & yapıştırın ve enter'a basın klavyenizden
sudo /Applications/Install\ macOS\ Sierra.app/Contents/Resources/createinstallmedia --volume /Volumes/USB --applicationpath /Applications/Install\ macOS\ Sierra.app --nointeraction
Install Clover to select your created installer usb drive | USB diski seçerek cloverı kurun
UEFI :
View attachment 292884
Navigate to /EFI/CLOVER/ and replace default config.plist with one of the attached config.plist examples | İndirdiğiniz config.plist dosyalarından size uygun olanı /EFI/CLOVER/ konumundakiconfig.plist ile değiştiriniz.
Downloaded kexts to copy /EFI/CLOVER/kexts/other/ paste | İndirdiğiniz kextleri /EFI/CLOVER/kexts/other/ kopyalayın