- Messages
- 474
- Reaction score
- 3
- Points
- 28
THIS IS VANILLA... (recommended)
This is for LAPTOP only you can try it on your desktop also.
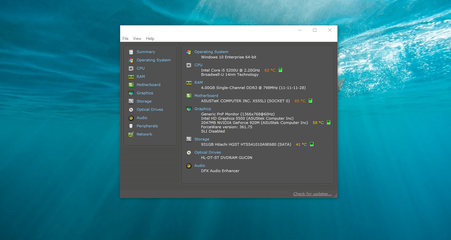
1st > you need to know your specification of your computer.
(example : intel core i5 4200U 4th gen, intel HD Haswell Mobile 4400, 8gb ram) this is my specs
(also codec ID, Device ID, Vendor ID for drivers : [example] : audio realtek 10EC: 0282) you can find on device manager.
how to know your codec ID? - download CPU-Z search it from google, or go to device manager..example right click audio then properties..you can see your vendor ID 10EC; device ID 0282 means 10EC;0282 its realtek you can search it from google if you are in doubt.
2nd > common sense
3rd > patience..
Requirements :
MAC Book or any MAC OS or if you don't have mac book or any MAC OS you can use this VMWARE MAC OS X YOSEMITE on windows to create a bootable usb..
USB 8GB
LAPTOP ONLY.. you can try on desktop.
download vmware yosemite
credits to tech review
https://drive.google.com/folderview?id=0B6ISDhJomGd8d0lJSTN2TG9VVkU&usp=sharing
or watch their videos here for the tutorial https://www.youtube.com/watch?v=G-r8CvCnen4
ASSUMING you have mac os on vmware or you have a real mac book.
download SIERRA OS from appstore.
after download finish.
create your bootable usb now.
insert your 8GB or 16GB USB
MAC OS Sierra 10.12.x
Instructions:
>Insert the USB drive
>Open /Applications/Utilities/Disk Utility
>Highlight the USB drive in left column
>Click on the Partition tab
>Click Current and choose 1 Partition
>Click Options
>Choose GUID Partition Table
>Name: type USB
>Format: choose Mac OS Extended Journaled
>Click Apply then Partition
>Open /Applications/Utilities/Terminal
>copy and paste this command and press enter
sudo /Applications/Install\ macOS\ Sierra.app/Contents/Resources/createinstallmedia --volume /Volumes/USB --applicationpath /Applications/Install\ macOS\ Sierra.app --nointeraction
download CLOVER boot loader r4091 - https://sourceforge.net/projects/cloverefiboot/
Steps on how to install clover.
>double click clover r4091
>select change install location > select your USB
>check the box for install UEFI booting only
>check the box for install Clvoer in the ESP
>check the box for themes
>click drop down driver64UEFI
>check the box OSxAptioFixDrv-64
>click install
now we need to install kext for booting process.
download and open clover configurator
click mount EFI put password (the password of your computer on vmware or realmac)
then open EFI folder or click finder then click EFI folder/Clover/Kext>Others > put all the kext that you download on my archive
[except intel_HD_Graphics unless you have the Intel Graphics 4200,4400,4600 you can put this driver]
"delete the default config.plist on EFI/Clover/config.plist"
next download config.plist on my archive (Laptop config master) depends on your graphics card.if you are using Intel Graphics 4200,4400,4600 you copy and paste it on EFI/Clover/here.
done.
----after creating a bootable usb-----
restart your computer and go to your bios setting if your bios is supported UEFI or legacy. just disable boot secure. and make sure your first boot is usb8gb or 16gb you created earlier.
ASSUMING The installation is Finish: INSTALLATION TIME 30mins-40mins maybe..
after installation on your laptop..
remove your bootable usb..
then download all the files on my archive..
install clover r3961 again this should be installed on your hard drive now.
>double click clover r3961
>select change install location > select your USB
>check the box for install UEFI booting only
>check the box for install Clvoer in the ESP
>check the box for themes
>click drop down driver64UEFI
>check the box EmuVariable-64
>check the box OSxAptioFix2Drv-64
>check the box install target VolumeRCscript
>click install
take note:
you cannot boot your desktop/laptop without usb.so you need to download clover EFI Boot loader so you can boot normally your computer.
Steps on how to boot without USB bootable drive..
open clover configuration
click mount EFI > click open partition.
open EFI/CLOVER/KEXT/Others>put all the kext that you download on my archive
[except intel_HD_Graphics unless you have the Intel Graphics 4200,4400,4600 you can put this driver]
open EFI/CLOVER copy & paste config.plist
now restart your computer without USB.
download multibeast sierra for drivers
you must select your drivers
finish!")
NOTE:
To make your computer MAKES PERFECT.
PATCH YOUR NATIVE DSDT/SSDT came from linux or windows.
Easiest way to get native DSDT/SSDT from you hackintosh.
after you successfully install the os x and clover boot loader.
restart your computer if the clover boot appears press F4 to get your DSDT & SSDT it is located at EFI/Clover/ACPI/Origin
Tutorial for patching your ACPI files
Patching your DSDT 1st before SSDT.
copy this "Origin" folder anywhere.
make a folder on desktop any name
copy DSDT.aml and paste on the folder you created.
download and extract iasl51, macIASL and Laptop DSDT Patch Offline on my archive and put it all on the folder you created.
>open terminal
>drag and drop iasl51 on the terminal then type -da -dl dsdt.aml | then you will get DSDT.dsl
>open DSDT.dsl on macIASL
>click compile then you have to fix those errors [search it on google how to fix it]
>After fixing those errors.. click patch then..
some patch required.
"Fix _WAK Arg0 v2"
"HPET Fix"
"SMBUS Fix"
"IRQ Fix"
"RTC Fix"
"OS Check Fix"
"Fix Mutex with non-zero SyncLevel"
"Fix PNOT/PPNT" (use only if you're dropping CPU related SSDTs)
"Add IMEI" (do not use if your DSDT or SSDTs already have IMEI/HECI/MEI device)
after patch..click file then save as filename DSDT acpi machine language to desktop..
"ADDITONAL"
DOWNLOAD
CPU POWER MANAGEMENT for better performance = https://github.com/Piker-Alpha/ssdtPRGen.sh
to make USB 2.0 & 3.0 Working correctly = https://github.com/RehabMan/OS-X-USB-Inject-All
Battery status working = https://github.com/RehabMan/OS-X-ACPI-Battery-Driver
Thank you Mr.Rehabman for giving me a permission.
Credits to the owner of files MR. Rehabman.
i will try to update this thread
DO THIS AT YOUR OWN RISK!
I AM NOT RESPONSIBLE FOR ANY DAMAGE OF YOUR DESKTOP / LAPTOP.
View attachment 256530
This is for LAPTOP only you can try it on your desktop also.
1st > you need to know your specification of your computer.
(example : intel core i5 4200U 4th gen, intel HD Haswell Mobile 4400, 8gb ram) this is my specs
(also codec ID, Device ID, Vendor ID for drivers : [example] : audio realtek 10EC: 0282) you can find on device manager.
how to know your codec ID? - download CPU-Z search it from google, or go to device manager..example right click audio then properties..you can see your vendor ID 10EC; device ID 0282 means 10EC;0282 its realtek you can search it from google if you are in doubt.
2nd > common sense
3rd > patience..
Requirements :
MAC Book or any MAC OS or if you don't have mac book or any MAC OS you can use this VMWARE MAC OS X YOSEMITE on windows to create a bootable usb..
USB 8GB
LAPTOP ONLY.. you can try on desktop.
download vmware yosemite
credits to tech review
https://drive.google.com/folderview?id=0B6ISDhJomGd8d0lJSTN2TG9VVkU&usp=sharing
or watch their videos here for the tutorial https://www.youtube.com/watch?v=G-r8CvCnen4
ASSUMING you have mac os on vmware or you have a real mac book.
download SIERRA OS from appstore.
after download finish.
create your bootable usb now.
insert your 8GB or 16GB USB
MAC OS Sierra 10.12.x
Instructions:
>Insert the USB drive
>Open /Applications/Utilities/Disk Utility
>Highlight the USB drive in left column
>Click on the Partition tab
>Click Current and choose 1 Partition
>Click Options
>Choose GUID Partition Table
>Name: type USB
>Format: choose Mac OS Extended Journaled
>Click Apply then Partition
>Open /Applications/Utilities/Terminal
>copy and paste this command and press enter
sudo /Applications/Install\ macOS\ Sierra.app/Contents/Resources/createinstallmedia --volume /Volumes/USB --applicationpath /Applications/Install\ macOS\ Sierra.app --nointeraction
download CLOVER boot loader r4091 - https://sourceforge.net/projects/cloverefiboot/
Steps on how to install clover.
>double click clover r4091
>select change install location > select your USB
>check the box for install UEFI booting only
>check the box for install Clvoer in the ESP
>check the box for themes
>click drop down driver64UEFI
>check the box OSxAptioFixDrv-64
>click install
now we need to install kext for booting process.
download and open clover configurator
click mount EFI put password (the password of your computer on vmware or realmac)
then open EFI folder or click finder then click EFI folder/Clover/Kext>Others > put all the kext that you download on my archive
[except intel_HD_Graphics unless you have the Intel Graphics 4200,4400,4600 you can put this driver]
"delete the default config.plist on EFI/Clover/config.plist"
next download config.plist on my archive (Laptop config master) depends on your graphics card.if you are using Intel Graphics 4200,4400,4600 you copy and paste it on EFI/Clover/here.
done.
----after creating a bootable usb-----
restart your computer and go to your bios setting if your bios is supported UEFI or legacy. just disable boot secure. and make sure your first boot is usb8gb or 16gb you created earlier.
ASSUMING The installation is Finish: INSTALLATION TIME 30mins-40mins maybe..
after installation on your laptop..
remove your bootable usb..
then download all the files on my archive..
install clover r3961 again this should be installed on your hard drive now.
>double click clover r3961
>select change install location > select your USB
>check the box for install UEFI booting only
>check the box for install Clvoer in the ESP
>check the box for themes
>click drop down driver64UEFI
>check the box EmuVariable-64
>check the box OSxAptioFix2Drv-64
>check the box install target VolumeRCscript
>click install
take note:
you cannot boot your desktop/laptop without usb.so you need to download clover EFI Boot loader so you can boot normally your computer.
Steps on how to boot without USB bootable drive..
open clover configuration
click mount EFI > click open partition.
open EFI/CLOVER/KEXT/Others>put all the kext that you download on my archive
[except intel_HD_Graphics unless you have the Intel Graphics 4200,4400,4600 you can put this driver]
open EFI/CLOVER copy & paste config.plist
now restart your computer without USB.
download multibeast sierra for drivers
you must select your drivers
finish!
NOTE:
To make your computer MAKES PERFECT.
PATCH YOUR NATIVE DSDT/SSDT came from linux or windows.
Easiest way to get native DSDT/SSDT from you hackintosh.
after you successfully install the os x and clover boot loader.
restart your computer if the clover boot appears press F4 to get your DSDT & SSDT it is located at EFI/Clover/ACPI/Origin
Tutorial for patching your ACPI files
Patching your DSDT 1st before SSDT.
copy this "Origin" folder anywhere.
make a folder on desktop any name
copy DSDT.aml and paste on the folder you created.
download and extract iasl51, macIASL and Laptop DSDT Patch Offline on my archive and put it all on the folder you created.
>open terminal
>drag and drop iasl51 on the terminal then type -da -dl dsdt.aml | then you will get DSDT.dsl
>open DSDT.dsl on macIASL
>click compile then you have to fix those errors [search it on google how to fix it]
>After fixing those errors.. click patch then..
some patch required.
"Fix _WAK Arg0 v2"
"HPET Fix"
"SMBUS Fix"
"IRQ Fix"
"RTC Fix"
"OS Check Fix"
"Fix Mutex with non-zero SyncLevel"
"Fix PNOT/PPNT" (use only if you're dropping CPU related SSDTs)
"Add IMEI" (do not use if your DSDT or SSDTs already have IMEI/HECI/MEI device)
after patch..click file then save as filename DSDT acpi machine language to desktop..
"ADDITONAL"
DOWNLOAD
CPU POWER MANAGEMENT for better performance = https://github.com/Piker-Alpha/ssdtPRGen.sh
to make USB 2.0 & 3.0 Working correctly = https://github.com/RehabMan/OS-X-USB-Inject-All
Battery status working = https://github.com/RehabMan/OS-X-ACPI-Battery-Driver
Thank you Mr.Rehabman for giving me a permission.
Credits to the owner of files MR. Rehabman.
i will try to update this thread
DO THIS AT YOUR OWN RISK!
I AM NOT RESPONSIBLE FOR ANY DAMAGE OF YOUR DESKTOP / LAPTOP.
View attachment 256530
Attachments
Last edited: