CLICK LIKE AND THANKS. AND ME UP SA FACEBOOK.
Facebook Account: https://www.facebook.com/ken.awtzyd
COMPONENTS AND SUPPLIES
View attachment 357119
View attachment 357120
View attachment 357121
ABOUT THIS PROJECT
I noticed a lot of people are getting interested with this tutorial. And I also noticed that this is terribly written. So I've added more info and notes a bit.
Connect your Arduino to the internet by adding ESP8266 WiFi Module!
The ESP8266 Wifi module is a complete Wi?Fi network where you can easily connect as a serving Wi- Fi adapter, wireless internet access interface to any microcontroller? based design on its simple connectivity through Serial Communication or UART interface.
Adding this module to your Arduino UNO will open you to more and exciting projects.
What is the process?
There are a lot of ways to use ESP866 for communication. Some may use it to send / receive data online or regularly upload data. For this tutorial I will just show you how can we communicate to Arduino wirelessly using your phone (Android or iPhone) . This will be done offline so no need to have internet connection.
Our ESP8266 will serve as Access Point (AP Mode), meaning it will provide access to Wi-Fi network to other devices (stations) and connects them further to a wired network
The process it pretty simple. Use your phone to send any command to Arduino. With the help of ESP8266, everything will work wirelessly.
View attachment 357122
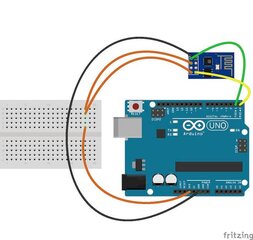
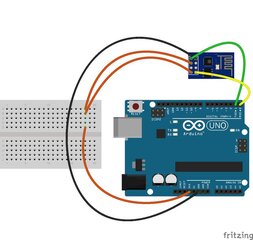
Built Circuit
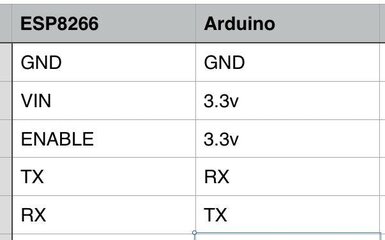
Connect the pins more described on this Pin table
View attachment 357123
Follow these steps.
connect the red wire to VIN(3.3V) to the +3.3V power from the microcontroller.
connect the black wire to the ground.
connect the green wire to the TX of the Wifi module and microcontroller
connect the yellow wite to the RX of the wifi module and microcontroller
View attachment 357124
About the circuit
ESP8266 is strictly powered only to 3.3 V. More that that will destroy the module.
IMPORTANT do not use voltages more than 3.3V!C
Connect the VIN to 3.3v to power up and also the ENABLE pin to enable the module.
TX is connected to RX which means whatever we want to Transmit in ESP8266 will Receive by Arduino UNO. And vise versa for RX to TX. Upon building this circuit, we now ready to start WIFI with Arduino UNO.
Talk to Module
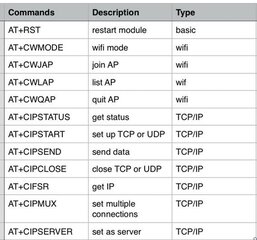
Communication with ESP8266 is via Attention Command or AT Commands.
View attachment 357125
View attachment 357126
Check the AT Commands table attached to review the codes.
Setting your board
Once everything is set up, you would notice that your ESP8266 Wifi will be available within the range of your phone.
1. Upload the sketch sample attached here to your Arduino UNO.
2. Download TCP Client for Android
You can down any TCP Client available in Play Store but I used https://play.google.com/store/apps/details?id=com.sollae.eztcpclient
From your phone, Connect to your ESP8266 Wifi
If your ESP8266 wifi is not displayed from available wifi networks, make sure your Arduino is running and everything is connected correctly. Usually the name of the wifi / ssid will start in ESP following its version name, mine is ESP11.
4. Once connected, get the Static IP address, you can check the IP by going to Wifi Settings of your phone, and click the network info.
The default IP Address in AP mode is 192.168.4.1 .
You can change the static IP by following this
https://www.arduino.cc/en/Reference/WiFiConfig reference.
Open TCP Client you downloaded earlier.
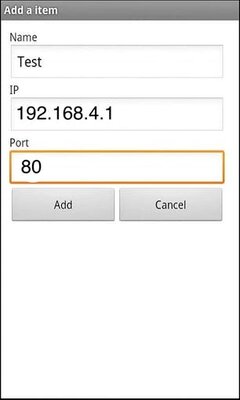
6. Create connection by clicking connect , Add IP and port 80.
80 is the port that I used for our ESP Server, but you can change it by replacing 80 to any port number you want from our code on line 23
View attachment 357127
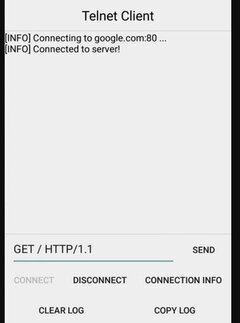
Wait for the TCP Console to say "Connected".
Once connected send request by typing the following code to TCP Client:
esp8266: <any AT Commands>
Or turn on built-in LED using command
LEDON
Or turn off built-in LED using command
LEDOFF
Or just say
HELLO
You can change what response from what you send depending on the logic you put into the code.
About the Code
There are different types of ESP8266. Please change the baud rate on the attached code on line 16 based on what your ESP8266 uses.
All our request will be read and parse on the loop() function
if(wifiSerial.available()>0){
String message = readWifiSerialMessage();
if(find(message,"esp8266:")){
String result = sendToWifi(message.substring(8,message.length()),responseTime,DEBUG);
if(find(result,"OK"))
sendData("\n"+result);
else
sendData("\nErrRead"); //At command ERROR CODE for Failed Executing statement
}else
if(find(message,"HELLO")){ //receives HELLO from wifi
sendData("\\nHI!"); //arduino says HI
}else if(find(message,"LEDON")){
digitalWrite(13,HIGH);
}else if(find(message,"LEDOFF")){
digitalWrite(13,LOW);
}
else{
sendData("\nErrRead"); //Command ERROR CODE for UNABLE TO READ
}
}
You can see from above that I used my function find(<received message>,<message you want to find> ) to interpret the message and to tell arduino which code to call.
If you want to communicate with Arduino UNO or ask todo something, just add your condition. for example :
if(find(message,"MY CODE")){
// I found 'MY CODE' from received message
// lets do something here
}
if(find(message,"A")){
// I found 'A' from received message
// lets do something here
}
I added some function to communicate with ESP8266.
/*
* Name: sendData
* Description: Function used to send string to tcp client using cipsend
* Params:
* Returns: void
*/
void sendData(String str){
String len="";
len+=str.length();
sendToWifi("AT+CIPSEND=0,"+len,responseTime,DEBUG);
delay(100);
sendToWifi(str,responseTime,DEBUG);
delay(100);
sendToWifi("AT+CIPCLOSE=5",responseTime,DEBUG);
}
/*
* Name: find
* Description: Function used to match two string
* Params:
* Returns: true if match else false
*/
boolean find(String string, String value){
if(string.indexOf(value)>=0)
return true;
return false;
}
/*
* Name: readSerialMessage
* Description: Function used to read data from Arduino Serial.
* Params:
* Returns: The response from the Arduino (if there is a reponse)
*/
String readSerialMessage(){
char value[100];
int index_count =0;
while(Serial.available()>0){
value[index_count]=Serial.read();
index_count++;
value[index_count] = '\0'; // Null terminate the string
}
String str(value);
str.trim();
return str;
}
/*
* Name: readWifiSerialMessage
* Description: Function used to read data from ESP8266 Serial.
* Params:
* Returns: The response from the esp8266 (if there is a reponse)
*/
String readWifiSerialMessage(){
char value[100];
int index_count =0;
while(wifiSerial.available()>0){
value[index_count]=wifiSerial.read();
index_count++;
value[index_count] = '\0'; // Null terminate the string
}
String str(value);
str.trim();
return str;
}
/*
* Name: sendToWifi
* Description: Function used to send data to ESP8266.
* Params: command - the data/command to send; timeout - the time to wait for a response; debug - print to Serial window?(true = yes, false = no)
* Returns: The response from the esp8266 (if there is a response)
*/
String sendToWifi(String command, const int timeout, boolean debug){
String response = "";
wifiSerial.println(command); // send the read character to the esp8266
long int time = millis();
while( (time+timeout) > millis())
{
while(wifiSerial.available())
{
// The esp has data so display its output to the serial window
char c = wifiSerial.read(); // read the next character.
response+=c;
}
}
if(debug)
{
Serial.println(response);
}
return response;
}
/*
* Name: sendToUNO
* Description: Function used to send data to UNO.
* Params: command - the data/command to send; timeout - the time to wait for a response; debug - print to Serial window?(true = yes, false = no)
* Returns: The response from the UNO (if there is a response)
*/
String sendToUno(String command, const int timeout, boolean debug){
String response = "";
Serial.println(command); // send the read character to the esp8266
long int time = millis();
while( (time+timeout) > millis())
{
while(Serial.available())
{
// The esp has data so display its output to the serial window
char c = Serial.read(); // read the next character.
response+=c;
}
}
if(debug)
{
Serial.println(response);
}
return response;
}
Thats it! Now that you've learn how to communicate with ESP8266, you may now explore more Internet of Things projects. Maximize the power of this WiFI module and be a Maker!. Feel free to add revisions on my github repo
CODE
ESP8266 Sample Communication with Arduino UNOC/C++
#include <SoftwareSerial.h>
SoftwareSerial wifiSerial(2, 3); // RX, TX for ESP8266
bool DEBUG = true; //show more logs
int responseTime = 10; //communication timeout
void setup()
{
pinMode(13,OUTPUT); //set build in led as output
// Open serial communications and wait for port to open esp8266:
Serial.begin(115200);
while (!Serial) {
; // wait for serial port to connect. Needed for Leonardo only
}
wifiSerial.begin(115200);
while (!wifiSerial) {
; // wait for serial port to connect. Needed for Leonardo only
}
sendToWifi("AT+CWMODE=2",responseTime,DEBUG); // configure as access point
sendToWifi("AT+CIFSR",responseTime,DEBUG); // get ip address
sendToWifi("AT+CIPMUX=1",responseTime,DEBUG); // configure for multiple connections
sendToWifi("AT+CIPSERVER=1,80",responseTime,DEBUG); // turn on server on port 80
sendToUno("Wifi connection is running!",responseTime,DEBUG);
}
void loop()
{
if(Serial.available()>0){
String message = readSerialMessage();
if(find(message,"debugEsp8266:")){
String result = sendToWifi(message.substring(13,message.length()),responseTime,DEBUG);
if(find(result,"OK"))
sendData("\nOK");
else
sendData("\nEr");
}
}
if(wifiSerial.available()>0){
String message = readWifiSerialMessage();
if(find(message,"esp8266:")){
String result = sendToWifi(message.substring(8,message.length()),responseTime,DEBUG);
if(find(result,"OK"))
sendData("\n"+result);
else
sendData("\nErrRead"); //At command ERROR CODE for Failed Executing statement
}else
if(find(message,"HELLO")){ //receives HELLO from wifi
sendData("\\nHI!"); //arduino says HI
}else if(find(message,"LEDON")){
//sending ph level:
digitalWrite(13,HIGH);
}else if(find(message,"LEDOFF")){
//sending ph level:
digitalWrite(13,LOW);
}
else{
sendData("\nErrRead"); //Command ERROR CODE for UNABLE TO READ
}
}
delay(responseTime);
}
/*
* Name: sendData
* Description: Function used to send string to tcp client using cipsend
* Params:
* Returns: void
*/
void sendData(String str){
String len="";
len+=str.length();
sendToWifi("AT+CIPSEND=0,"+len,responseTime,DEBUG);
delay(100);
sendToWifi(str,responseTime,DEBUG);
delay(100);
sendToWifi("AT+CIPCLOSE=5",responseTime,DEBUG);
}
/*
* Name: find
* Description: Function used to match two string
* Params:
* Returns: true if match else false
*/
boolean find(String string, String value){
if(string.indexOf(value)>=0)
return true;
return false;
}
/*
* Name: readSerialMessage
* Description: Function used to read data from Arduino Serial.
* Params:
* Returns: The response from the Arduino (if there is a reponse)
*/
String readSerialMessage(){
char value[100];
int index_count =0;
while(Serial.available()>0){
value[index_count]=Serial.read();
index_count++;
value[index_count] = '\0'; // Null terminate the string
}
String str(value);
str.trim();
return str;
}
/*
* Name: readWifiSerialMessage
* Description: Function used to read data from ESP8266 Serial.
* Params:
* Returns: The response from the esp8266 (if there is a reponse)
*/
String readWifiSerialMessage(){
char value[100];
int index_count =0;
while(wifiSerial.available()>0){
value[index_count]=wifiSerial.read();
index_count++;
value[index_count] = '\0'; // Null terminate the string
}
String str(value);
str.trim();
return str;
}
/*
* Name: sendToWifi
* Description: Function used to send data to ESP8266.
* Params: command - the data/command to send; timeout - the time to wait for a response; debug - print to Serial window?(true = yes, false = no)
* Returns: The response from the esp8266 (if there is a reponse)
*/
String sendToWifi(String command, const int timeout, boolean debug){
String response = "";
wifiSerial.println(command); // send the read character to the esp8266
long int time = millis();
while( (time+timeout) > millis())
{
while(wifiSerial.available())
{
// The esp has data so display its output to the serial window
char c = wifiSerial.read(); // read the next character.
response+=c;
}
}
if(debug)
{
Serial.println(response);
}
return response;
}
/*
* Name: sendToWifi
* Description: Function used to send data to ESP8266.
* Params: command - the data/command to send; timeout - the time to wait for a response; debug - print to Serial window?(true = yes, false = no)
* Returns: The response from the esp8266 (if there is a reponse)
*/
String sendToUno(String command, const int timeout, boolean debug){
String response = "";
Serial.println(command); // send the read character to the esp8266
long int time = millis();
while( (time+timeout) > millis())
{
while(Serial.available())
{
// The esp has data so display its output to the serial window
char c = Serial.read(); // read the next character.
response+=c;
}
}
if(debug)
{
Serial.println(response);
}
return response;
}
SCHEMATICS
Circuit https://halckemy.s3.amazonaws.com/uploads/attachments/322056/fm4or4dj4ofoi58_large_ZmmMDLmYHS.jpg
View attachment 357128
Just A Copy Paste Of Arduino Piso Wifi Hit Thanks If I Help.

