- Messages
- 147
- Reaction score
- 1
- Points
- 28
Hindi ka ba makalaro online sa Nintendo Switch o PlayStation 4 mo sa Prepaid or Postpaid Internet nyo mapa Globe, PLDT, o Converge?
Lagi bang NAT Type C or D (Switch) or Type 3 (PS4) and NAT Type mo pag nagra run ka ng "Test Connection"?
Nahihirapan ka ba mag setup ng Open NAT na may complicated steps or wala ka bang extra branded router?
Worry no more, aayusin natin yan para makapaglaro ka na ulit online!
There are actually 3 solutions to this issue, namely:
Simulan natin sa requirements:
Note: eto po ang Specs ng devices ko sa tutorial na ito, pero no worries kase gagana sya kahit naka PS4 ka or Pospaid ang Internet Subscription mo.
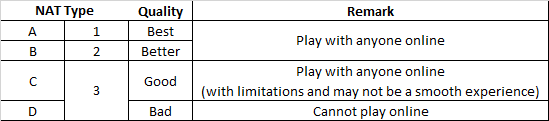
For reference, eto ang NAT Type Table and what we should expect:
Step 1 (Optional, to verify kung kelangan mo ba talaga gawin to): Test natin ang Speed, Qualitiy, at NAT Type ng Internet natin.
Do this if and only if hindi ka sure kung anong NAT Type meron pa but you still encounter difficulties playing online.
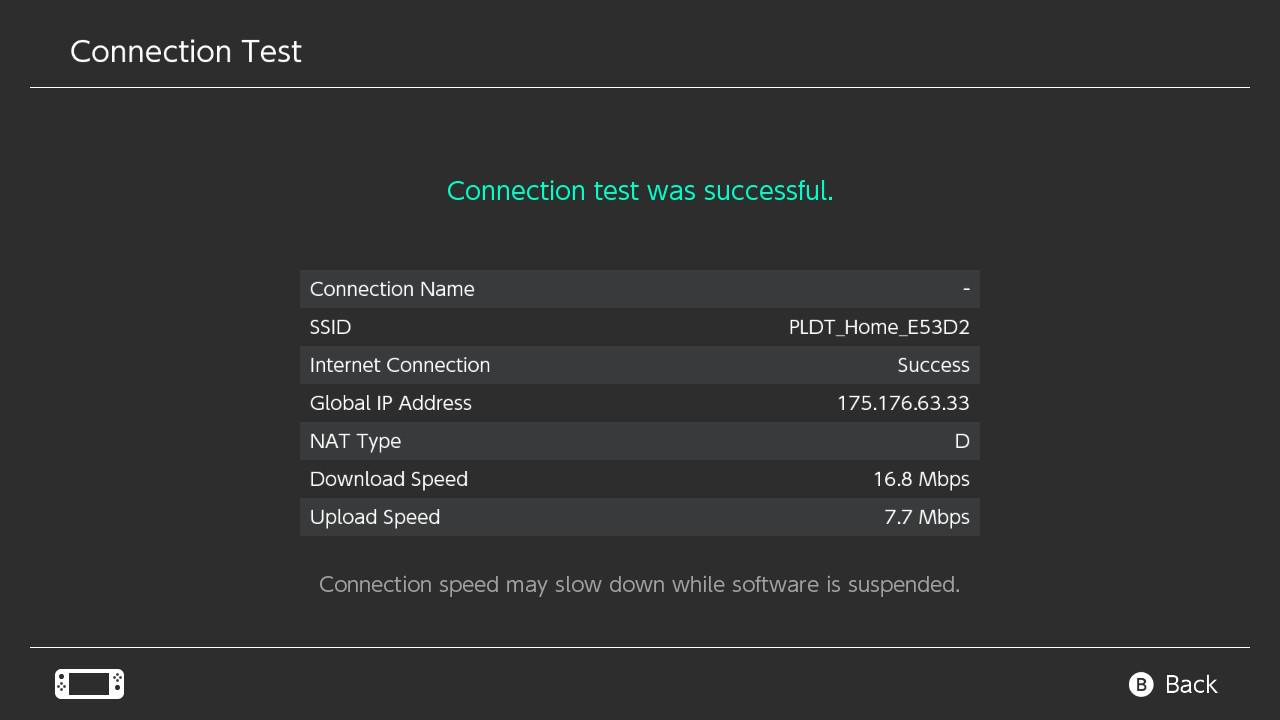
(via Nintendo Switch: 16.8 MBPS with NAT Type D)
Dito pa lang kita na agad natin na hindi na tayo makakapaglaro with others online like Splatoon! 2, Pokemon Sword & Shield, Animal Crossing: New Horizons, Mortal Kombat 11, and other games na may Online Play capability because we have the lowest and worst NAT Type we can expect (NAT Type D).
Step 2: Subscribe to a VPN Service.
So for us to work around the NAT Type C or D/3 issue na naglilimita sa atin para makapag laro online, we have to subscribe to a VPN Service. Why? Kase we can bypass the NAT Type Restriction using a VPN, For this one, i highly recommend PrivateVPN kase bukod sa mabilis at effective ang service nila, may Dedicated (Virtual) Server pa sila dito sa Pilipinas. This gives us better latency when playing online with others versus other VPN Service na kelangan pa natin mag connect to the nearest foreign server like in HongKong. On top of that mura pa ang subscription nila at only around PHP 382 per month (the longer term of subscription you avail, the bigger savings you can get up to 65%).
So, go to PrivateVPN using this link, create an account and avail a subscription. No need to worry kase if hindi mo magustuhan ang service nila, you can get your money back with their Money-back Guarantee protection. For starters, piliin natin yung 1 Month subscription. Pwede natin gamitin ang Debit Card, GCash, PayMaya, MVP, or Credit Cards for this purchase.
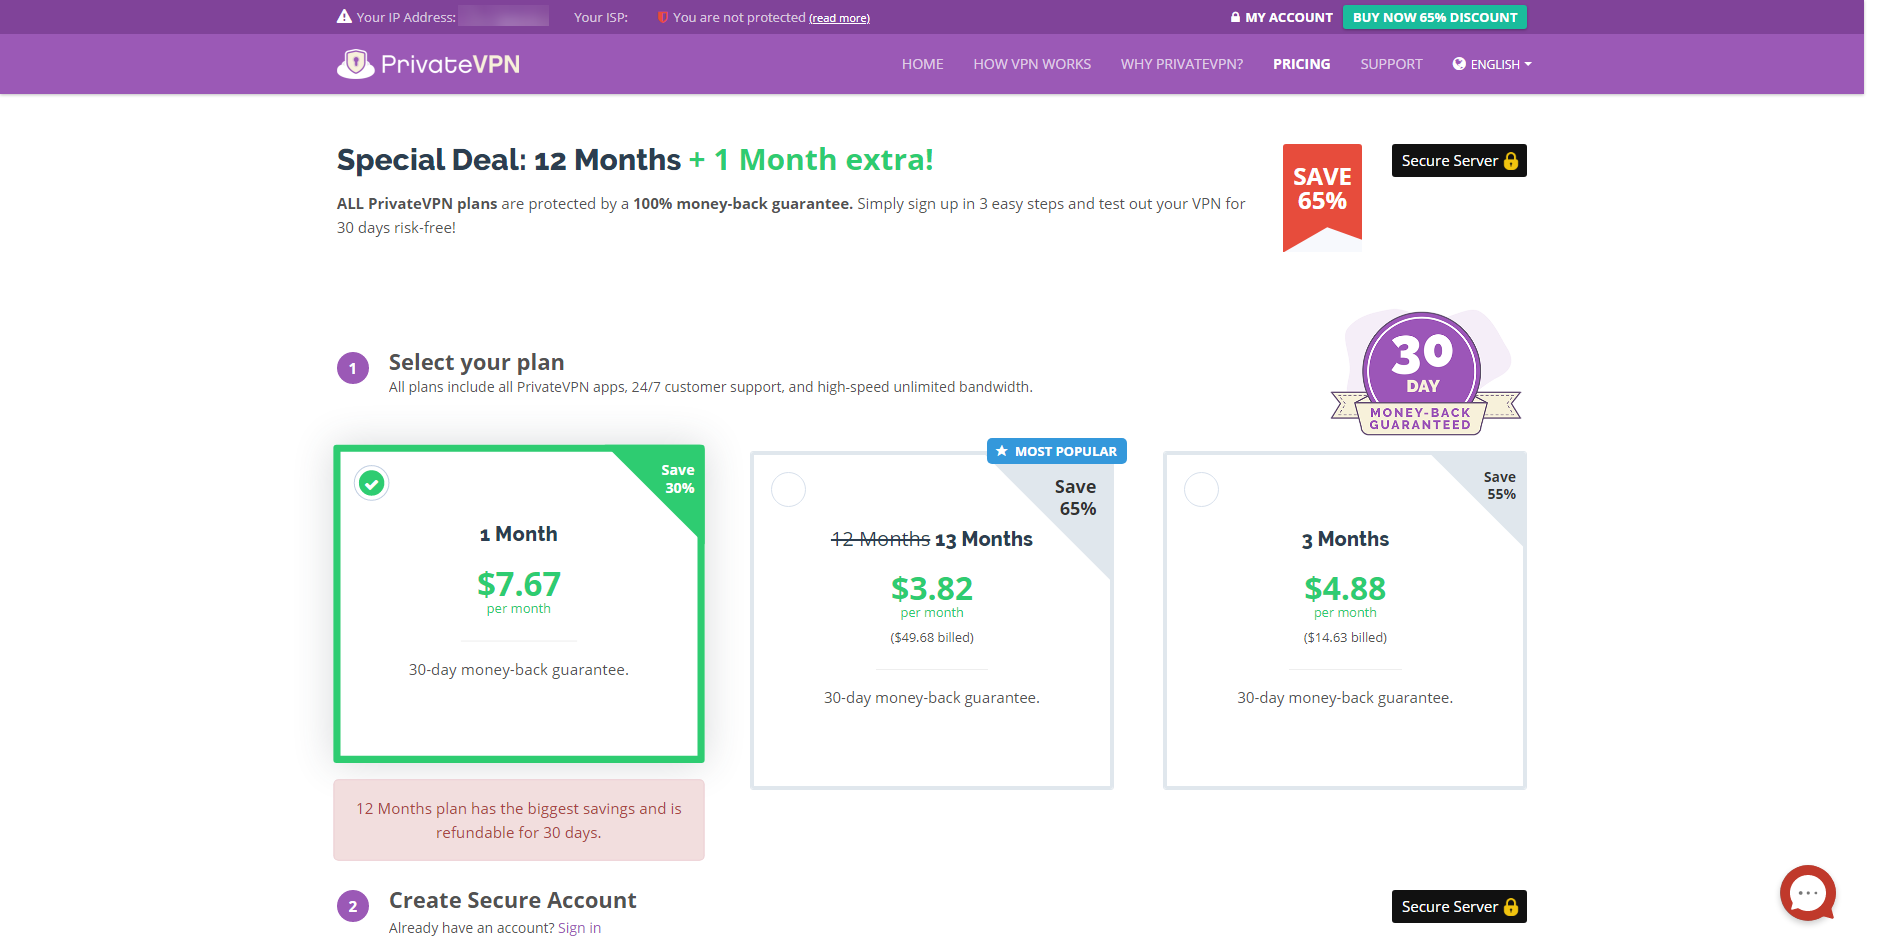
(To summarize: Select Plan, Create Account, and Pay.)
Step 3: Setup your Router with the VPN Credentials.
Once subscribed na tayo sa VPN Service ni PrivateVPN, we can now set it up sa Router ng Internet Modem natin. To do that, follow these simple steps:
PAP/CHAP Username: <username mo sa PrivateVPN>
PAP/CHAP Password: <password mo sa PrivateVPN>
Once entered, click nyo lang yung "Save" button and mag reboot si Router nyo.
Step 4: Reconnect to your WiFi
After nya mag reboot or restart, connect nyo ulit Nintendo Switch nyo and do another "Test Connection" procedure, this time we expect na mag change ang IP, NAT Type, and possibly ang Internet Speed natin.
Step 5: Enjoy playing online
Since ang NAT Type mo na ngayon is B then you're good to play online! Nothing to worry anymore
--
Ayun lang sya sa totoo lang haha. Sana naintindihan nyo instructions ko kahit medyo magulo (ngayon lang ulit ako gumawa tutorial after so many years). Let me know if may tanong kayo and i'll be more than glad to help ^^
P.S.: will edit more solutions bukas or the following days. pag maganda kinalabasan gawan ko video tutorial")
Lagi bang NAT Type C or D (Switch) or Type 3 (PS4) and NAT Type mo pag nagra run ka ng "Test Connection"?
Nahihirapan ka ba mag setup ng Open NAT na may complicated steps or wala ka bang extra branded router?
Worry no more, aayusin natin yan para makapaglaro ka na ulit online!
There are actually 3 solutions to this issue, namely:
- Kung naka Prepaid WiFi or Postpaid Internet Plan ka, proceed in reading and following this instructions.
- If meron kang branded Routers like ASUS, TPLink, Tenda, Newifi, D-Link, Cisco, at iba pa, follow this guide. [SOON]
- Pag naka mobile data ka lang sa phone mo at naka hotspot ka, sundan mo to. [SOON]
Simulan natin sa requirements:
- Good Internet Connection - i suggest internet speed of at least 5MBPS
- (Stock) Router Access - Dapat may access ka sa gateway portal ng Router mo
- VPN Subscription - Eto ang secret recipe para makawala tayo sa Restricted NAT Type natin
- Computer - Para hindi ka mahirap sa setup process natin. Pwede din naman na phone lang pero its your choice.
Note: eto po ang Specs ng devices ko sa tutorial na ito, pero no worries kase gagana sya kahit naka PS4 ka or Pospaid ang Internet Subscription mo.
- Internet: PLDT Home Prepaid WiFi (White Modem)
- Console: Nintendo Switch
For reference, eto ang NAT Type Table and what we should expect:
Step 1 (Optional, to verify kung kelangan mo ba talaga gawin to): Test natin ang Speed, Qualitiy, at NAT Type ng Internet natin.
Do this if and only if hindi ka sure kung anong NAT Type meron pa but you still encounter difficulties playing online.
(via Nintendo Switch: 16.8 MBPS with NAT Type D)
Dito pa lang kita na agad natin na hindi na tayo makakapaglaro with others online like Splatoon! 2, Pokemon Sword & Shield, Animal Crossing: New Horizons, Mortal Kombat 11, and other games na may Online Play capability because we have the lowest and worst NAT Type we can expect (NAT Type D).
Step 2: Subscribe to a VPN Service.
So for us to work around the NAT Type C or D/3 issue na naglilimita sa atin para makapag laro online, we have to subscribe to a VPN Service. Why? Kase we can bypass the NAT Type Restriction using a VPN, For this one, i highly recommend PrivateVPN kase bukod sa mabilis at effective ang service nila, may Dedicated (Virtual) Server pa sila dito sa Pilipinas. This gives us better latency when playing online with others versus other VPN Service na kelangan pa natin mag connect to the nearest foreign server like in HongKong. On top of that mura pa ang subscription nila at only around PHP 382 per month (the longer term of subscription you avail, the bigger savings you can get up to 65%).
So, go to PrivateVPN using this link, create an account and avail a subscription. No need to worry kase if hindi mo magustuhan ang service nila, you can get your money back with their Money-back Guarantee protection. For starters, piliin natin yung 1 Month subscription. Pwede natin gamitin ang Debit Card, GCash, PayMaya, MVP, or Credit Cards for this purchase.
(To summarize: Select Plan, Create Account, and Pay.)
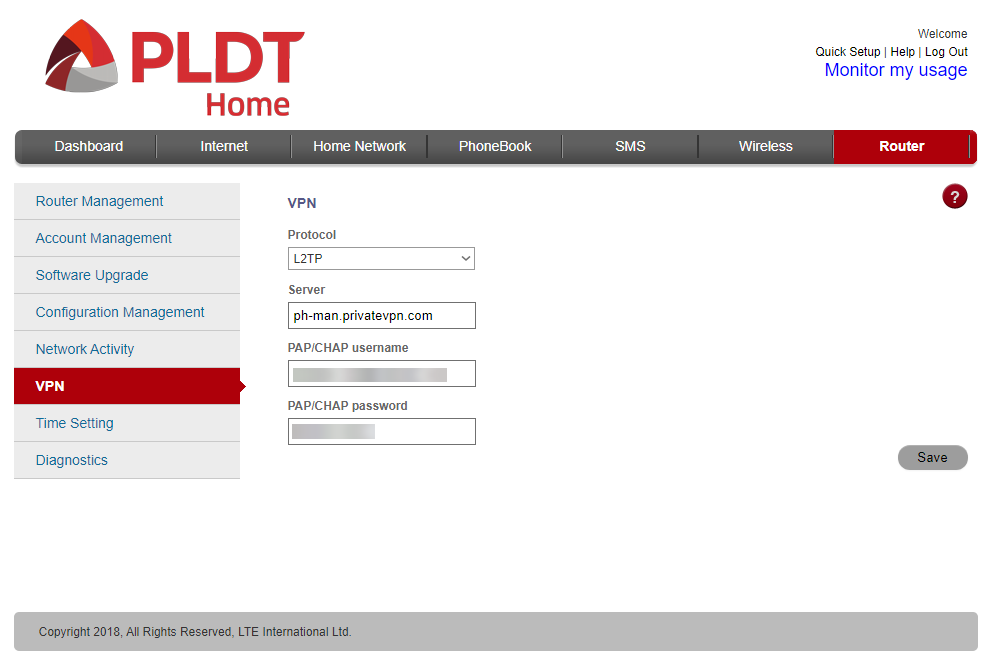
Step 3: Setup your Router with the VPN Credentials.
Once subscribed na tayo sa VPN Service ni PrivateVPN, we can now set it up sa Router ng Internet Modem natin. To do that, follow these simple steps:
- go to your router's gateway address (usually http://192.168.0.1) and login.
- go to your router's VPN Settings Page (usually nasa Router Tab or Security Tab). Change the protocol to L2TP and enter below information:
PAP/CHAP Username: <username mo sa PrivateVPN>
PAP/CHAP Password: <password mo sa PrivateVPN>
Once entered, click nyo lang yung "Save" button and mag reboot si Router nyo.
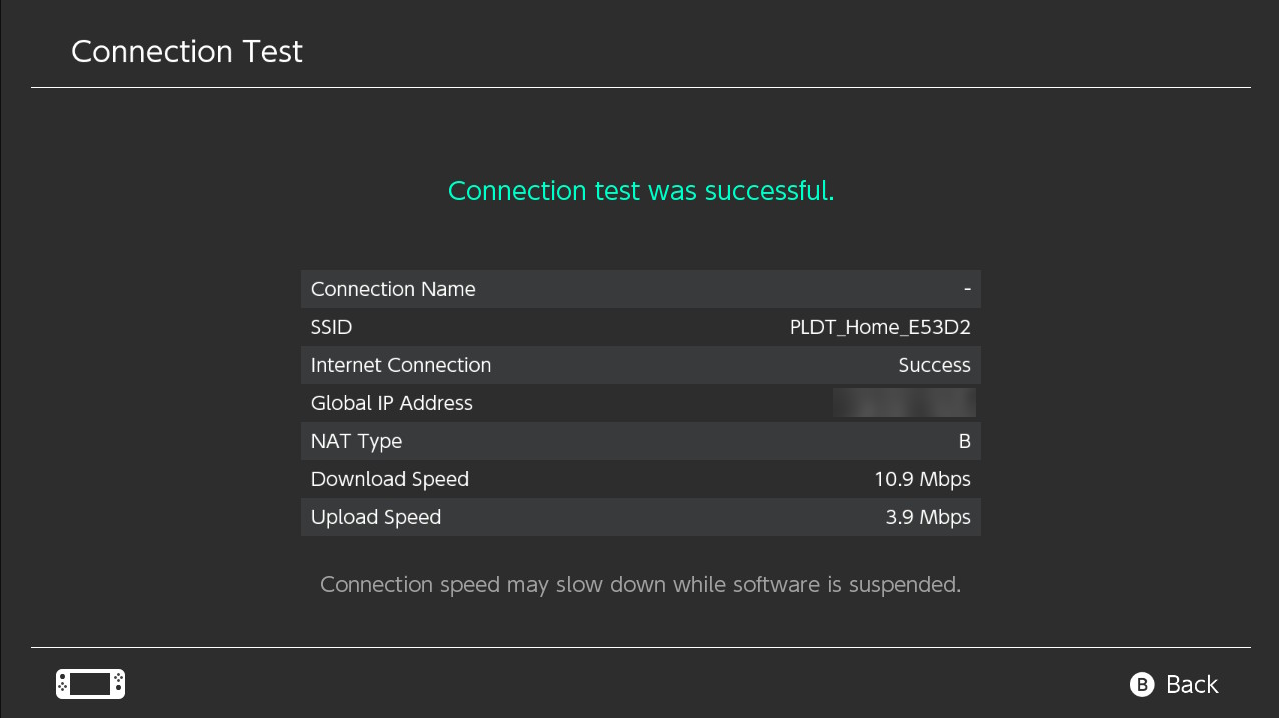
Step 4: Reconnect to your WiFi
After nya mag reboot or restart, connect nyo ulit Nintendo Switch nyo and do another "Test Connection" procedure, this time we expect na mag change ang IP, NAT Type, and possibly ang Internet Speed natin.
Step 5: Enjoy playing online
Since ang NAT Type mo na ngayon is B then you're good to play online! Nothing to worry anymore
--
Ayun lang sya sa totoo lang haha. Sana naintindihan nyo instructions ko kahit medyo magulo (ngayon lang ulit ako gumawa tutorial after so many years). Let me know if may tanong kayo and i'll be more than glad to help ^^
P.S.: will edit more solutions bukas or the following days. pag maganda kinalabasan gawan ko video tutorial
Last edited:
")