- Messages
- 83
- Reaction score
- 0
- Points
- 26
pulot lang po ito mga ka SB tried and tested. credit to author Max Lee
Root Method #1 – CWM Root Method (Root + CWM recovery
This root method is for the following Galaxy S5 models:
SM-G900T T-Mobile Galaxy S5
SM-G900P Sprint Galaxy S5
SM-G900R4 US Cellular Galaxy S5
SM-G900T1 Metro PCS Galaxy S5
SM-G900W8 Canadian Galaxy S5
SM-G900F International/European/Asian Galaxy S5
SM-G900M Middle East/South America Galaxy S5
SM-G900H International Exynos Galaxy S5
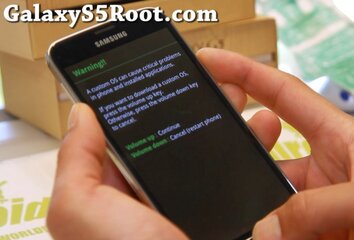
Step 1. Power off your Galaxy S5. Then hold down Volume Down, Center Home, and Power buttons together for about 3-5 seconds until you see a warning screen like shown below:
View attachment 192154
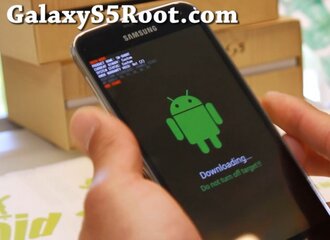
Step 2. Hit Volume Up and you should see “Downloading…” screen like below
View attachment 192155
Step 3. Next connect a USB 2.0 micro-USB cable from your Galaxy S5 to your computer.
View attachment 192156
Step 4. You will need to download the following three files, ODIN, Philz Touch CWM recovery, and SuperSU:
http://stockroms.net/file/Tools/ODIN/Odin3v185.zip
http://galaxys5root.com/cwmtwrp-recovery/
http://downloadandroidrom.com/file/tools/SuperSU/UPDATE-SuperSU-v1.94.zip
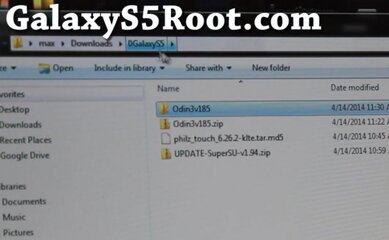
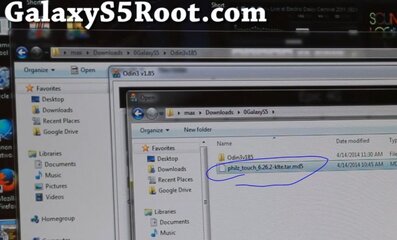
Once downloaded, unzip the Odin3v185.zip and you should get a folder with executable EXE program. DO NOT UNZIP other files, leave them in their zip file states.
View attachment 192157
View attachment 192158
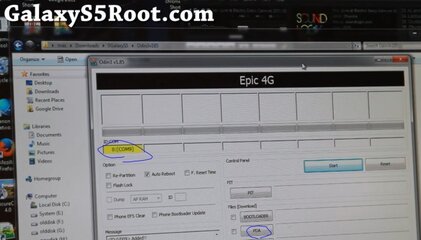
Step 5. Double-click on the file “odin3 v1.85.exe” to start the ODIN program. You should see a yellow-highlighted box with a random COM number. If you do see this, you are good to go. If you don’t see it, you need to install Samsung USB drivers. Download and run the Samsung Galaxy S5 USB Driver program,reboot and repeat this Step.
http://androiddrivers.net/samsung-android-drivers/download-galaxy-s5-windows-drivers/
View attachment 192159
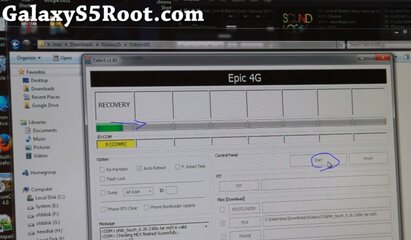
Step 6. Next, choose “PDA” button and find the Philz Touch CWM recovery file you downloaded earlier
View attachment 192160
Step 7. Click on “Start” and you should see Philz Touch CWM recovery being flashed to your Galaxy S5.
View attachment 192161
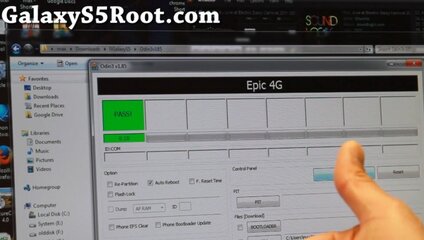
Step 8. If you see “PASS!”, that means CWM recovery has been successfully flashed and your S5 should be rebooting now.
View attachment 192162
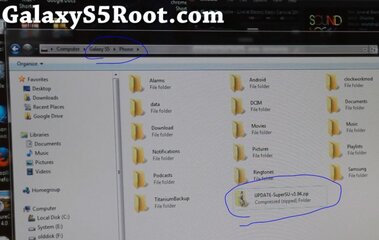
Step 9. Once rebooted, copy over the SuperSU zip file to anywhere on your Galaxy S5 internal storage.
View attachment 192163
Step 10. Power off your S5 again. Then hold down Volume Up, Center Home, and Power buttons together for around 3-5 seconds until you see “RECOVERY BOOTING” at the top-left of your screen. If you see that, let go of all the buttons.
Step 11.You should now be in Philz Touch CWM recovery. Choose “Install Zip”.
Step 12. Next, choose “Choose zip from /sdcard”.
Step 13. Next choose the SuperSU zip file you copied over earlier. This is the actual file that will root your Galaxy S5.
Step 14. Once done, simply reboot your Galaxy S5
Step 15. Once rebooted, you should see a new app called “SuperSU”. Tap on it to run.
Step 16. Choose “OK” when SuperSU asks you to disable KNOX. KNOX is an idiotic Samsung security that you really don’t need and will interrupt your root like an annoying sister who wakes you up in the middle of the night. Just disable it and get on with your life. (We should really petition to get Samsung to completely remove KNOX.)
Step 17. Once KNOX has been zapped, your Galaxy S5 should be free and 100% rooted. You can download and run any rooted app such as Titanium Backup app (which I highly recommend for backing up your apps as it will also backup your app data) and find the Superuser request window. If you see this, congratulations! You have fully rooted 100% Galaxy S5, go show off to your non-rooted friends with boring lives.
Q&A:
Q: Does this root method erase everything on my Galaxy S5?
A: No, it does not, both root methods on this page will root your Galaxy S5 and keep all of your data in-tact.
Q: Does this root method trip KNOX?
A: Yes, both root methods on this page trip KNOX, which is used by Samsung to void warranty. However, if you have insurance, they should replace your phone regardless if something goes wrong and I highly recommend you have phone insurance if this is the first time rooting an Android device.
Q: I don’t get CWM Recovery, I just see stock recovery after flashing CWM with ODIN!!!
A: On some S5 models, there is a script that overwrites the recovery you flashed. If you get stock recovery, just simply flash recovery again using method 1, as soon as you see “PASS!”, pull the battery before your phone reboots.
Put the battery back in and boot straight into CWM recovery, then when you reboot in CWM recovery, it will ask you to disable recovery script. Do that and you should be good to go.
Sana nakatulong pa ito.. tnx lang oks na oks na sakin... weee.. happy rooting your Samsung Galaxy S5
- - - Updated - - -
working po ito.. ito ginamit ko sa S5 ko. feedback lang kung nakatulng.
Root Method #1 – CWM Root Method (Root + CWM recovery
This root method is for the following Galaxy S5 models:
SM-G900T T-Mobile Galaxy S5
SM-G900P Sprint Galaxy S5
SM-G900R4 US Cellular Galaxy S5
SM-G900T1 Metro PCS Galaxy S5
SM-G900W8 Canadian Galaxy S5
SM-G900F International/European/Asian Galaxy S5
SM-G900M Middle East/South America Galaxy S5
SM-G900H International Exynos Galaxy S5
Step 1. Power off your Galaxy S5. Then hold down Volume Down, Center Home, and Power buttons together for about 3-5 seconds until you see a warning screen like shown below:
View attachment 192154
Step 2. Hit Volume Up and you should see “Downloading…” screen like below
View attachment 192155
Step 3. Next connect a USB 2.0 micro-USB cable from your Galaxy S5 to your computer.
View attachment 192156
Step 4. You will need to download the following three files, ODIN, Philz Touch CWM recovery, and SuperSU:
http://stockroms.net/file/Tools/ODIN/Odin3v185.zip
http://galaxys5root.com/cwmtwrp-recovery/
http://downloadandroidrom.com/file/tools/SuperSU/UPDATE-SuperSU-v1.94.zip
Once downloaded, unzip the Odin3v185.zip and you should get a folder with executable EXE program. DO NOT UNZIP other files, leave them in their zip file states.
View attachment 192157
View attachment 192158
Step 5. Double-click on the file “odin3 v1.85.exe” to start the ODIN program. You should see a yellow-highlighted box with a random COM number. If you do see this, you are good to go. If you don’t see it, you need to install Samsung USB drivers. Download and run the Samsung Galaxy S5 USB Driver program,reboot and repeat this Step.
http://androiddrivers.net/samsung-android-drivers/download-galaxy-s5-windows-drivers/
View attachment 192159
Step 6. Next, choose “PDA” button and find the Philz Touch CWM recovery file you downloaded earlier
View attachment 192160
Step 7. Click on “Start” and you should see Philz Touch CWM recovery being flashed to your Galaxy S5.
View attachment 192161
Step 8. If you see “PASS!”, that means CWM recovery has been successfully flashed and your S5 should be rebooting now.
View attachment 192162
Step 9. Once rebooted, copy over the SuperSU zip file to anywhere on your Galaxy S5 internal storage.
View attachment 192163
Step 10. Power off your S5 again. Then hold down Volume Up, Center Home, and Power buttons together for around 3-5 seconds until you see “RECOVERY BOOTING” at the top-left of your screen. If you see that, let go of all the buttons.
Step 11.You should now be in Philz Touch CWM recovery. Choose “Install Zip”.
Step 12. Next, choose “Choose zip from /sdcard”.
Step 13. Next choose the SuperSU zip file you copied over earlier. This is the actual file that will root your Galaxy S5.
Step 14. Once done, simply reboot your Galaxy S5
Step 15. Once rebooted, you should see a new app called “SuperSU”. Tap on it to run.
Step 16. Choose “OK” when SuperSU asks you to disable KNOX. KNOX is an idiotic Samsung security that you really don’t need and will interrupt your root like an annoying sister who wakes you up in the middle of the night. Just disable it and get on with your life. (We should really petition to get Samsung to completely remove KNOX.)
Step 17. Once KNOX has been zapped, your Galaxy S5 should be free and 100% rooted. You can download and run any rooted app such as Titanium Backup app (which I highly recommend for backing up your apps as it will also backup your app data) and find the Superuser request window. If you see this, congratulations! You have fully rooted 100% Galaxy S5, go show off to your non-rooted friends with boring lives.
Q&A:
Q: Does this root method erase everything on my Galaxy S5?
A: No, it does not, both root methods on this page will root your Galaxy S5 and keep all of your data in-tact.
Q: Does this root method trip KNOX?
A: Yes, both root methods on this page trip KNOX, which is used by Samsung to void warranty. However, if you have insurance, they should replace your phone regardless if something goes wrong and I highly recommend you have phone insurance if this is the first time rooting an Android device.
Q: I don’t get CWM Recovery, I just see stock recovery after flashing CWM with ODIN!!!
A: On some S5 models, there is a script that overwrites the recovery you flashed. If you get stock recovery, just simply flash recovery again using method 1, as soon as you see “PASS!”, pull the battery before your phone reboots.
Put the battery back in and boot straight into CWM recovery, then when you reboot in CWM recovery, it will ask you to disable recovery script. Do that and you should be good to go.
Sana nakatulong pa ito.. tnx lang oks na oks na sakin... weee.. happy rooting your Samsung Galaxy S5
- - - Updated - - -
working po ito.. ito ginamit ko sa S5 ko. feedback lang kung nakatulng.
Attachments
-
 howto-root-galaxys5-1-690x469.jpg56.4 KB · Views: 21
 -
 howto-root-galaxys5-2-690x503.jpg51 KB · Views: 12
 -
 howto-root-galaxys5-3-690x487.jpg48.1 KB · Views: 10
 -
 howto-root-galaxys5-4-690x404.jpg42 KB · Views: 38
 -
 howto-root-galaxys5-5-690x426.jpg47.4 KB · Views: 31
 -
 howto-root-galaxys5-6-690x394.jpg62.7 KB · Views: 67
 -
 howto-root-galaxys5-7-690x418.jpg68.1 KB · Views: 47
 -
 howto-root-galaxys5-8-690x403.jpg65.6 KB · Views: 48
 -
 howto-root-galaxys5-9-690x391.jpg62.1 KB · Views: 35
 -
 howto-root-galaxys5-10-690x437.jpg66.2 KB · Views: 43
