- Messages
- 15
- Reaction score
- 0
- Points
- 16
"Iruna Pinoy Alternative Guild"
Recruiting Place: Rokoko City, Server 2 (Flammel)
View attachment 169763
Official FB: https://www.facebook.com/groups/irunapinoyalternative/
Free slotted "Red Scarf" (Agi+5 Evasion +10) for all new guild members (For Symbianize mem only!!!). Just say who you are here in symbianize on Guild Chat.
Below are some helpful guides on playing Iruna Online.
----------------------------------------------------------------------------------------------------------------------------------------------------------------------
Leveling Guide:
Level 1-30
So this is pretty easy: Just kill the Monsters you can kill, preferably solo, or let Friends kill Things for you. This is sad, but it's the most efficient Way. You could also get help with the Main Mission.
Or you could start killing Baums as early as possible, why? You will understand if you read further.
Level 30-40+
Now you can do the Quest named "Impromptu Arrows".
The Rewards are 7500 EXP and 1000 Spina, if you do it by handing in the Items I recommend.
It wants you to hand in 30 Broken Staves.
You can get those by either killing Baums at Rokoko Plains, or by killing Dedrons at Starfall Road, though Dedrons are much harder to kill than Baums.
You can accept the Quest from Nepherta, she is located at the The Guild in Soya City here is a Picture (you have to enter the Consulate then turn right):
Alternatively:
Now you can do the Quest named "The Forgotten Cave".
The Rewards are 4 800 EXP and 3 Revita(M).
It wants you to kill 30 Skeletons in the Forgotten Cave.
You can accept the Quest from Venia, he is located at Rokoko Plains here is a Picture:
Level 40-50+
I recommend you to keep doing the Impromptu Arrows quest until you reach Level 50 below there is an alternative Way
Now you can do two Quests in Combination.
One is named "The Winged Serpent".
The Rewards are 6 500 EXP and 1 000 Spina.
It wants you to kill 30 Coatls in Rokoko Windhole Lower Level.
You can accept the Quest from Fia, she is located at Diel Village.
The other Quest is named "Mysterious Underground Fish".
The Rewards are 7 000 EXP and 12 Revita(M).
It wants you to kill 30 Argoteus, they are in the same Map as the Coatls.
You can accept the Quest from Seryn, she's next to Fia.
(Not sure about Genders and if Argoteus needs lvl 45, let me know)
Both Quests sum up to 13 500 EXP, 1 000 Spina and 12 Revita(M).
Alternatively you can GRIND Coatls(~450EXP), or Flame Rockers(~950EXP), they are in the Scorched Tunnels.
Here is a Picture of Fia and Seryn:
Level 50-80+
Let me start with the QUESTS first.
RECOMMENDED
Army of Darkness
Level 50 is required
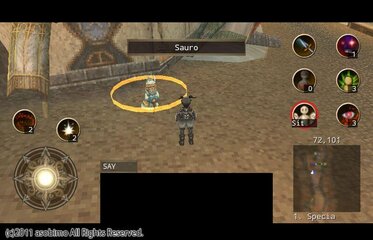
Where to obtain: Sauro at Wibo City
What to do: Kill Zolban, Bongea, Hydra and Burnos once
Move from Wibo City to Teschen Highlands (Zolban),head to Karue Reef but pass by Hydra and go to Zalm Desert (Bongea), head back to Karue Reef (Hydra) and finally to Rolba Flatlands (Burnos).
Reward: 64 500 EXP and 2 Sauro Medals
Here is a Picture of Sauro:
Alternatives
Rampant Fiery Beasts
Level 50 is required
Where to obtain: Villager at Lunite Village
What to do: Kill 20 Itzamnas and 15 Flame Rockers
They can be found in the Scorched Tunnels.
Reward: 10 000 EXP and 10 Regera(XS)
Floating Island Beasts
Level 55 is needed
Where to obtain: Villager at Lunite Village
What to do: Kill 30 Harpies and 30 Griffins
They can be found in the Floating Island.
Reward: 32 000 EXP and 5 ★Lunite Village
Here is a Picture of the Villager:

And then there's the GRIND Monsters:
RECOMMENDED
Minotaur (Boss)
Level: 76
EXP: 7000
HP: 30000
Location:

Alternatives
Kijimu
Level: 50 51
EXP: 625 647
HP: ~2890
DEF: 214 220
Location: Floating Island
Dark Warrior
Level: 55 56
EXP: 3267 3375
HP: ~27000
Location: Dark Wasteland, Dark Mansion
Dark Soldier
Level: 54 55 56
EXP: 574 594 613
HP: 1945 2075 2115
Location: Dark Mansion F1,F2,F3
Porge
Level: 66 68
EXP: 828 875
HP: 2350 2420
Location: Wind Cave F2,F3
Level 80-120+
Now we are getting somewhere!
It's time for the BEST Quest/s for EXP for quite a While!
Where do you get it from: Inje Enclave
Who to talk to?
Well there are two Quests you can accept, the first one requires Level 80, the second one Level 100.
The first Quest can be obtained from Inje Man and it wants you to do the following:
Awaiting the Goddess
Kill:
30 Albreros
30 Ganoschkas
30 Leopards
OPTIONAL: 1 False Grecia
Rewards:
280 000 EXP and 2 Regera(S)
With False Grecia: 355 000 EXP and 2 Regera(S)
Here is a Picture of Inje Man:

The second Quest can be obtained from Kubron and it wants you to do the following:
Enemies of the Inje Level 100 required
Kill:
50 Albreros
10 Leopards
20 Ganoschkas
Rewards:
81 000 EXP and 5 Regera(M) OR 3 Vita Plus(M)
A good Party Setup would be:
1 Wizard to penetrate F Grecia's Defense Layers
1 Cleric to buff and heal
1 Hunter to cure Poison and Paralysis
1 Knight to tank
Alternatives
Evil Vibes (Medusa Variant Solo!, Cleric/Wizard or high MDEF recommended)
Level Requirement: 70+ (As a Cleric 100+, you need Holy Light as a Wizard 80+, you need the MDEF)
Where to obtain: Cleil, Saterica City: President's Office
What to do: Kill 50 Medusas
They can be found at Morga Zone.
Rewards: 138 000 EXP
Opis (High MDEF recommended)
Level:137 138 139
EXP: 3604 3655 3706
Location: Tower of Zebul: Level 1,Level 2, Level 4
So why kill these? They drop Revita L, and give great XP for less Work compared to Dark Warriors if you have enough MDEF they barely deal any serious Damage to you.
Fradar (Cleric or Light Element user recommended)
Level: 139 140
EXP: 3369 3416
Location: Tower of Zebul: Level 3, Level 4
Their Weakness is the Light Element so have fun spamming these down with Holy Light if you just can't find a party for ATG or you want to level up alone as a Cleric, this is a great Way to do so.
If you have an Arrow of Light for Example you can make use of this and kill them with an elemental Advantage but Hunters aren't limited to a mediocre Damage Skill like Clerics so it's up to your Decision.
Level 120+
"The new ATG"
The Quest can be obtained from Shekto in the Maze of Enzeits (Underground Level 4)
Snake in the Maze
Kill:
99 Naga (Do not kill 30 only!)
Rewards:
410 000 EXP and 2 Revita(L) OR 1 Magic Jar(Cold)
Here is a Picture of Shekto:

Alternative
Level 130+
Wayward Golems
Location: Capital City Elban
The Quest is given by Ralul on the open Field.
Rewards: 450 000 EXP and 1 Binal(L)
What to do: Collect 50 Broken Magic Engines and 10 Magic Engines
You can find these Items from the Monsters called Ghoulie and Advanced Ghoulie. They can be found in the Dikkit Sector, you will reach the Dikkit Sector by simply taking the North Exit. The Boss is on the Southeast of the Dikkit Sector. It's Weakness is the Fire Element, try to make use of this.
Here is a Picture of Ralul:

Level 70+ possible
You can only level up faster than ATG in one possible Way now as far as I know.
You have to get a higher EXP/Time Ratio than ATG, this is very hard to achieve and I know of only one possible Way to do this. (If you're not using EXP Boosters that is.)
Location: Capital City Saterica
The Quest is given by Cleil in the Consulate, it's the central Building of Saterica, you basically can't miss it.
Rewards: 181 000 or 164 000 or 138 000 EXP
What to do: Kill 50 Baphomets, 50 Evil Swords or 50 Medusae (Medusa recommended)
These Monsters can be found at Morga Zone, head towards the East starting from Saterica, go to the North and then to the Northwest.
In order to get better EXP/Time you need to kill as fast as possible, thus getting more EXP/Time due to the shorter traveling Time compared to ATG.
Bishops will find themselves deal tremendous Damage to all of the Monsters here because their Weakness is the Light Element.
You can make use of this Fact even further by having a Paladin in your Party (He can be a DPS Build as long as your Party manages to survive) who Buffs up Attacks, enabling Auto Attackers (possibly Arrow Rain Hunters too) to deal ridiculous Damage against these Monsters.
It all comes down to the simple Fact that you are able to kill faster with 3rd Job Apprenticeships, you must use this Advantage if you want to gain more EXP.
You can mix and match the Party though this is my recommended Setup:
1 Bishop (Just him-/herself)
1 Gladiator(Any DPS Build)
1 Paladin (DPS Build preferred)
1 Arrow Rain Sniper (Just him-/herself, that is if Gloria boosts Arrow Rain)
Here is a Picture of Cleil:

Popular Quest Experience
Level 30+
NPC: Viena, Rokoko Plains
The Forgotten Cave
Skeleton × 30
Reward: Experience 4800, Revita M × 3
Level 30+
NPC: Nepherta, Capital City of Sofya
Impromptu Arrows
Collect one of the following, Kijimu Thorn x30, Broken Staff x30 or Bird Wing x30
Reward: 1000 Spina
Experience 2500: Kijimu Thorn
Experience 7500: Broken Staff
Experience 2300: Bird Wing
Level 40+
NPC: Fia, Diel Village
The Winged Serpent
Coatl× 30
Reward: Experience 6500, 1,000 Spina
Level 40+
NPC: Seryn, Diel Village
Mysterious Underground Fish
Argoteus × 30
Reward: Experience 7000, Revita M × 12
Level 45+
NPC: Zarla, Nidea Coast
Fisherman's Fury
Shelfie × 25, Toritorn x25
Reward: Experience 9200, Vaccine (paralysis) × 1 or 2,300 Spina
Level 50+
NPC: Seryn, Diel Village
Golems and Scorpians
Stone Golem x20, Scorpia x10
Reward: Experience 9000, ★ Diel Village x5
Level 50+
NPC: Villager, Lunite Village
Rampant Fiery Beasts
Flame Rocker × 15, Itzamna x20
Reward: 10000 experience, Rijeru (bi) × 10
Level 50+
NPC: Sauro, Wibo City
Army of Darkness
Brunos × 1, Hydra × 1, Bongea × 1, Zolban x1
Reward: Experience 64500, Medal × 2
Level 55+
NPC: Villager, Lunite Village
Floating Island Beasts
Harpy × 30, Griffin x30
Reward: Experience 32000, ★ Lunite Village x5
Level 60-100
NPC: Sitara, Keyla
Refining
Vespa × 30, Zepluth × 30, Dessert Crab x30
Reward: Experience 67000, Rijeru (medium) × 2
Level 60+
NPC: Neryl, Karue Reef
Broscher ×30
Reward: Experience 6500
Level 60+
NPC: Isuza, Zalm Desert
Peril in the Sand
Sand Snake × 20, Genomille x10
Reward: 13500 experience, Revitalizing sake × 1 or specialties Revitalizing liquor × 1
Level 65+
NPC: Lufan, Teschen Highlands
Dispel the Dark Forces!
Dark Knight x10, Death × 10 & Vilde x10
Reward: 20000 experience
Level 70+
NPC: Cleil, Capital Saterica
Evil Vibes
Baphomet × 50 or Evil Sword × 50 or × 50 Medusa
Reward: Baphomet 181000
experience, Evil Sword 164000 experience, Medusa 138000 experience, Poison Knife × 1 or Vaccine x5 (???) or Magic Jar (cold water) × 1
Level 70+
NPC: Inje Man, Inje Enclave
Mole Fighting
Mole × 50
Reward: Experience 40000, Magic Lamp × 1 or Sapphire × 1
Level 80+
NPC: Zarla, Nidea Coast
Repair Work Gear
Broken Parts × 30 & Broken Engine × 30
Reward: 33000 experience, Revita L × 3
Level 80+
NPC: Inje Man, Inje Enclave
Awaiting the Goddess
Albrero × 30, Ganoschka × 30, Leopard × 30, False Grecia x1
Reward: Regera S × 2, experience 355000, (if you do not defeat false Grecia, experience 280000)
Level 100+
NPC: Kubron, Inje Enclave
Enemies of the Inje
Albrero × 50, Leopard × 10, × 20 Ganoschka
Reward: 81000 experience, Rijeru M × 5 or Vita Plus M × 3
Level 120+
NPC: Shekto, Maze of Enzeits
Snake in the Maze
Naga × 30 or Naga × 99
Reward: Naga x30: Experience 120000, Revita L × 1
Naga × 99: Experience 410000, Revita L × 2 or Magic Jar (cold) × 1
Level 120+
NPC: Kunst, Maze of Enzeits
Safety Rope in the Maze
Tough Vine × 30
Reward: Experience 55000, ★ Maze of Enzeits × 1
Level 130+
NPC: Ralul, Capital city Elban
Wayward Golems
Broken Magic Engine × 50, Magic Engine x10
Reward: Experience 450000, Binal (L)× 1
Level 150+
NPC: Hasuteru, Homunculus City
Monster of the Valley
Rutato × 60, Effects x 60, Embryo × 60
Reward: Experience 940000, Tree Nuts x3 or Medicinal Mushroom x5
Level 170+
NPC: Suigetsu, Minaula City
Monster Attack Plan
Rat Samurai x50, Bear Samurai x40, Gator Samurai x30, Crow Samurai x20
Reward: Experience 670000, Salt x10, Dango x15, Rice x20, ◇ Suigetsu
Level 170+
NPC: Levia, Pub: Rainbow Butterfly - Spargas Harbor
Jail Break
Ripreza x30, Polti x30 and Kyon x30
Reward: Experience 530000, Revitalizing (Giant) × 6 or Revita L × 20
Level 170+
NPC: Ornel the Blacksmith, Spargas Harbor
Rare Metal
Bumble x30, Sloan x30, Rassegarel x30, Garel x1
Reward: Experience 740000, Mithril ×2 or Damascus steel ×4 or Hematite x8
Level 170+
NPC: Ulde, Dierolt: The Inner Depths
Makeshift Armor
Hard Armor Piece x90, Zimov x1
Reward: Experience 450000 (If you do not defeat Zimov, Experience 290000)
Level 180+
NPC: Levia, Pub: Rainbow Butterfly - Spargas Harbor
Snowy Mountain Battle
Hard colon ×60, Redres ×30, Madness ×10, Rossam x1
Reward: Experience 630000, Ring without a Gem × 1 or Revitalizing (small) × 10
PLEASE Hit if this guide is helpful!!!
- - - Updated - - -
Refining Guide
○ - High Chance
△ - Low Chance
For a slotted item, refining value tends to decrease on failure. (-2 decrease in a 1 slotted equipment, -3 decrease in a 2 slotted equipment)
Success rate of refining is higher in the order of Hematite, Damascus steel, Mythril, Orichalcum.
You can also Smelt Ores at certain Blacksmiths which can be used for Upgrades or Refining.
Iron to +4 refining. (It can not be used to +4 or more)
Wrought iron to +5 refining. (It can not be used to +5 or more)
High Mithril to +6 refining. (It can not be used to +6 or more)
Hihiirokane to +7 refining. (It can not be used to +7 or more)
On refining of Additional Equipment and Armor there is an added bonus of +1% Damage reduction as well as the defence boost* you gain. This can max total at +18% Damage Reduction by having both items +9
On refining of Weapon there is an added attack bonus which can be viewed in your status*
Recruiting Place: Rokoko City, Server 2 (Flammel)
View attachment 169763
Official FB: https://www.facebook.com/groups/irunapinoyalternative/
Free slotted "Red Scarf" (Agi+5 Evasion +10) for all new guild members (For Symbianize mem only!!!). Just say who you are here in symbianize on Guild Chat.
Below are some helpful guides on playing Iruna Online.
----------------------------------------------------------------------------------------------------------------------------------------------------------------------
Leveling Guide:
Level 1-30
So this is pretty easy: Just kill the Monsters you can kill, preferably solo, or let Friends kill Things for you. This is sad, but it's the most efficient Way. You could also get help with the Main Mission.
Or you could start killing Baums as early as possible, why? You will understand if you read further.
Level 30-40+
Now you can do the Quest named "Impromptu Arrows".
The Rewards are 7500 EXP and 1000 Spina, if you do it by handing in the Items I recommend.
It wants you to hand in 30 Broken Staves.
You can get those by either killing Baums at Rokoko Plains, or by killing Dedrons at Starfall Road, though Dedrons are much harder to kill than Baums.
You can accept the Quest from Nepherta, she is located at the The Guild in Soya City here is a Picture (you have to enter the Consulate then turn right):
Alternatively:
Now you can do the Quest named "The Forgotten Cave".
The Rewards are 4 800 EXP and 3 Revita(M).
It wants you to kill 30 Skeletons in the Forgotten Cave.
You can accept the Quest from Venia, he is located at Rokoko Plains here is a Picture:
Level 40-50+
I recommend you to keep doing the Impromptu Arrows quest until you reach Level 50 below there is an alternative Way
Now you can do two Quests in Combination.
One is named "The Winged Serpent".
The Rewards are 6 500 EXP and 1 000 Spina.
It wants you to kill 30 Coatls in Rokoko Windhole Lower Level.
You can accept the Quest from Fia, she is located at Diel Village.
The other Quest is named "Mysterious Underground Fish".
The Rewards are 7 000 EXP and 12 Revita(M).
It wants you to kill 30 Argoteus, they are in the same Map as the Coatls.
You can accept the Quest from Seryn, she's next to Fia.
(Not sure about Genders and if Argoteus needs lvl 45, let me know)
Both Quests sum up to 13 500 EXP, 1 000 Spina and 12 Revita(M).
Alternatively you can GRIND Coatls(~450EXP), or Flame Rockers(~950EXP), they are in the Scorched Tunnels.
Here is a Picture of Fia and Seryn:
Level 50-80+
Let me start with the QUESTS first.
RECOMMENDED
Army of Darkness
Level 50 is required
Where to obtain: Sauro at Wibo City
What to do: Kill Zolban, Bongea, Hydra and Burnos once
Move from Wibo City to Teschen Highlands (Zolban),head to Karue Reef but pass by Hydra and go to Zalm Desert (Bongea), head back to Karue Reef (Hydra) and finally to Rolba Flatlands (Burnos).
Reward: 64 500 EXP and 2 Sauro Medals
Here is a Picture of Sauro:
Alternatives
Rampant Fiery Beasts
Level 50 is required
Where to obtain: Villager at Lunite Village
What to do: Kill 20 Itzamnas and 15 Flame Rockers
They can be found in the Scorched Tunnels.
Reward: 10 000 EXP and 10 Regera(XS)
Floating Island Beasts
Level 55 is needed
Where to obtain: Villager at Lunite Village
What to do: Kill 30 Harpies and 30 Griffins
They can be found in the Floating Island.
Reward: 32 000 EXP and 5 ★Lunite Village
Here is a Picture of the Villager:
And then there's the GRIND Monsters:
RECOMMENDED
Minotaur (Boss)
Level: 76
EXP: 7000
HP: 30000
Location:
Alternatives
Kijimu
Level: 50 51
EXP: 625 647
HP: ~2890
DEF: 214 220
Location: Floating Island
Dark Warrior
Level: 55 56
EXP: 3267 3375
HP: ~27000
Location: Dark Wasteland, Dark Mansion
Dark Soldier
Level: 54 55 56
EXP: 574 594 613
HP: 1945 2075 2115
Location: Dark Mansion F1,F2,F3
Porge
Level: 66 68
EXP: 828 875
HP: 2350 2420
Location: Wind Cave F2,F3
Level 80-120+
Now we are getting somewhere!
It's time for the BEST Quest/s for EXP for quite a While!
Where do you get it from: Inje Enclave
Who to talk to?
Well there are two Quests you can accept, the first one requires Level 80, the second one Level 100.
The first Quest can be obtained from Inje Man and it wants you to do the following:
Awaiting the Goddess
Kill:
30 Albreros
30 Ganoschkas
30 Leopards
OPTIONAL: 1 False Grecia
Rewards:
280 000 EXP and 2 Regera(S)
With False Grecia: 355 000 EXP and 2 Regera(S)
Here is a Picture of Inje Man:
The second Quest can be obtained from Kubron and it wants you to do the following:
Enemies of the Inje Level 100 required
Kill:
50 Albreros
10 Leopards
20 Ganoschkas
Rewards:
81 000 EXP and 5 Regera(M) OR 3 Vita Plus(M)
A good Party Setup would be:
1 Wizard to penetrate F Grecia's Defense Layers
1 Cleric to buff and heal
1 Hunter to cure Poison and Paralysis
1 Knight to tank
Alternatives
Evil Vibes (Medusa Variant Solo!, Cleric/Wizard or high MDEF recommended)
Level Requirement: 70+ (As a Cleric 100+, you need Holy Light as a Wizard 80+, you need the MDEF)
Where to obtain: Cleil, Saterica City: President's Office
What to do: Kill 50 Medusas
They can be found at Morga Zone.
Rewards: 138 000 EXP
Opis (High MDEF recommended)
Level:137 138 139
EXP: 3604 3655 3706
Location: Tower of Zebul: Level 1,Level 2, Level 4
So why kill these? They drop Revita L, and give great XP for less Work compared to Dark Warriors if you have enough MDEF they barely deal any serious Damage to you.
Fradar (Cleric or Light Element user recommended)
Level: 139 140
EXP: 3369 3416
Location: Tower of Zebul: Level 3, Level 4
Their Weakness is the Light Element so have fun spamming these down with Holy Light if you just can't find a party for ATG or you want to level up alone as a Cleric, this is a great Way to do so.
If you have an Arrow of Light for Example you can make use of this and kill them with an elemental Advantage but Hunters aren't limited to a mediocre Damage Skill like Clerics so it's up to your Decision.
Level 120+
"The new ATG"
The Quest can be obtained from Shekto in the Maze of Enzeits (Underground Level 4)
Snake in the Maze
Kill:
99 Naga (Do not kill 30 only!)
Rewards:
410 000 EXP and 2 Revita(L) OR 1 Magic Jar(Cold)
Here is a Picture of Shekto:
Alternative
Level 130+
Wayward Golems
Location: Capital City Elban
The Quest is given by Ralul on the open Field.
Rewards: 450 000 EXP and 1 Binal(L)
What to do: Collect 50 Broken Magic Engines and 10 Magic Engines
You can find these Items from the Monsters called Ghoulie and Advanced Ghoulie. They can be found in the Dikkit Sector, you will reach the Dikkit Sector by simply taking the North Exit. The Boss is on the Southeast of the Dikkit Sector. It's Weakness is the Fire Element, try to make use of this.
Here is a Picture of Ralul:
Level 70+ possible
You can only level up faster than ATG in one possible Way now as far as I know.
You have to get a higher EXP/Time Ratio than ATG, this is very hard to achieve and I know of only one possible Way to do this. (If you're not using EXP Boosters that is.)
Location: Capital City Saterica
The Quest is given by Cleil in the Consulate, it's the central Building of Saterica, you basically can't miss it.
Rewards: 181 000 or 164 000 or 138 000 EXP
What to do: Kill 50 Baphomets, 50 Evil Swords or 50 Medusae (Medusa recommended)
These Monsters can be found at Morga Zone, head towards the East starting from Saterica, go to the North and then to the Northwest.
In order to get better EXP/Time you need to kill as fast as possible, thus getting more EXP/Time due to the shorter traveling Time compared to ATG.
Bishops will find themselves deal tremendous Damage to all of the Monsters here because their Weakness is the Light Element.
You can make use of this Fact even further by having a Paladin in your Party (He can be a DPS Build as long as your Party manages to survive) who Buffs up Attacks, enabling Auto Attackers (possibly Arrow Rain Hunters too) to deal ridiculous Damage against these Monsters.
It all comes down to the simple Fact that you are able to kill faster with 3rd Job Apprenticeships, you must use this Advantage if you want to gain more EXP.
You can mix and match the Party though this is my recommended Setup:
1 Bishop (Just him-/herself)
1 Gladiator(Any DPS Build)
1 Paladin (DPS Build preferred)
1 Arrow Rain Sniper (Just him-/herself, that is if Gloria boosts Arrow Rain)
Here is a Picture of Cleil:
Popular Quest Experience
Level 30+
NPC: Viena, Rokoko Plains
The Forgotten Cave
Skeleton × 30
Reward: Experience 4800, Revita M × 3
Level 30+
NPC: Nepherta, Capital City of Sofya
Impromptu Arrows
Collect one of the following, Kijimu Thorn x30, Broken Staff x30 or Bird Wing x30
Reward: 1000 Spina
Experience 2500: Kijimu Thorn
Experience 7500: Broken Staff
Experience 2300: Bird Wing
Level 40+
NPC: Fia, Diel Village
The Winged Serpent
Coatl× 30
Reward: Experience 6500, 1,000 Spina
Level 40+
NPC: Seryn, Diel Village
Mysterious Underground Fish
Argoteus × 30
Reward: Experience 7000, Revita M × 12
Level 45+
NPC: Zarla, Nidea Coast
Fisherman's Fury
Shelfie × 25, Toritorn x25
Reward: Experience 9200, Vaccine (paralysis) × 1 or 2,300 Spina
Level 50+
NPC: Seryn, Diel Village
Golems and Scorpians
Stone Golem x20, Scorpia x10
Reward: Experience 9000, ★ Diel Village x5
Level 50+
NPC: Villager, Lunite Village
Rampant Fiery Beasts
Flame Rocker × 15, Itzamna x20
Reward: 10000 experience, Rijeru (bi) × 10
Level 50+
NPC: Sauro, Wibo City
Army of Darkness
Brunos × 1, Hydra × 1, Bongea × 1, Zolban x1
Reward: Experience 64500, Medal × 2
Level 55+
NPC: Villager, Lunite Village
Floating Island Beasts
Harpy × 30, Griffin x30
Reward: Experience 32000, ★ Lunite Village x5
Level 60-100
NPC: Sitara, Keyla
Refining
Vespa × 30, Zepluth × 30, Dessert Crab x30
Reward: Experience 67000, Rijeru (medium) × 2
Level 60+
NPC: Neryl, Karue Reef
Broscher ×30
Reward: Experience 6500
Level 60+
NPC: Isuza, Zalm Desert
Peril in the Sand
Sand Snake × 20, Genomille x10
Reward: 13500 experience, Revitalizing sake × 1 or specialties Revitalizing liquor × 1
Level 65+
NPC: Lufan, Teschen Highlands
Dispel the Dark Forces!
Dark Knight x10, Death × 10 & Vilde x10
Reward: 20000 experience
Level 70+
NPC: Cleil, Capital Saterica
Evil Vibes
Baphomet × 50 or Evil Sword × 50 or × 50 Medusa
Reward: Baphomet 181000
experience, Evil Sword 164000 experience, Medusa 138000 experience, Poison Knife × 1 or Vaccine x5 (???) or Magic Jar (cold water) × 1
Level 70+
NPC: Inje Man, Inje Enclave
Mole Fighting
Mole × 50
Reward: Experience 40000, Magic Lamp × 1 or Sapphire × 1
Level 80+
NPC: Zarla, Nidea Coast
Repair Work Gear
Broken Parts × 30 & Broken Engine × 30
Reward: 33000 experience, Revita L × 3
Level 80+
NPC: Inje Man, Inje Enclave
Awaiting the Goddess
Albrero × 30, Ganoschka × 30, Leopard × 30, False Grecia x1
Reward: Regera S × 2, experience 355000, (if you do not defeat false Grecia, experience 280000)
Level 100+
NPC: Kubron, Inje Enclave
Enemies of the Inje
Albrero × 50, Leopard × 10, × 20 Ganoschka
Reward: 81000 experience, Rijeru M × 5 or Vita Plus M × 3
Level 120+
NPC: Shekto, Maze of Enzeits
Snake in the Maze
Naga × 30 or Naga × 99
Reward: Naga x30: Experience 120000, Revita L × 1
Naga × 99: Experience 410000, Revita L × 2 or Magic Jar (cold) × 1
Level 120+
NPC: Kunst, Maze of Enzeits
Safety Rope in the Maze
Tough Vine × 30
Reward: Experience 55000, ★ Maze of Enzeits × 1
Level 130+
NPC: Ralul, Capital city Elban
Wayward Golems
Broken Magic Engine × 50, Magic Engine x10
Reward: Experience 450000, Binal (L)× 1
Level 150+
NPC: Hasuteru, Homunculus City
Monster of the Valley
Rutato × 60, Effects x 60, Embryo × 60
Reward: Experience 940000, Tree Nuts x3 or Medicinal Mushroom x5
Level 170+
NPC: Suigetsu, Minaula City
Monster Attack Plan
Rat Samurai x50, Bear Samurai x40, Gator Samurai x30, Crow Samurai x20
Reward: Experience 670000, Salt x10, Dango x15, Rice x20, ◇ Suigetsu
Level 170+
NPC: Levia, Pub: Rainbow Butterfly - Spargas Harbor
Jail Break
Ripreza x30, Polti x30 and Kyon x30
Reward: Experience 530000, Revitalizing (Giant) × 6 or Revita L × 20
Level 170+
NPC: Ornel the Blacksmith, Spargas Harbor
Rare Metal
Bumble x30, Sloan x30, Rassegarel x30, Garel x1
Reward: Experience 740000, Mithril ×2 or Damascus steel ×4 or Hematite x8
Level 170+
NPC: Ulde, Dierolt: The Inner Depths
Makeshift Armor
Hard Armor Piece x90, Zimov x1
Reward: Experience 450000 (If you do not defeat Zimov, Experience 290000)
Level 180+
NPC: Levia, Pub: Rainbow Butterfly - Spargas Harbor
Snowy Mountain Battle
Hard colon ×60, Redres ×30, Madness ×10, Rossam x1
Reward: Experience 630000, Ring without a Gem × 1 or Revitalizing (small) × 10
PLEASE Hit
if this guide is helpful!!!- - - Updated - - -
Refining Guide
○ - High Chance
△ - Low Chance
| +1 | +2 | +3 | +4 | +5 | +6 | +7 | +8 | +9 | |
| Hematite | ○ | ○ | ○ | ○ | △ | ||||
| Damascus Steel | ○ | ○ | △ | ||||||
| Mythril | ○ | △ | |||||||
| Orichalcum | ○ | △ |
For a slotted item, refining value tends to decrease on failure. (-2 decrease in a 1 slotted equipment, -3 decrease in a 2 slotted equipment)
Success rate of refining is higher in the order of Hematite, Damascus steel, Mythril, Orichalcum.
You can also Smelt Ores at certain Blacksmiths which can be used for Upgrades or Refining.
Iron to +4 refining. (It can not be used to +4 or more)
Wrought iron to +5 refining. (It can not be used to +5 or more)
High Mithril to +6 refining. (It can not be used to +6 or more)
Hihiirokane to +7 refining. (It can not be used to +7 or more)
On refining of Additional Equipment and Armor there is an added bonus of +1% Damage reduction as well as the defence boost* you gain. This can max total at +18% Damage Reduction by having both items +9
On refining of Weapon there is an added attack bonus which can be viewed in your status*
Attachments


Last edited:
") ?
?
")


 up-up-up-up