- Messages
- 505
- Reaction score
- 0
- Points
- 126
[TUT]Setup a SOHO(Small Office/Home Office) or Computer Shop Network
This tutorial helps you to build a Simple Network either SOHO(Small Office/Home Office) or Computer Shop
I've noticed that somebody still don't know how to setup network even a simple, so this would serves your guide or a manual. I hope that this tutorial would be informative to you.

Equipments you need:
Switch (not Hub, they're different)
Router
Ethernet UTP Cat5 cable w/ rj45 (or Cat5e or Cat6 cable for Gigabit connection)
PC Units
Crimp Tool
LAN Cable Tester
Procedures:
1.) Structured Cabling

- The 1st thing you need to perform so you have a better preparation is to create first a Type of Ethernet Cable together with rj45 crimping. Just create a Straighthrough type because you'll just link another devices. Here's some guides.
Just Refer to Straighthrough cable
(Crossover cable will be used when same devices are attached)
(In rj45 crimping just search a tutorial on youtube)
(After you create, verify it if your cables are running fine by using your LAN cable tester,. just make sure you know how the LAN cable tester works.)
(Crimp and create cables as many as you needed for you Local Area Network including all the PC units connected to switch.)
2.) Installation (step by step)
- First of all, you need to have a DSL line from the ISP, to have an internet connection. right? I'm sure alam mo na yun.
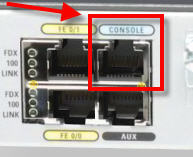
- Now let's install first the cable from the ISP to the WAN of the router(located at the back)
For Example:

- Kung makita mo may WAN port sa likod ng router referring to the example above. Ang cable line ng galing sa ISP(DSL line) mo ay e attach mo dyan sa WAN port ng router. Ok? Gets?
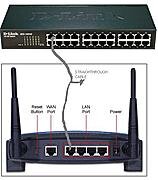
- Now, router to switch connection naman. Get a one piece of straighthrough type cable na ginawa mo. make sure ok ang cable ha and its working fine. Ang gawin mo, ang isang dulo ng Ethernet cable (the rj45) ay e attach mo sa LAN port ng router na nasa likod at ang isang dulo ng Ethernet cable(rj45) ay attach mo sa LAN port ng Switch na nasa likod nito. Just like an example below.
- And lastly, the installation of cables from your Switch to End User Devices(PC Units). First, Kumuha ka na naman ng Straightthrough cables to link the PC units to your switch. Referring on the example screens on the switch above. Ang gawin mo ang isang dulo ng Ethernet cable (rij45) ay attach mo in one ports of your switch na nasa likod niya at ang isang dulo naman ng Ethernet cable(rj45) ay e attach mo sa NIC(Network Interface Card) na naka locate sa likod ng system unit ng PC's. just like this.

- Ok? getch? After that, proceed tayo in configuration.
3.) Configuration
- Login to your Router Web GUI
* To access inside your Router Web GUI. Check your manuals kung ano default IP address ng router niyo. Or either you can check it the manufacturer website online regarding your router login details.
* Type the default ip address of your router at the address bar of your web browsers(IE, firefox, chrome) then press enter.
- Then we'll proceed to our router configuration for able to communicate the router to end-user devices or they called it Routing. Explain ko muna shortly two types of routing in a simple Local Area Network. The common used by everybody is either Static or Dynamic(DHCP) configuration. And I'll let you choose whether what would you like to use for your network,. and analyze what's best routing good for management.
In a Static configuration, you'll be able to assigned the ip address on the end-user devices MANUALLY. So ibig sabihin every PC's ay kailangan mo e input bawat IP address nila for them to communicate. For example kay PC1 -> e input mo sa TCP/IP properties niya 192.168.2.100 kay PC2 -> e input mo ang 192.168.2.110..
Now in Dynamic(DHCP) configuration, if once you enabled or configured the DHCP config inside the router, it will able to assigned ip address to the end-user devices dynamically or depends if the user requests an ip address into DHCP server/from the router, the router will grant the user an usable IP address.
Okay,. I'll give you guides on how to configure Static or DHCP(Dynamic) configuration. first take a look at these image serves as your guide.
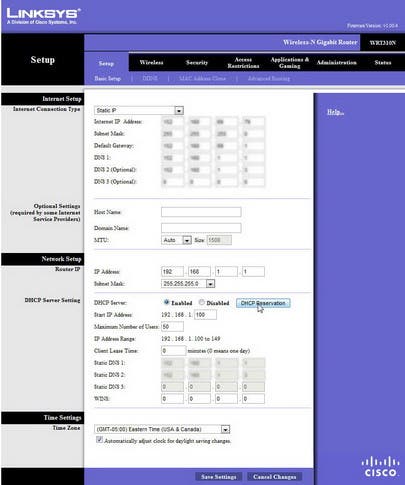
STATIC
- Now kung gusto mo mag static, at the image above, set mo ang radio button ng DHCP server into Disabled
- Now first on routing, is to set your Default Gateway Address. serves as the IP address of your router. Kung makikita mo sa image on the Network Setup, Router ID and Subnet Mask, the purpose of gateway is to let the end user devices grant their request when they want to access some public websites, the gateway will be their open doors to process outside the Local Area Network.
Guide:
* Router ID = 192.168.1.1
* Subnet Mask = 255.255.255.0
Set Static: (refer to the example image above)
* Internet Connection Type = Static IP
* Internet IP address = (binigay sayo ng ISP mo) (take note pwede ka humingi ng detalye nito sa ISP mo, bibigyan ka nyan nila)
* Subnet Mask = (binigay sayo ng ISP mo)
* Default Gateway = (bigay sayo ng ISP mo)
* DNS = (optional) it could be the DNS address given by your ISP or pwede rin gamitin mo ang IP address ng router mo for DNS address. depends on you.
- Now click Save Settings below
Okay, on PC Client Units.

- Set the radio button to Use the following IP address
* IP address = 192.168.1.10(take note, all of your PC units must be in line with your network address 192.168.1.1 that you set on the router -> Network Setup, that's why I start the ip address into 192.168.1.10 and so on to the another PC units.)
* Subnet Mask = 255.255.255.0
* Default Gateway = 192.168.1.1
* DNS Address = (optional pwede yung binigay sa ISP mo or yung ip address ng default gateway, depends on you)
* Click Ok and Save
* Now verify mo kung maka communicate na ba ang PC client na yan sa router mo? to verify. just use ping sa command prompt.
example: ping 192.168.1.1 <- ip add ng router, pag success. okay!
ping google.com <- verify kung maka ping ka sa public sites
type also this on command prompt -> ipconfig /all
para makita mo details ng IP address mo without going TCP/IP properties
at pag okay na ang verification, then good. at ikaw na bahala mag assign manually sa ibang PC units mo dapat in-line sa network kung mas mabuti sundan mo na lang yung starting ip address ko which 192.168.1.10 then .11, .12 and so on to another units.
Set DHCP Configuration(Dynamic):
Refer to example image above, to set DHCP server:
Yung network setup, router ID and Subnet Mask is still the same na nasa configure ng static.(the ip address of the router)
* Internet Connection Type = Dynamic/DHCP (kung wala hayaan mo na lang)
* DHCP Server Setting = set the radio button into Enabled
* Start IP address = 192.168.1.100
* Maximum Host users = 50 (depende kung gaano kadami PC clients mo dyan. mas maganda kung gaano kadami ang PC clients mo jan dagdagan mo ng allowance ng Maximum host users mo for future purposes and to prevent conflict addresses) so for example may 20 units ka jan then make it twice 40 Maximum Host users.
* Client Least time = 0
* Static DNS = (optional either the ISP DNS address or your IP address of your router)
* Click Save Settings
On PC client unit:
* Open Command Prompt
* Type ipconfig /all kung may existing ip address,. kung meron ito gawin mo.
- Type ipconfig /release
- Type ipconfig /renew (it will give the user an ip address)
- Type ipconfig /flushdns
- Type ipconfig /all (for details)
- Type ping 192.168.1.1 (for verification)
- Type ping google.com
* Pag Okay ang results and then you're good to go, same procedure pa rin gawin mo sa ibang PC client unit. ikaw na bahala.
* Pag wala naman existing IP address after you enter ipconfig /all, pwede ka na magshort cut dito.
- Type ipconfig /renew (it will give the user an ip address)
- Type ipconfig /flushdns
- Type ipconfig /all (for details)
- Type ping 192.168.1.1 (for verification)
- Type ping google.com
- Now we're done

- Welcome

Update: We can discuss here your concerns related on this tutorial. Just feel free to ask and I can assist you
Attachments
Last edited:
")