- Messages
- 196
- Reaction score
- 0
- Points
- 26
Hello guys, I've returned with more information to share. Enjoy!
Did you know that you can play on ULTRA SETTINGS in a NON-GAMING LAPTOP?!
This tutorial will feature a special new hardware that will beef up your laptop graphics easily!
Read on to know what an External Graphics Processing Unit (eGPU) is all about. (TL;DR at the end of post)
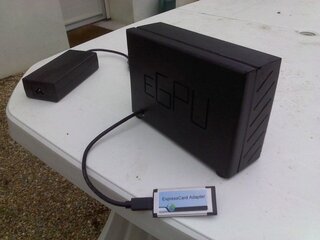
View attachment 213252 View attachment 165683
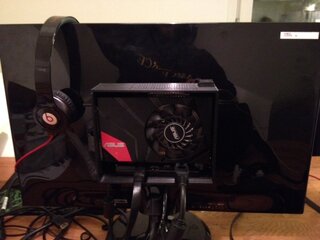
(Performance Build vs. Portable Build)
Note: SLI is not necessary for the eGPU, but was proven possible (for future-proofing purposes)
For most laptop users, heavy gaming and video editing are usually a compromised activity. But now, with the use of an external GPU, your laptop can achieve enough graphics acceleration comparable to that of a gaming desktop PC!
Video of a simple eGPU
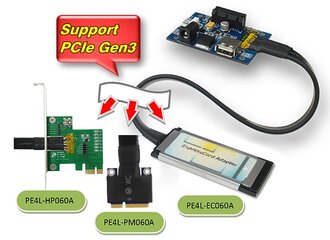
Where does this Desktop GPU adapter connect to my laptop?
PCIe laptop ports:
View attachment 165686 View attachment 915145
Why would I want to use an eGPU?
Future-proofing/Laptop Survivability. The GPU is arguably the limiting factor of any gaming laptop because CPU and RAM requirements have not been as demanding yet for most games. The option to use a recent desktop GPU adds a few more years to your laptop's upgradability/survivability.
Performance boost. Desktop GPU>>Laptop dGPU. It's really hard not to be impressed by a rMBP that can do 4k resolution gaming at ultra settings via SLI NVIDIA GTX 780Ti.
Modular. You have a lighter, power-efficient laptop for school, work, and all your basic daily needs. Then when at home, convert it to a power-packed gaming machine. Compact, light, yet packs a punch.
Desktop compatible. When "retiring" an old desktop GPU, you can use it an eGPU and give your laptop a greater video editing/gaming experience!
Portability. The Nvidia Optimus setting allows you to display to your laptop's main screen instead of an external desktop monitor (like a regular desktop GPU). Bring your PC complete with keyboard, mouse, speakers, webcam, etc. all in a small compact setup anywhere you want to go. Off the grid gaming with desktop quality specs.
The love for tinkering. It might be possible to build a gaming desktop equivalent for the same price of the Laptop+eGPU. So why build one? Well, because you can!
UPDATE:Adapters are much cheaper now and are powered by AC adapters. This makes eGPU-gaming more affordable and a better alternative!
What happens when I use an eGPU?
The eGPU boosts/accelerates the graphics performance of your laptop by allowing the desktop GPU to take over your laptop's integrated GPU (iGPU). Gaming laptops with built-in Nvidia/AMD dedicated graphics card (dGPU) will need to disable the dGPU first before getting the eGPU to work. The end result is that your laptop gets the graphics performance near to that of a desktop GPU.
Examples:
When is it useful?
1. You have a fast laptop with poor graphics performance. (MBPs, Mac Mini, laptops by Lenovo, HP, Dell, etc. with Intel GPUs)
Why? A smooth gaming experience deals with both processing power (CPU/processor) and graphics acceleration (GPU). Having a slow laptop with a very powerful (external) graphics card attached will bottleneck in performance causing a reduction in frame rates (ex. choppy movements). Same goes for available RAM but to a lesser extent. If your notebook was manufactured 2011 or later (Sandy Bridge, Ivy Bridge, Haswell, etc), you have 70-80% chance for eGPU implementation.
Note: For those planning to "rejuvenate" older laptops (pre-Sandy Bridge 2011 era), I will have to warn you that the success rate for an eGPU setup is 20-30% of the time only. You are bmetter off upgrading to a newer desktop/laptop. Netbooks have zero chance to work at the moment.
2. You have an mPCIe/M.2/Expresscard slot with at least a PCIe 2.0 lane (5GT/s). (non-Gaming Lenovo, HP, Dell laptops/workstations)
Why? The special eGPU adapters (PE4L, PE4C, EXP GDC, Akitio) enable the eGPU to work optimally at this transfer rate.
UPDATE: Macintosh users, the Thunderbolt adapters are now stable for eGPU gaming! The TB2 port is currently the best choice for eGPU gaming because the x4.2 performance of a TB2 port maximizes the GPU's throughput. GTX 780 SLI (2-GPUs linked together) setups have even been documented!
Jargon - x2 means 2 lanes used with a PCIe 1.0 slot, x1.2 means means 1 lane used with a PCIe 2.0 slot, x2.2 means 2 lanes used with a PCIe 2.0 slot, x2.3 means 2 lanes used with a PCIe 3.0 slot, the list goes on. A single Thunderbolt 2 port is the equivalent of 4 combined PCIe 2.0 lanes, transferring at 20 GT/s!
3. You can supply power to the GPU+Adapter with a DC adapter or additional ATX PSU. (for power hungry cards)
Why? Your laptop PCIe lanes do not provide the power to run the GPUs (though problems involving heat dissipation is not an issue since the GPU heat is outside the laptop only).
Since most eGPU adapters have multiple connections for power, you have the option of: using a 12V DC adapter for 75W cards (ex. GTX750Ti), or using an external ATX power supply to power the best GPUs in the market. Some adapters (PE4C, EXP GDC) use an AC adapter that powers up to 220W Graphics cards.
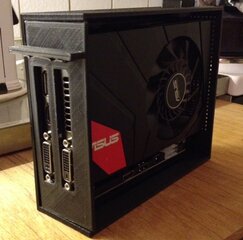
Working eGPU in a custom case
- - - Updated - - -
TUTORIAL: Step-by-Step eGPU setup
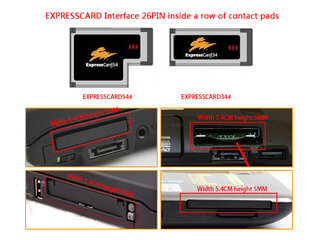
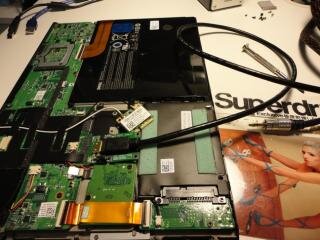
1. Inspect your laptop's hardware.
Check if you have an Expresscard slot. If you don't know what this is, chances are your laptop does not have it. hehe
If you do not have an EC slot, look for an available mPCIe slot (disconnect the WWAN/WLAN card, or find other free ports).
View attachment 165790 View attachment 165791
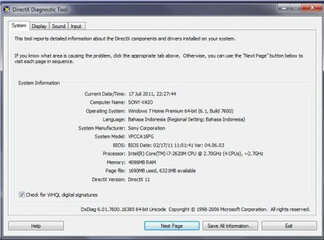
2. Check your laptop specs (run dxdiag in Windows).
Since you will put in a desktop graphics card, check the processor and RAM if it will be sufficient to run the games you intend to play (hopefully at max settings).
View attachment 165792
(Representative Picture)
3. Obtain the parts required for an eGPU setup.
The eGPU is made up of the following parts:
I got my PE4L 2.1b adapter from here: Bplus Technology
Lazada has some eGPU adapters on stock. The rest of the parts are also available locally.
Adapters cost more or less $60-100 with shipping already.
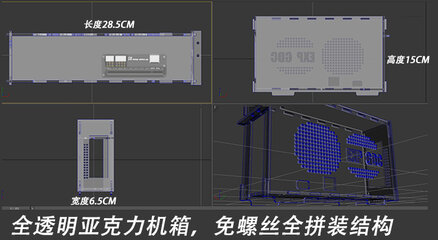
If your GPU consumes less than 220W, I'd really advise on getting a PE4C v3.0 Adapter, or an EXP GDC V7 adapter Instead of adding a bulky ATX PSU to your setup, these adapters use a 220W AC adapter to power up a GTX680, GTX980, HD7870, or R9 270X. Combine this with a nice custom case and you can now enjoy portable heavy gaming!
4. Plug-in your equipment
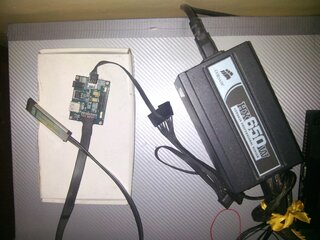
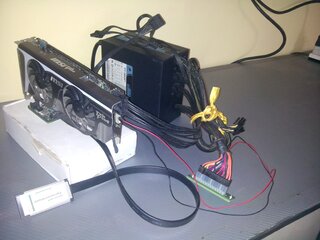
My (Old) eGPU Adapter: PE4L 2.1b
(PE4L 2.1b Adapter powered by floppy connector of PSU)
View attachment 166453
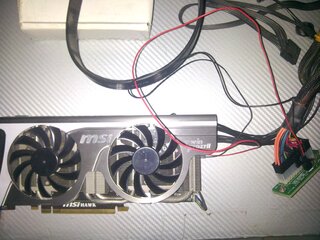
(Dupont 2PIN Cable from GPU attached to SWEX, 24 pin cable from PSU also attached to SWEX for on/off of eGPU, 6-Pin Cables from the PSU attached to GPU to supply power to the GPU)
View attachment 166454
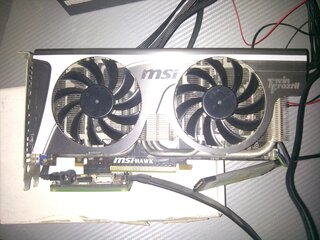
(GPU attached to Adapter)
View attachment 166458
(Parts placed altogether)
View attachment 166459
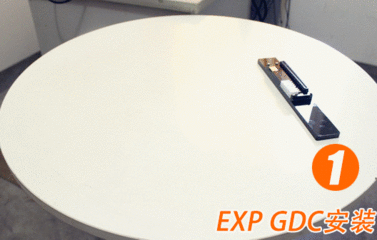
Newer, Easy to assemble eGPU Adapter: EXP GDC
View attachment 913097
(Click to View Gif)
5. Install the latest GPU drivers, restart, and start Playing at BEYOND GODLIKE SETTINGS.
Video of my old eGPU rig
Note: At 0:16, the Adapter should read PE4L 2.1b 
Laptop Specs:
i7 Quadcore Ivy Bridge (3840QM) CPU
16Gb Crucial 1600MHz DDR3L RAM
500Gb Samsung 840 EVO SSD partitioned for Dual Boot
2Tb 5400rpm Seagate M9T HDD for Storage
BCM4352 Dual Band WiFi Card (For OSX Compatibility and WiFi upgrade)
eGPU: GTX970+PE4L 2.1b (x1.2) + Corsair CX550 PSU
Other Symbianize eGPU Users
ken_marvin (Link 2) - Lenovo T400 + Nvidia GTS450
ixfire - Acer Aspire v3-571G + Nvidia GTX 750ti
Possible Problems
This is not as easy as it sounds because there are occasional problems which are dealt with on a case-to-case basis (Bios errors, Code 12, Code 43, Code 6, Setup 1.X, etc).
The rule of thumb is if your laptop is running Sandybridge or later, most cards from NVIDIA GTX460 (Fermi) and above are plug and play.
For the Mac users out there
Final Notes:
Hope to see your own rigs and benchmarks soon so we can compare our laptops before and after eGPU installation. HTM
- - - Updated - - -
News and Updates:
tl; dr
Did you know that you can play on ULTRA SETTINGS in a NON-GAMING LAPTOP?!
This tutorial will feature a special new hardware that will beef up your laptop graphics easily!
Read on to know what an External Graphics Processing Unit (eGPU) is all about. (TL;DR at the end of post)
View attachment 213252 View attachment 165683
(Performance Build vs. Portable Build)
Note: SLI is not necessary for the eGPU, but was proven possible (for future-proofing purposes)
For most laptop users, heavy gaming and video editing are usually a compromised activity. But now, with the use of an external GPU, your laptop can achieve enough graphics acceleration comparable to that of a gaming desktop PC!
Video of a simple eGPU
Where does this Desktop GPU adapter connect to my laptop?
PCIe laptop ports:
- mini PCIe slot (usual attachment of your WiFi/WWAN card)
- or 34mm/54mm Expresscard slot (a slot that connects directly to the Motherboard's PCIe)
- or Thunderbolt port (available in Macbooks and Ultrabooks)
- or M.2 slot
View attachment 165686 View attachment 915145
Why would I want to use an eGPU?
Future-proofing/Laptop Survivability. The GPU is arguably the limiting factor of any gaming laptop because CPU and RAM requirements have not been as demanding yet for most games. The option to use a recent desktop GPU adds a few more years to your laptop's upgradability/survivability.
Performance boost. Desktop GPU>>Laptop dGPU. It's really hard not to be impressed by a rMBP that can do 4k resolution gaming at ultra settings via SLI NVIDIA GTX 780Ti.
Modular. You have a lighter, power-efficient laptop for school, work, and all your basic daily needs. Then when at home, convert it to a power-packed gaming machine. Compact, light, yet packs a punch.
Desktop compatible. When "retiring" an old desktop GPU, you can use it an eGPU and give your laptop a greater video editing/gaming experience!
Portability. The Nvidia Optimus setting allows you to display to your laptop's main screen instead of an external desktop monitor (like a regular desktop GPU). Bring your PC complete with keyboard, mouse, speakers, webcam, etc. all in a small compact setup anywhere you want to go. Off the grid gaming with desktop quality specs.
The love for tinkering. It might be possible to build a gaming desktop equivalent for the same price of the Laptop+eGPU. So why build one? Well, because you can!
UPDATE:Adapters are much cheaper now and are powered by AC adapters. This makes eGPU-gaming more affordable and a better alternative!
What happens when I use an eGPU?
The eGPU boosts/accelerates the graphics performance of your laptop by allowing the desktop GPU to take over your laptop's integrated GPU (iGPU). Gaming laptops with built-in Nvidia/AMD dedicated graphics card (dGPU) will need to disable the dGPU first before getting the eGPU to work. The end result is that your laptop gets the graphics performance near to that of a desktop GPU.
Examples:
- Intel HD3000 graphics (iGPU) stops working -> Graphics Acceleration taken over -> eGPU (GTX Titan Black/R9 295X2)
- Built-in Radeon HD3400 (dGPU) is disabled -> Graphics Acceleration taken over -> eGPU (GTX Titan Black/R9 295X2)
When is it useful?
1. You have a fast laptop with poor graphics performance. (MBPs, Mac Mini, laptops by Lenovo, HP, Dell, etc. with Intel GPUs)
Why? A smooth gaming experience deals with both processing power (CPU/processor) and graphics acceleration (GPU). Having a slow laptop with a very powerful (external) graphics card attached will bottleneck in performance causing a reduction in frame rates (ex. choppy movements). Same goes for available RAM but to a lesser extent. If your notebook was manufactured 2011 or later (Sandy Bridge, Ivy Bridge, Haswell, etc), you have 70-80% chance for eGPU implementation.
Note: For those planning to "rejuvenate" older laptops (pre-Sandy Bridge 2011 era), I will have to warn you that the success rate for an eGPU setup is 20-30% of the time only. You are bmetter off upgrading to a newer desktop/laptop. Netbooks have zero chance to work at the moment.
2. You have an mPCIe/M.2/Expresscard slot with at least a PCIe 2.0 lane (5GT/s). (non-Gaming Lenovo, HP, Dell laptops/workstations)
Why? The special eGPU adapters (PE4L, PE4C, EXP GDC, Akitio) enable the eGPU to work optimally at this transfer rate.
UPDATE: Macintosh users, the Thunderbolt adapters are now stable for eGPU gaming! The TB2 port is currently the best choice for eGPU gaming because the x4.2 performance of a TB2 port maximizes the GPU's throughput. GTX 780 SLI (2-GPUs linked together) setups have even been documented!
Jargon - x2 means 2 lanes used with a PCIe 1.0 slot, x1.2 means means 1 lane used with a PCIe 2.0 slot, x2.2 means 2 lanes used with a PCIe 2.0 slot, x2.3 means 2 lanes used with a PCIe 3.0 slot, the list goes on. A single Thunderbolt 2 port is the equivalent of 4 combined PCIe 2.0 lanes, transferring at 20 GT/s!
3. You can supply power to the GPU+Adapter with a DC adapter or additional ATX PSU. (for power hungry cards)
Why? Your laptop PCIe lanes do not provide the power to run the GPUs (though problems involving heat dissipation is not an issue since the GPU heat is outside the laptop only).
Since most eGPU adapters have multiple connections for power, you have the option of: using a 12V DC adapter for 75W cards (ex. GTX750Ti), or using an external ATX power supply to power the best GPUs in the market. Some adapters (PE4C, EXP GDC) use an AC adapter that powers up to 220W Graphics cards.
Working eGPU in a custom case
- - - Updated - - -
TUTORIAL: Step-by-Step eGPU setup
1. Inspect your laptop's hardware.
Check if you have an Expresscard slot. If you don't know what this is, chances are your laptop does not have it. hehe
If you do not have an EC slot, look for an available mPCIe slot (disconnect the WWAN/WLAN card, or find other free ports).
View attachment 165790 View attachment 165791
2. Check your laptop specs (run dxdiag in Windows).
Since you will put in a desktop graphics card, check the processor and RAM if it will be sufficient to run the games you intend to play (hopefully at max settings).
View attachment 165792
(Representative Picture)
3. Obtain the parts required for an eGPU setup.
The eGPU is made up of the following parts:
- Desktop Graphics Card (GTX Titan Black if you want)
- eGPU adapter (with the correct PM3N/EC cable) - Adapter models based on reliability: PE4C 3.0, PE4C 2.1, PE4L 2.1b, EXP GDC
- Power Supply - an ATX PSU is needed for high performance cards (NVIDIA or AMD), medium and low level cards can be powered by the AC adapters of the newer eGPU adapters (ex. PE4C 3.0, EXP GDC V7)
I got my PE4L 2.1b adapter from here: Bplus Technology
Lazada has some eGPU adapters on stock. The rest of the parts are also available locally.
Adapters cost more or less $60-100 with shipping already.
If your GPU consumes less than 220W, I'd really advise on getting a PE4C v3.0 Adapter, or an EXP GDC V7 adapter Instead of adding a bulky ATX PSU to your setup, these adapters use a 220W AC adapter to power up a GTX680, GTX980, HD7870, or R9 270X. Combine this with a nice custom case and you can now enjoy portable heavy gaming!
4. Plug-in your equipment
My (Old) eGPU Adapter: PE4L 2.1b
(PE4L 2.1b Adapter powered by floppy connector of PSU)
View attachment 166453
(Dupont 2PIN Cable from GPU attached to SWEX, 24 pin cable from PSU also attached to SWEX for on/off of eGPU, 6-Pin Cables from the PSU attached to GPU to supply power to the GPU)
View attachment 166454
(GPU attached to Adapter)
View attachment 166458
(Parts placed altogether)
View attachment 166459
Newer, Easy to assemble eGPU Adapter: EXP GDC
View attachment 913097
(Click to View Gif)
5. Install the latest GPU drivers, restart, and start Playing at BEYOND GODLIKE SETTINGS.
Video of my old eGPU rig
Laptop Specs:
i7 Quadcore Ivy Bridge (3840QM) CPU
16Gb Crucial 1600MHz DDR3L RAM
500Gb Samsung 840 EVO SSD partitioned for Dual Boot
2Tb 5400rpm Seagate M9T HDD for Storage
BCM4352 Dual Band WiFi Card (For OSX Compatibility and WiFi upgrade)
eGPU: GTX970+PE4L 2.1b (x1.2) + Corsair CX550 PSU
Other Symbianize eGPU Users
ken_marvin (Link 2) - Lenovo T400 + Nvidia GTS450
ixfire - Acer Aspire v3-571G + Nvidia GTX 750ti
Possible Problems
This is not as easy as it sounds because there are occasional problems which are dealt with on a case-to-case basis (Bios errors, Code 12, Code 43, Code 6, Setup 1.X, etc).
The rule of thumb is if your laptop is running Sandybridge or later, most cards from NVIDIA GTX460 (Fermi) and above are plug and play.
For the Mac users out there
Final Notes:
- Don't expect 100% GPU performance yet because this setup is more of an external hack for a laptop with limited PCIe bandwidth (5GT/s, 10GT/s, etc.) and is not tailor-fit to work yet as it normally does with a desktop motherboard. Future PCIe ports (ex. Thunderbolt-3 with 40GT/s) will solve this problem.
- Unless otherwise stated, your eGPU is ideally hooked to an external monitor to project the screen. This allows the fastest possible graphics acceleration for your device. (Your external monitor is the primary display and your main laptop screen is the secondary display)
- For those who want to utilize the laptop screen only (for portable gaming), this is possible only if you use an NVIDIA Card (Fermi or better). NVIDIA's Optimus technology helps "virtualize" the primary display (supposedly an external monitor) and projects the secondary monitor (laptop's screen) as well. Down side is a little performance loss but is not that bad if your GPU is powerful.
- Helpful resources: eGPU Forums
Hope to see your own rigs and benchmarks soon so we can compare our laptops before and after eGPU installation. HTM
- - - Updated - - -
News and Updates:
- PE4C v2.1 allows x1.2/x1.2opt and x2.2 link (for advanced users)
- PE4C 3.0 is a more stable eGPU adapter for x1.2 implementation
- PE4C 4.0 now supports M.2 slot! (Still x1.2)
- The future looks promising with Thunderbolt 3!
tl; dr
- eGPU setup: Laptop + $60-90 Special Adapter + Desktop GPU = Heavy Gaming / Video Editing
- Non-gaming Laptops become "GPU upgradable"
- Affordable, portable, cheap setup, with desktop-compatible parts
- Prolongs laptop's lifespan (weak GPU = reason for gaming laptop upgrade)
- Compatible with 80-90% of Notebooks, Macbooks, Mac Minis running Sandy Bridge or later (2011 model onwards)
- Not recommended for 2010 or older models and Netbooks
- Best viewed through an external monitor attached to the GPU, but can work without it (using the laptop screen)
- Unique, and fun!
Attachments
-
 1328789565-egpu1.jpg56.8 KB · Views: 443
 -
 PE4L-XXA_V2.1_4_Gen3.jpg74.8 KB · Views: 1,125
 -
 866871724_843.jpg125.6 KB · Views: 1,106
 -
 post-316128-1315008155_thumb.jpg19.7 KB · Views: 907
 -
 DxdiagVaio64Bit.jpg33.2 KB · Views: 709
 -
 1-PE4L 2.1a Adapter powered by floppy connector of PSU.jpg1.7 MB · Views: 470
 -
 2-Dupont 2PIN Cable and 6-Pin Cables from the PSU powering GPU.jpg1.7 MB · Views: 291
 -
 4-GPU attached to Adapter.jpg1.5 MB · Views: 215
 -
 5-Altogether.jpg1.5 MB · Views: 255
 -
 photo 1.png1.4 MB · Views: 347
Last edited:
") salamat ts
salamat ts