UPDATE TYU
eTO yung request ng ghost effect tutorial
ETO PO AY ISANG EASY TUTORIAL LANG HAHA SANA MAGUSTUHAN NYU[/SIZE]
Lets start:
Step 1: Copy The Background Layer
As always, we never want to work directly on our Background layer, since it contains our original pixel information, so the first thing I'm going to do is copy it. I'm a big fan of naming layers and you should be too, so I'm going to use the keyboard shortcut Ctrl+Alt+J (Win) / Command+Option+J (Mac) to bring up the New Layer dialog box. I'm going to name my Background copy layer desaturated, and we'll see why in a moment:
This gives me a copy of my Background layer in the Layers palette, which Photoshop has named "desaturated":
Adobe Photoshop Tutorials - Photo Effects
Photoshop Effects: Ghosting An Image
Learn Photoshop with Photo Effects Tutorials at Photoshop Essentials.com
Written By Steve Patterson
In this Photoshop effects tutorial, we're going to look at a way to give a photo a more "ghostly" appearance.
I'm a fan of horror films, but I admit I'm a bit shallow in that I usually just watch them for the special effects. I'm usually sitting there thinking to myself, "I wonder how they did that". So while playing around in Photoshop one night, I came up with this little technique for taking a living, breathing person and making them appear more like a ghost, which is why I called it"ghosting an image". It's a simple effect with only a few steps involved and they're easy to do.
Of course, as with most photo effects, it helps if you start with the right type of image. A photo of your kids playing at the beach on a summer afternoon may not be the best choice. Then again, you never know till you try it.
Here's the photo I'll be starting with:
The original image
The original image.
And here's the "ghosting" effect we're after:
The final result
The final effect.
Not what you're looking for? Check out our other Photoshop Effects tutorials!
New! Download our Photoshop tutorials as convenient, print-ready PDFs!
Photoshop Essentials on Facebook!
Let's get started.
Step 1: Copy The Background Layer
As always, we never want to work directly on our Background layer, since it contains our original pixel information, so the first thing I'm going to do is copy it. I'm a big fan of naming layers and you should be too, so I'm going to use the keyboard shortcut Ctrl+Alt+J (Win) / Command+Option+J (Mac) to bring up the New Layer dialog box. I'm going to name my Background copy layer desaturated, and we'll see why in a moment:
Photoshop's New Layer dialog box
Photoshop's New Layer dialog box. Name your layer "desaturated".
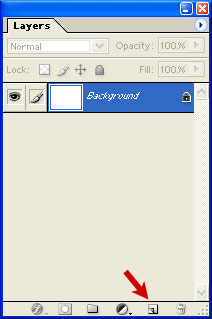
This gives me a copy of my Background layer in the Layers palette, which Photoshop has named "desaturated":
Copy the Background layer
Photoshop's Layers palette now showing my Background layer and the copy above it.
Step 2: Desaturate The Background Copy Layer
With my "desaturated" layer selected in the Layers palette, I'm going to, you guessed it, desaturate it to remove all the colors. To do that, I'll use the keyboard shortcut Ctrl+Shift+U (Win) / Command+Shift+U (Mac). The image now appears black and white:
Step 3: Copy The "Desaturated" Layer
I need to make a copy of my "desaturated" layer at this point, so with it selected in the Layers palette, I'll use the keyboard shortcut Ctrl+Alt+J (Win) / Command+Option+J (Mac) once again to bring up the New Layer dialog box. This time, I'll name the layer "motion blur":
I now have three layers in my Layers palette, including my new "motion blur" layer at the top:
Step 4: Apply The Motion Blur Filter
I feel like I'm giving away the endings with my layer names, but oh well. With the "motion blur" layer selected, go up to the Filter menu at the top of the screen, select Blur, and then select Motion Blur. This brings up the "Motion Blur" dialog box. Normally you'd apply a motion blur to an object that's, you know, in motion, but applying it to a stationary object tends to give it a ghost-like effect, which is what we're after. When the dialog box appears, set the Angle to zero degrees, and then drag the slider bar at the bottom to the right to increase the Distance value until your image is blurred out quite a bit. Here I've set mine to 95 pixels:
Here's my image after applying the Motion Blur filter:
Step 5: Add A Layer Mask To The "Motion Blur" Layer
Our image already looks a little spooky with the motion blur applied, but now we're going to bring back some of her face, and we're going to do that using a layer mask. With the "motion blur" layer selected, click on the "Add Layer Mask" icon at the bottom of the Layers palette:
This adds a layer mask to the "motion blur" layer:
Step 6: Paint With Black On The Layer Mask To Reveal Some Of The Face
Grab your Brush tool from the Tools palette, or press B on your keyboard to quickly select it. Then press D on your keyboard to make sure black is selected as your foreground color (Note: If your layer mask was already selected when you pressed "D", your foreground color will actually become white, since white is the default foreground color for a layer mask. If that's the case, simply press X to swap the foreground and background colors, which will set your foreground color to black). Go up to the Options Bar at the top of the screen and lower the opacity of your brush to around 10%:

This will allow you to paint the face back in gradually. Click on the layer mask thumbnail in the Layers palette to select it if it's not already selected (it will have a highlight border around it if it's selected), and then with a large, soft-edged brush and black as your foreground color, paint over the middle area of the face in short, gradual strokes to bring back some of the eyes, nose and mouth, leaving the rest blurred out. Be sure to stay well within the boundaries of the face so everything blurs out nicely from the center:
Step 7: Merge All Of The Layers Onto A New Layer
We're going to merge all three layers onto a new layer at this point, and we can do that with the keyboard shortcut Shift+Ctrl+Alt+E (Win) / Shift+Command+Option+E (Mac), which takes all three layers and merges them onto a brand new layer at the top of the Layers palette. Double-click on the name of the layer and rename it to merged:
Step 8: Apply The "Diffuse Glow" Filter To The Merged Layer
With the new "merged" layer selected, go up to the Filter menu at the top of the screen, select Distort, and then select Diffuse Glow. This brings up Photoshop's Filter Gallery (it doesn't actually say Filter Gallery anywhere at the moment but it's the Filter Gallery) set to the Diffuse Glow filter options. You may have to play around with the three options a little depending on the image you're using, but for my image, I've set Graininess to 3, Glow Amount to 10, and Clear Amount also to 10 as circled below:
Here's my image after applying the "Diffuse Glow" filter:
Step 9: Add A Solid Color Fill Layer
All that's left to do now is add a little color, so with the "merged" layer still selected, click on the New Fill Or Adjustment Layer icon at the bottom of the Layers palette:
Select Solid Color from the top of the list:
This will bring up Photoshop's Color Picker. I'm going to choose a green color:
Click OK once you've chosen a color to exit out of the Color Picker. You're image will now be filled entirely with the solid color, so we'll fix that next.
Step 10: Change The Blend Mode Of The Fill Layer To "Color" And Lower The Opacity
With the Solid Color fill layer selected, go up to the layer blend mode options in the top left of the Layers palette, click on the down-pointing arrow beside the word "Normal" and change the blend mode to Color. This will colorize the image with the color you've chosen (green in my case). The color will most likely be too intense though, so move over to the right to the Opacity option at the top of the Layers palette and lower the opacity to reduce the intensity. I've lowered mine considerably, all the way down to 11% for just a hint of color:
AND WERE DONE HERES THE FINAL IMAGE THAT WE WORK HAHAHA
I HOPE SANA NAGUSTUHAN NYU SIMPLE TUTORIAL KO
dito










 thanks dito sir,try ko to pg may free time
