Symbianize Forum

Most of our features and services are available only to members, so we encourage you to login or register a new account. Registration is free, fast and simple. You only need to provide a valid email. Being a member you'll gain access to all member forums and features, post a message to ask question or provide answer, and share or find resources related to mobile phones, tablets, computers, game consoles, and multimedia.

All that and more, so what are you waiting for, click the register button and join us now! Ito ang website na ginawa ng pinoy para sa pinoy!

Alcatel One Touch 918N/D/M Tricks and Tutorials

nupandu

The Fanatic
Advanced Member
Messages
423
Reaction score
0
Points
26

Welcome to Alcatel One Touch 918D/N/M Tutorials​
Hi guys i made this thread para sa compilation ng mga tweaks and tutorials about our phone how to root, what will do next and ano mga dapat i-install to optimize my phone. Marami kasing nagtatanong kung pano gawin ito, pano yon, saan nyo po nakuha and pede po kaya ito sa phone natin. So ito na yung sagot, lahat po ito tried and tested sa phone natin kaya good luck sa mga di pa nakakatry. First things first, is how to root our device.


Before anything else READ THIS especially New Users


How to Root Alcatel One Touch 918N
The following instructions will lead you how to root your Alcatel One Touch 918N.
http://www.symbianize.com/showpost.php?p=11514350&postcount=1

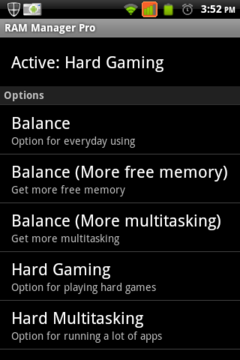
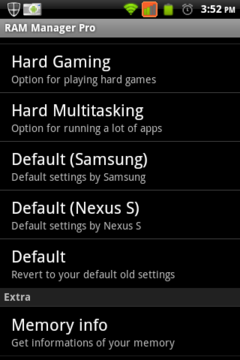
How to patch V6 SuperCharger
What is v6 SuperCharger?
V6 SuperCharger is a script, take not it’s a script not and an app developed by zeppilinox of xda-forums to optimize and organize memory consumption and allocation of our device, in a nut shell it makes our device run smooth without lag and redrawing. The author also declare that it is far more reliable to any other Killer Apps and working to any Android Device whether you’re using Stock ROM or Custom ROM. It has a risk in running the script but the author said that it is minimal, so don’t worry it won’t break your phone.

Prerequisites
1. Rooted Phone
2. Busybox Installer that can be downloaded to Google Play, formerly Android Market, just download and install it to your device.
3. Script Manager that can also be downloaded to Google Play.
4. V6 SuperCharger V9RC5 Script 6.1 in .pdf format (It’s a .pdf file I swear but don’t know why).
5. You can also try the script provided by the author in his post in XDA just download V6_SuperChargerScript_for_Android-update7.sh.txt or V6_SuperChargerScript_for_Android-update8.sh.txt just google it.

Procedures
Note: The script looks familiar right just like command prompt in windows. You can use your keyboard here to response for the queries by touching the cursor and your keyboard will be prompted. Everything stated here were just my point of view, I’m not pertaining to the steps how to setup supercharging but into the options you need to choose to optimize your device using this incredible script.
1. Install and Open Busybox Installer (Select Busybox 1.18.2 since it is recommended by the author).
2. Install and Open Script Manager. Touch MENU Pad then Touch MORE and Advance Option then Config. Check for the field of BROWSE AS ROOT.
3. Download and place the V6 SuperCharger script to your SD card.
4. Open your Script Manager and locate the script file then RUN AS ROOT or if you don’t see RUN AS ROOT touch the Super User Icon, if its green Touch RUN.
5. If the script asked you to choose from BUILD.prop or LOCAL.prop, choose LOCAL.prop.
6. If the script asked about System Integration, choose YES.
7. Wait until the script show you option from 1-31.

8. Option 1 will show your current status about super charging. Just a plain status that’s it.
9. After option 1 you will see that from option 2 to 9, options were grouped into 3 except for the last two so (2,3,4) (5,6,7) and (8,9). The above numbers (256 HP) that make them grouped are that approximately maximum RAM of your device so only choose options on the same group.
10. Since Alcatel OT918N has 150MB of RAM approximately lets choose options from 2 to 4.
11. You will see label for this option like UnLedded (Multitasking), Ledded (Balanced) and Super UL (Aggressive) it tells you how are you going to optimize your memory consumption so choose what’s best to your need.
12. Now pick option 10 to set minfrees values.
13. If the script asked you to restart your phone please do so.
14. Option 11 to 13 tells you what Launcher Setup you are going to use. Is it Hard to Kill, Die Hard or Bulletproof. I think the author just exaggerate the names of this Launcher Setup as it pertain how your current launcher behave as by default our launcher experiencing redrawing each time we open and close an application. Choose Die Hard.
15. Choose option 18 for Engine Flush this option will flash your RAM not how Task Manager works were all your application can be close to free up some memory. This option is a good way if your experiencing some slow down to you device so make a habit to run this option.
16. Choose option 20 for Nitro Lag Nullifier as what the label means it experimental still won’t hurt your device just try it.
17. Choose option 31 to close the script but don’t close the script manager yet instead go to /data/99supercharger.sh and run this script as root and make sure that are browsing as root. And restart phone to save settings.
18. The other options are still mystery in my mind sorry for that.
19. After the above setup try to check your status and you will see that you are 100% supercharged. Congratulation.

Sorry for my bad English and hope that it helps you to make your device more useful. That’s all.
To have a shortcut for engine flush or any script you want to run have a widget of script manager to your desktop I know you already know that. Please visit the original source in xda forum just search for v6 supercharging.

Files for Download
V6 SuperCharger Script update9 RC5

Partitioning Micro SD
This method is not limited for Alcatel phones only but as far as I know this is the general way how to partition Micro SD that most of Android phone available in the market uses. For the sake of everyone asking how to do this, I appended this tutorial to our thread.

Why do we need to partition Micro SD Card?
Micro SD card is the primary storage that some of android devices use in order to save data that we are using. We need to utilize the use of this storage device for us to maximize the optimal uses of the device and its application. Through this tutorial I will guide you how you will attain that goals.

Prerequisites
1. Micro SD of any size but preferably 2GB and up.
2. Any Adapter that can be use to connect our Micro SD to our computer.
3. MiniTool Partition Application (Take note that this is a windows application, the link provided below)
4. It’s always a practice to BACK UP your things before starting this tutorial.

Procedures
1. Download the MiniTool Partition Application and Install as your regular application.
2. Insert your micro SD to the adapter available for you such as Micro SD Adapter that mostly when you bought a new card it is included in the package or any N in 1 card adapter that sometimes we can bought this awesome product in CD-R King or simply plug your device to your machine with the micro SD inserted and use USB Connection.

3. When our phone already plug in and the drive can be seen in our computer as a removable disk we can now start to partition.
4. Open the MiniTool Partition App and it will prompt you the drives that are available to your machine. Make sure that you are selecting the right drive or else you know already.

5. As you can see in the image above I’m using a 2GB card but the card is already used and has a 60.12MB of used space.
6. Simply Right Click on the drive and select Delete to delete the partition. Don’t worry it will not yet applied any changes unless if you’re going to hit the Apply button already.

7. Now select Create and you will be prompted with a window as you can see below. By the way in the left pane of the window for this application you will be seeing some of the information regarding the processes that can be done and also the operations that will execute when the changes applied.
[url=http://serve.imagehyper.com/img.php?id=12120617&c=b69
8. Make a Partition Label for the new partition of any name; set Create As as Primary, for your main partition just select FAT32 in File System and for your secondary partition select FAT32 since ext2, ext3 and ext4 is not supported to our device. Select Drive Letter of your choice and set the Partition Size of your choice for this particular partition. Then Click OK.
9. To Create our second partition just right click the unallocated space and select Create and prompted you with a window below. Just Click Yes.
10. Repeat Step 8 with the remaining spaces and Click Ok.
11. After all changes done, just Click Apply and viola your Micro SD is now ready for the next big thing.
 

Attachments

  • 918n_1.jpg
    918n_1.jpg
    8.3 KB · Views: 137
  • 918n_2.jpg
    918n_2.jpg
    8.1 KB · Views: 102
Last edited by a moderator:
Re: Alcatel One Touch 918N Tricks and Tutorials

How to remove pre-installed applications

Due to popular demand other tutorial for you guys seeking for help on how to remove pre-installed applications from our device. Again this tutorial is a general thing that most android users are using, so just follow each step to obtain your goal. Once we purchase a new android device, the handset come with a stock rom that handset provider impose some applications that mostly android users hate this stuff because of it consume our precious internal memory that is a very vital storage for our device and we want that storage to be free as much as we can. Through this tutorial we can remove those applications that we consider trash so here we go.

Prerequisites
1. Rooted Phone.
2. Titanium Backup (an android application that lets you do the thing, link provided below)
3. Optional Extra Micro SD Card for dumping storage of your backups.

Procedures
1. Download and install all the necessary files. The archive file for Titanium Back includes a patcher because Titanium Backup is not free so we need to use this.

2. Install Titanium Backup first but don’t open yet install the patcher right after and patch the application. Once the patch success you now open the Titanium Backup.

3. Upon opening the application you will be greeted with a couple of things. First Click on the Problems? Button for some notes.

4. Now Click Backup/Restore Tab for the real thing.
5. This Tab shows you all the application software installed to your device system application also included. We can filter and sort application base on the criteria that we select in the upper of the list.

6. In the right most side of the application entry you will be seeing a phone icon together a warning sign indicating that that application is residing to your internal storage and no backup available to restore. Otherwise seeing an application with a SD card icon meaning the application resides to your external storage (note: it only means that your application has been transferred to SD card via native App2SD method).
7. Please refer to the Legend functionality of Titanium Backup for more information (Click Menu -> Click Help and Support -> Legend).

8. To Backup an application Click the desire application to backup and Click the Backup!. Backup will be place to your SD card in /mnt/sdcard/TitaniumBackup.
9. Be advice that removing vital system application can harm your device and lead to malfunction only remove that you don’t need. Below are list of some vital application that should not un-install.
a. Account and Sync Settings
b. Android Networking Diagnose Tool
c. Bluetooth
d. Bluetooth Share
e. CellConnectionService
f. Certificate Installer
g. com.mediatek
h. com.mediatek.omacp
This is as far as I know maybe I missed some of it so be careful.
10. This time I will explain to you the popup menu when clicking the application. Look at the image below. Backup! Button allows you to back the application itself, Freeze! Button allows you to freeze the application meaning this application cannot be run or halted to run if it is a service to minimize the use of RAM while our device is running but still the application is installed so it only means that the application reside to where you have been place it. Un-install! Button allows you to totally remove the application to your system so remember to back it up and finally Wipe Data Button allows you to delete cache for that certain application.

11. To Restore your application back to your system just simply Click the application and Press the Restore Button. You can also Delete the Backup File by just Clicking the Delete Button in the popup menu.
12. Remember to put back the backup file in the backup directory of Titanium Backup (/mnt/sdcard/TitaniumBackup) to restore your application. Backup file for each application comprises of 3 files (.properties, .tar.gz and .apk.gz) so put back this 3 files together to properly restore that certain application.

13. This is an optional procedure, keep safe your backup files to another storage you want maybe you still have that memory card that is free when we bought our device so place it there to free up some space to the memory card that you are using.
14. So that’s it this is as far as I know with this procedures please note me if I missed or mislead something.

Link for Pre-Installed Application Removal
Titanium_Backup+Patcher
 
Last edited:
Re: Alcatel One Touch 918N Tricks and Tutorials

wow! galing mo tlaga master nupando!:)
 
Re: Alcatel One Touch 918N Tricks and Tutorials

wow! galing mo tlaga master nupando!:)

thanks mate di ko pa nalalagay yung sa partitioning at ext2 ginagawa ko pa hahaha...more to come bro maganda kung nakaorganize kaysa nakakalat diba.. :thumbsup:
 
Re: Alcatel One Touch 918N Tricks and Tutorials

eto ang matagal ko ng inaabangan! mas ok to sir, astig! mas helpful ito sa ming mga newbie...
 
Re: Alcatel One Touch 918N Tricks and Tutorials

***thanks ts, atleast dito complete tut at madali ma access... keep sharing pa poh....:)
 
Re: Alcatel One Touch 918N Tricks and Tutorials

Thanks sa inyong support. More to come guys..
 
Re: Alcatel One Touch 918N Tricks and Tutorials

sir pa-request kung meron na kayo tut ng data2ext, thanks :pray:
 
Re: Alcatel One Touch 918N Tricks and Tutorials

yeah! galing tlga if nka organize.. im willing to help the newbie rin poh kaso busy kc ako.. hahaha.. successful ako sa ext2 sir. ung napost ko sa isang thread natin. try nyo poh un! :)
 
Re: Alcatel One Touch 918N Tricks and Tutorials

WOW, ang galing nice tut:yipee:
:help: error po yung busybox ko( installer error)
 
Re: Alcatel One Touch 918N Tricks and Tutorials

WOW, ang galing nice tut:yipee:
:help: error po yung busybox ko( installer error)

yung sa market po ba yung ginamit nyo ala din kasi akong .apk nun.. ang mas sure kasi kung sa market dahil nandoon din yung mga latest na version ng busybox... anyway after rooting our phone kasi for sure nagsuggest yun for installing busybox kaso di ko alam kung anong version yun..

yeah! galing tlga if nka organize.. im willing to help the newbie rin poh kaso busy kc ako.. hahaha.. successful ako sa ext2 sir. ung napost ko sa isang thread natin. try nyo poh un! :)

di ko masundan yun dre eh.. di ko rin makita yung script kaya di ko pa natatry... ano ginawa mo copy paste lang ng mga script sa directory ng phone tapos reboot ganun lang ba yun??
 
Re: Alcatel One Touch 918N Tricks and Tutorials

sir paano nyo ginagamit yung RAM Manager na app? what setting should it be to utilize our phone?
 

Attachments

  • 2012-03-16-15-52-15.png
    2012-03-16-15-52-15.png
    39.1 KB · Views: 144
  • 2012-03-16-15-52-22.png
    2012-03-16-15-52-22.png
    39.7 KB · Views: 179
Re: Alcatel One Touch 918N Tricks and Tutorials

yung sa market po ba yung ginamit nyo ala din kasi akong .apk nun.. ang mas sure kasi kung sa market dahil nandoon din yung mga latest na version ng busybox... anyway after rooting our phone kasi for sure nagsuggest yun for installing busybox kaso di ko alam kung anong version yun..


di ko masundan yun dre eh.. di ko rin makita yung script kaya di ko pa natatry... ano ginawa mo copy paste lang ng mga script sa directory ng phone tapos reboot ganun lang ba yun??

un script may andun lng yun sa link.. hanapin mo lng sa whole page.. im using root explorer to edit the script tpos after script manager to run as boot!

depende sa need mo pre... kung naggagames ka set mo lang sa hard gaming...

ito mga screen
View attachment 514902View attachment 514903

ndi ba nasisira ung v6 supercharger natin if we would use the ram manager pro?? :noidea:
 
Re: Alcatel One Touch 918N Tricks and Tutorials

un script may andun lng yun sa link.. hanapin mo lng sa whole page.. im using root explorer to edit the script tpos after script manager to run as boot!


ndi ba nasisira ung v6 supercharger natin if we would use the ram manager pro?? :noidea:

oo nga, wala bang conflict yung 2? parang same kasi sila ng magiging role eh.

wala naman sabi ng ibang taga xda hahha yung iba nga combo ginagamit nila pero yung iba sabi nila both do their job well so either which your going to use it will give you same effect hahaha.. naisip ko nga nagpakahirap pa ako sa v6 pede naman pala mag RAM Manager na lang :lol:
 
Re: Alcatel One Touch 918N Tricks and Tutorials

pa marka ts.,plan c bumili ng bro q.,prepare lng
 
Re: Alcatel One Touch 918N Tricks and Tutorials

newbie lang po sa androids pansin ko TS sa siggy mo may GPU yung 918N mo.di po ba walang gpu ang 918N?anu po yan tini-TWEAK? thanks sa tuts sana bumilis din 918N ko :thumbsup:
 
Back
Top Bottom