- Messages
- 378
- Reaction score
- 0
- Points
- 26
[Latest] Samsung Galaxy S3 Clone (SP8810 S930) - how to root? merun na! check it now!
UPDATES!!!!
Eto na po yung "update.zip" ng S930 S3 clone ko.....
Download Mediafire links:
http://www.mediafire.com/download/kqm367b6u49a1xd/update.zip.001
http://www.mediafire.com/download/6mvbrqdfga7csw6/update.zip.002
http://www.mediafire.com/download/nsgq9hk5btk51ff/update.zip.003
http://www.mediafire.com/download/zaffeiktwpt4zjv/update.zip.004
HJSPLIT download link:
http://www.mediafire.com/download/po3tl3dxa9y4dce/hjsplit.exe
Note: you need to download everything! all of the 4 archives (zip files) then join the files using HJSPLIT selecting the first zip file (.001) and all the parts will follow, and then the output file name...wait until you see the "update.zip" in the same folder location.

*******************************************************************************************************************
********************************************************************************
LATEST UPDATES!
1. Added some screenshots for Root Checker & Superuser Granted Permissions!
2. Newly revised script! "root.bat"
3. Translated in English language
Note: Applicable only for Android Phones!
>>>
GOOD NEWS!!!
Last, feb. 8, 2013 at 1:46PM, I successfully rooted my samsung galaxy s3 clone korea (s930) using H_BLER'S method and the root app (root.exe) of portugese guy at xda dev, to them for their root method...and now i'm very happy for my newly rooted phone! hahaha!!!
New Root Procedures:
1. Download & Extract the archive file (attachments below):
Root_v2.1+SPRD_Drivers.7z <<-- Newly Updated!!! English Version
Root_v1.2+SPRD_Drivers.7z <<-- English Version of old attachment below
Note: If the 1st link did'nt work for your phone, try the 2nd link above, then follow the procedure below with your phone attached to your pc, enabled debugging, & with installed required drivers....
2. Copy & paste the extracted folder you downloaded to C:\ similar to this "C:\Root_v2.1+SPRD_Drivers". Open the extracted folder, select the file "SCI-android-usb-driver-jungo-v4.7z" then extract
3. Open the extracted driver folder, select & install the suited driver for your unit by running the "DPInst.exe" , after that enable "USB DEBUGGING" of the phone from (Menu\Settings\Applications\Development) and enable "UNKNOWN SOURCES" of the phone from (Menu\Settings\Applications)
4. After installing the drivers, your pc must start detecting your phone, or you can easily check it in the device manager:
- Spreadtrum Phone >> Android Composite ADB Interface (driver instaled with Android SDK)
- Spreadtrum Phone >> SCI General U2S(AT) (COM3) (Google Search: Spreadtrum Drivers)
- Spreadtrum Phone >> SCI Vendor U2S(DIAG) (COM4) (Google Search: Spreadtrum Drivers)

All drivers must be installed successfully!!! No yellow marks!!!
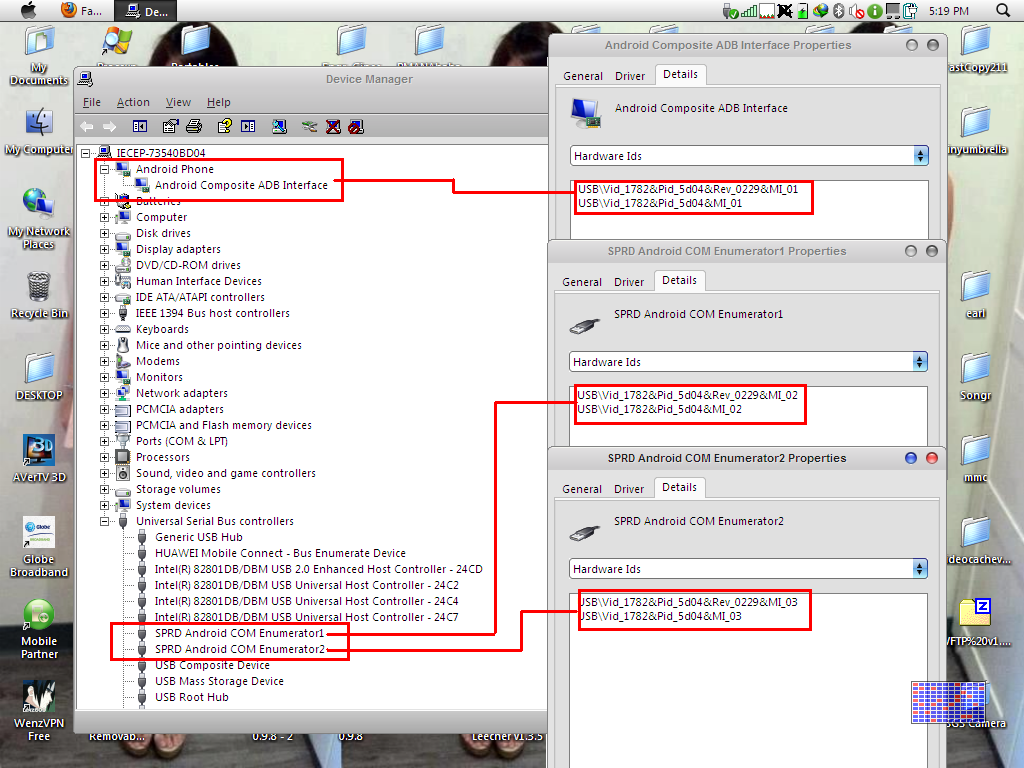
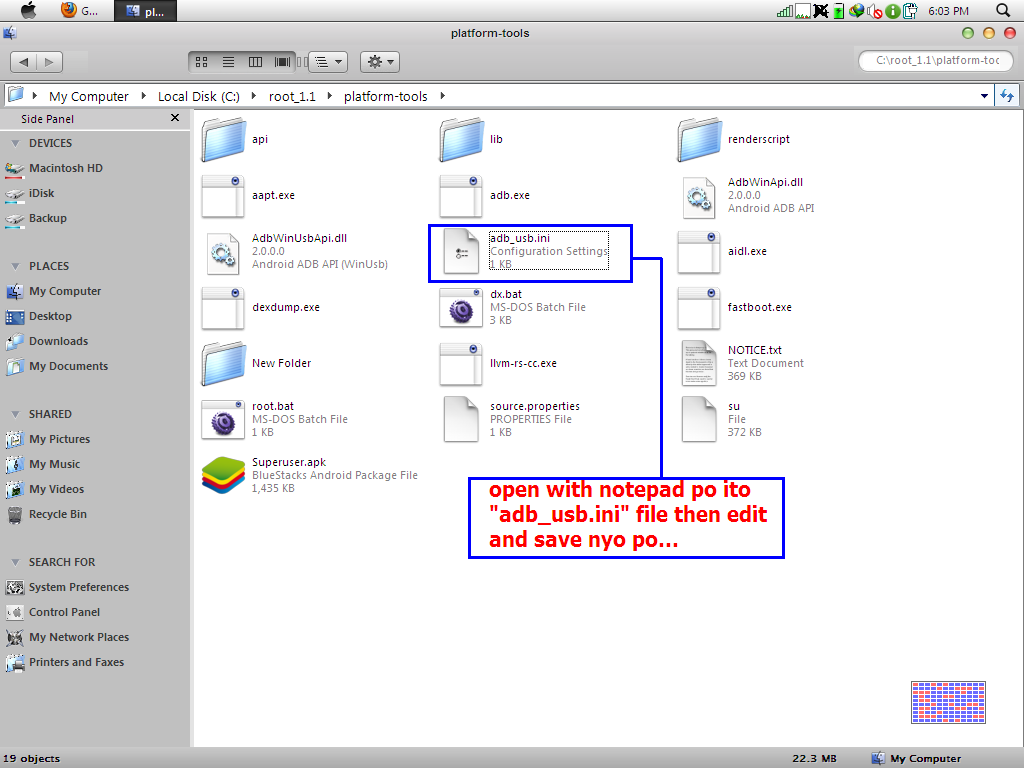
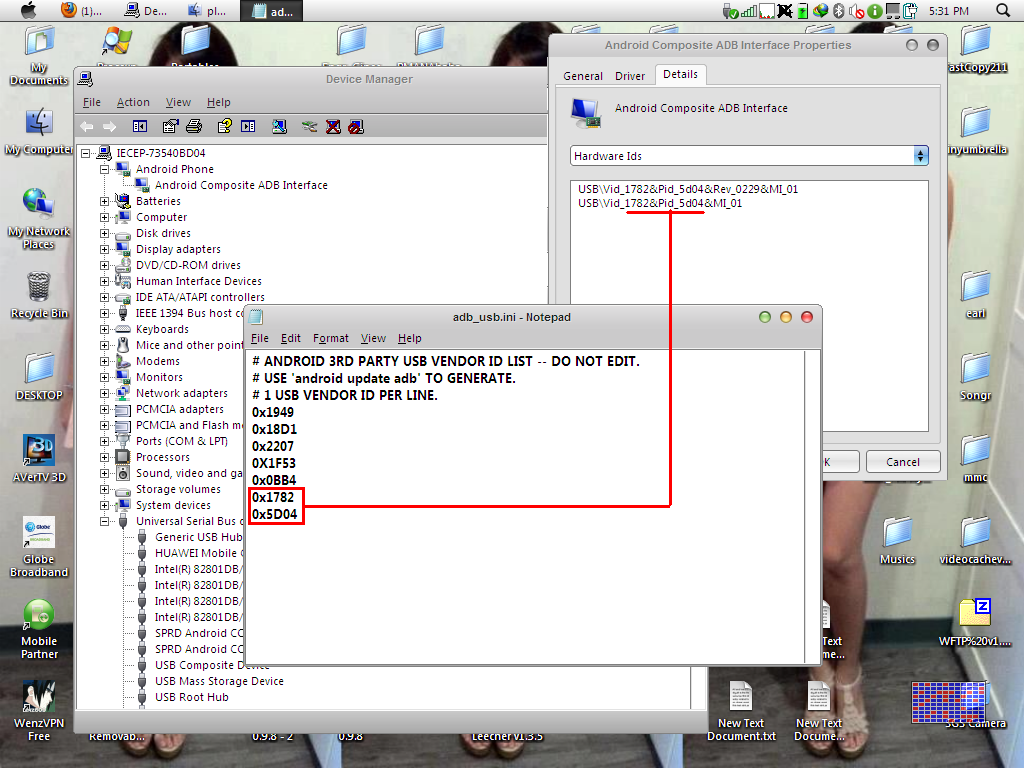
5. Open the folder Root_v2.1+SPRD_Drivers > root_2.1 > platform-tools, find the "adb_usb.ini" file, open it in notepad, at the last line of the script, add the hex code of your phone driver, you can check it via device manager, follow screenshots below then save:
6. Run "root.bat" , You will get this info:
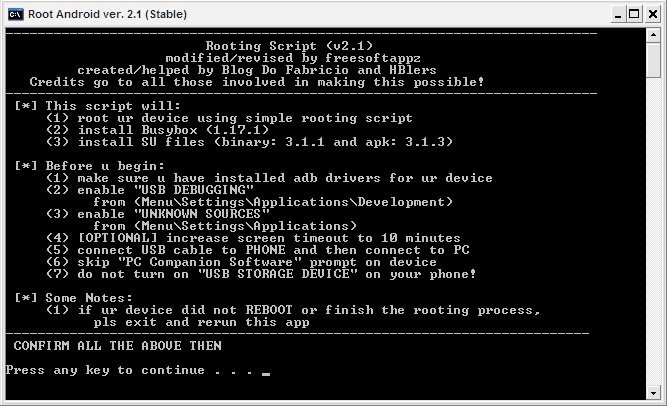
Press any key to continue . . .
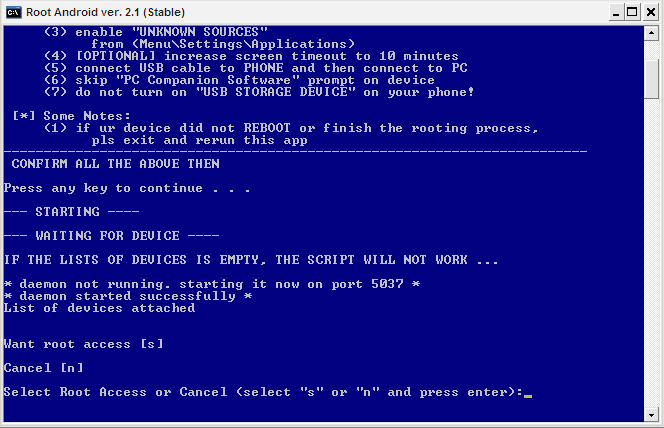
- - - - - -
--- STARTING ----
--- WAITING FOR DEVICE ----
IF THE LISTS OF DEVICES IS EMPTY, THE SCRIPT WILL NOT WORK ...
* daemon not running. starting it now on port 5037 *
* daemon started successfully *
List of devices attached
XXXXXXX device <<--- in here must be your phone device! that's very important!!!
Want root access
Cancel [n]
Select Root Access or Cancel (select "s" or "n" and press enter):
7. Your phone must be on the list of devices attached, then press "s" to proceed rooting....
You will get this info:
--- STARTING ----
--- WAITING FOR DEVICE ----
IF THE LISTS OF DEVICES IS EMPTY, THE SCRIPT WILL NOT WORK ...
[/COLOR]* daemon not running. starting it now on port 5037 *
* daemon started successfully *
List of devices attached
082787626 device <<--- something like this
Want root access
Cancel [n]
Select Root Access or Cancel (select "s" or "n" and press enter): s
8. It will now start rooting your phone, when it finish, your phone will reboot, if not and nothing happens, try again from #6....
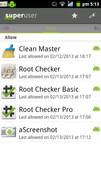
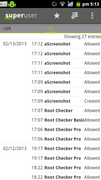
9. Check your drawer apps, if superuser is installed successfully in phone, your DONE!, if not try again from #6
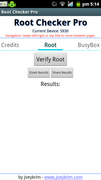
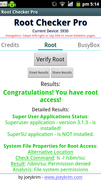
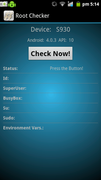
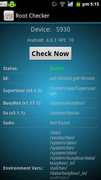
**TIPS: If superuser is installed, verify granted root access….that's the best sign of rooted device, install Root Checker (download from google play), then open root checker, and press "verify root" refer to screenshots below:
Screenshots: (Superuser Root Access Granted & Root Checker Pro)


10. and your DONE.....
- - - - - - - -
Old Root Procedures:
1. Download & Extract the archive file (download attachment (mf))
2. Open the extracted folder, select the file "SCI-android-usb-driver-jungo-v4.7z" then extract
3. Open the extracted driver folder, select & install the suited driver for your unit by running the "DPInst.exe"
4. After installing the drivers, your pc must start detecting your phone, or you can easily check it in the device manager:
- Spreadtrum Phone >> Android Composite ADB Interface (driver instaled with Android SDK)
- Spreadtrum Phone >> SCI General U2S(AT) (COM3) (Google Search: Spreadtrum Drivers)
- Spreadtrum Phone >> SCI Vendor U2S(DIAG) (COM4) (Google Search: Spreadtrum Drivers)
All drivers must be installed successfully!!! No yellow marks!!!
5. Open the folder root_1.1 > platform-tools, run root.bat
You will get this info:
script root
Se a lista de devices estiver vazia, o script nao vai funcionar...
List of devices attached
XXXXXXX device <<--- in here must be your phone device! thats important!!!
Comecar processo de Root
Cancelar [n]
Selecione a opcao e o processo comecara (selecione "s" ou "n" e de enter):
6. Your phone must be on the list of devices attached, then press "s" to proceed rooting....
You will get this info:
script root
Se a lista de devices estiver vazia, o script nao vai funcionar...
List of devices attached
09387465 device
Comecar processo de Root
Cancelar [n]
Selecione a opcao e o processo comecara (selecione "s" ou "n" e de enter): s
7. Your phone will reboot, if not and nothing happens, try again starts from #5
8. Check your apps, if superuser is installed successfully in phone, your DONE, if not try again from #5
9. and your DONE.....
Give feedback na lang po if merun kayong questions or problems on the rooting procedure....
TIPS:
1.) Twice ko po ni-run yung root.bat bago sya nag-reboot! after that rooted na sya, Superuser is installed now & has granted root access!
2.) Sa mga susubok sa root app pero sa ibang model or cpu chipset ng android at kung gumana sa inyo, paki-update po ako dito or post yung mga android clone phones nyo dito para maupdate ko dito sa 1st page…
3.) If you have problems on installing your own drivers for your unit, if the given drivers above didn't work for you, then download and install this small software, search on google: Moborobo OR (i.e. 'PdaNet for Android'). It will search suitable drivers for your device and install it automatically. You will see Android ADB Device or so.... in your Device Manager.
Thereafter open properties of your device from Device Manager. Go to 'Details' Tab and change 'Property' to Hardware Id….
You can see Device id.... something like this
USB\VID_1782&PID_5D04&REV_0229&MI_02
USB\VID_1782&PID_5D04&MI_02
Just copy these. Go the root app folder you downloaded earlier. Open the adb_usb.ini file and modify it using NotePad. You may open it in NotePad and paste the hardware ids lines in the file and save the file as adb_usb.ini.
Your adb_usb.ini file should contain lines like below:
USB\VID_1782&PID_5D04&REV_0229&MI_02
USB\VID_1782&PID_5D04&MI_02
0x1782
0x5D04
Your ADB prompt will start showing device now.
Solved some ERROR encountered while rooting:
1. "Read-only file system"
solution: type ADB root -d then afterwards ADB remount -d
2. "adbd cannot run as root in production builds"
solution: both adb remount and adb root don't work on a production build without altering ro.secure (boot.img has ro.secure set to 1, it drops permissions after it loads), but you can still remount /system by opening a shell, asking for root permissions and typing the mount command.
$ adb shell
$ su
# mount -o rw,remount /system
or
I've had this happen before. I fixed it by first killing adb with "adb kill-server", then do "adb root" to make adb run as root. Then you can "adb remount" to write to the filesystem, then push away! Hope that helps.
3. "adb server out of date issue"
solution: exit any "adb.exe" in your task manager, download the "adb.zip" in the attachment below, then extract, copy & paste the adb files (including the adb.exe) to the root app folder you are using, then run "adb.exe".
Supported Links:
[Q] Rooting Chinese Spreadtrum Phone w/ Android 4.0.3 - XDA Developers
How to solve Android adb device not found errors
Can't get ADB Root Access in certain ROMs? - XDA Developers
ADB Shell! - Pro Root method!
ADB Shell! - Alternate root method.
Home of Superuser
Run ADB in Root Mode with ADBD Insecure
http://forum.xda-developers.com/showthread.php?t=1899288
http://forum.xda-developers.com/showthread.php?t=1562595
Tutorial: A Guide to Link2SD for Android
lang po ok na.....
>>>
ACTUAL SPECS OF THE UNIT using Antutu Benchmark
CPU HARDWARE: SP8810
CPU MODEL: ARMv7 PROCESSOR (VFPv3,NEON)
CPU FREQUENCY: 400.0-1024.0 MHZ
OPERATING SYSTEM: ANDROID 4.0.3 ICE CREAM SANDWICH
GPU VENDOR: ARM
GPU RENDER: Mali-300
GPU VERSION: OPENGL E520
MEMORY SIZE(INTERNAL): 126.3/506
MEMORY SIZE(EXTERNAL): UPGRADABLE UPTO 32GB
RAM: 512MB DDR3
DISPLAY SIZE: 4.7 Inch ( TFT, Capacitive Touch Screen )
RESOLUTION: 480 x 800 ( 260k Colors )
CAMERA: Dual Camera 2MP Back & 0.3MP Front 1600 x 1200 Pixels ( LED Flash & Auto Focus )
CONNECTIVITY: WiFi, Bluetooth, GPS
SIM Card: Dual SIM Card Dual Standby ( 1 Micro & 1 Regular SIM )
Screenshots:


UPDATES!!!!
Eto na po yung "update.zip" ng S930 S3 clone ko.....
Download Mediafire links:
http://www.mediafire.com/download/kqm367b6u49a1xd/update.zip.001
http://www.mediafire.com/download/6mvbrqdfga7csw6/update.zip.002
http://www.mediafire.com/download/nsgq9hk5btk51ff/update.zip.003
http://www.mediafire.com/download/zaffeiktwpt4zjv/update.zip.004
HJSPLIT download link:
http://www.mediafire.com/download/po3tl3dxa9y4dce/hjsplit.exe
Note: you need to download everything! all of the 4 archives (zip files) then join the files using HJSPLIT selecting the first zip file (.001) and all the parts will follow, and then the output file name...wait until you see the "update.zip" in the same folder location.
*******************************************************************************************************************
********************************************************************************
LATEST UPDATES!
1. Added some screenshots for Root Checker & Superuser Granted Permissions!
2. Newly revised script! "root.bat"
3. Translated in English language
Note: Applicable only for Android Phones!
>>>
GOOD NEWS!!!
Last, feb. 8, 2013 at 1:46PM, I successfully rooted my samsung galaxy s3 clone korea (s930) using H_BLER'S method and the root app (root.exe) of portugese guy at xda dev,
to them for their root method...and now i'm very happy for my newly rooted phone! hahaha!!!New Root Procedures:
1. Download & Extract the archive file (attachments below):
Root_v2.1+SPRD_Drivers.7z <<-- Newly Updated!!! English Version
Root_v1.2+SPRD_Drivers.7z <<-- English Version of old attachment below
Note: If the 1st link did'nt work for your phone, try the 2nd link above, then follow the procedure below with your phone attached to your pc, enabled debugging, & with installed required drivers....
2. Copy & paste the extracted folder you downloaded to C:\ similar to this "C:\Root_v2.1+SPRD_Drivers". Open the extracted folder, select the file "SCI-android-usb-driver-jungo-v4.7z" then extract
3. Open the extracted driver folder, select & install the suited driver for your unit by running the "DPInst.exe" , after that enable "USB DEBUGGING" of the phone from (Menu\Settings\Applications\Development) and enable "UNKNOWN SOURCES" of the phone from (Menu\Settings\Applications)
4. After installing the drivers, your pc must start detecting your phone, or you can easily check it in the device manager:
- Spreadtrum Phone >> Android Composite ADB Interface (driver instaled with Android SDK)
- Spreadtrum Phone >> SCI General U2S(AT) (COM3) (Google Search: Spreadtrum Drivers)
- Spreadtrum Phone >> SCI Vendor U2S(DIAG) (COM4) (Google Search: Spreadtrum Drivers)
All drivers must be installed successfully!!! No yellow marks!!!
5. Open the folder Root_v2.1+SPRD_Drivers > root_2.1 > platform-tools, find the "adb_usb.ini" file, open it in notepad, at the last line of the script, add the hex code of your phone driver, you can check it via device manager, follow screenshots below then save:
6. Run "root.bat" , You will get this info:
Press any key to continue . . .
- - - - - -
--- STARTING ----
--- WAITING FOR DEVICE ----
IF THE LISTS OF DEVICES IS EMPTY, THE SCRIPT WILL NOT WORK ...
* daemon not running. starting it now on port 5037 *
* daemon started successfully *
List of devices attached
XXXXXXX device <<--- in here must be your phone device! that's very important!!!
Want root access
Cancel [n]
Select Root Access or Cancel (select "s" or "n" and press enter):
7. Your phone must be on the list of devices attached, then press "s" to proceed rooting....
You will get this info:
--- STARTING ----
--- WAITING FOR DEVICE ----
IF THE LISTS OF DEVICES IS EMPTY, THE SCRIPT WILL NOT WORK ...
[/COLOR]
* daemon started successfully *
List of devices attached
082787626 device <<--- something like this
Want root access
Cancel [n]
Select Root Access or Cancel (select "s" or "n" and press enter): s
8. It will now start rooting your phone, when it finish, your phone will reboot, if not and nothing happens, try again from #6....
9. Check your drawer apps, if superuser is installed successfully in phone, your DONE!, if not try again from #6
**TIPS: If superuser is installed, verify granted root access….that's the best sign of rooted device, install Root Checker (download from google play), then open root checker, and press "verify root" refer to screenshots below:
Screenshots: (Superuser Root Access Granted & Root Checker Pro)
10. and your DONE.....
- - - - - - - -
Old Root Procedures:
1. Download & Extract the archive file (download attachment (mf))
2. Open the extracted folder, select the file "SCI-android-usb-driver-jungo-v4.7z" then extract
3. Open the extracted driver folder, select & install the suited driver for your unit by running the "DPInst.exe"
4. After installing the drivers, your pc must start detecting your phone, or you can easily check it in the device manager:
- Spreadtrum Phone >> Android Composite ADB Interface (driver instaled with Android SDK)
- Spreadtrum Phone >> SCI General U2S(AT) (COM3) (Google Search: Spreadtrum Drivers)
- Spreadtrum Phone >> SCI Vendor U2S(DIAG) (COM4) (Google Search: Spreadtrum Drivers)
All drivers must be installed successfully!!! No yellow marks!!!
5. Open the folder root_1.1 > platform-tools, run root.bat
You will get this info:
script root
Se a lista de devices estiver vazia, o script nao vai funcionar...
List of devices attached
XXXXXXX device <<--- in here must be your phone device! thats important!!!
Comecar processo de Root
Cancelar [n]
Selecione a opcao e o processo comecara (selecione "s" ou "n" e de enter):
6. Your phone must be on the list of devices attached, then press "s" to proceed rooting....
You will get this info:
script root
Se a lista de devices estiver vazia, o script nao vai funcionar...
List of devices attached
09387465 device
Comecar processo de Root
Cancelar [n]
Selecione a opcao e o processo comecara (selecione "s" ou "n" e de enter): s
7. Your phone will reboot, if not and nothing happens, try again starts from #5
8. Check your apps, if superuser is installed successfully in phone, your DONE, if not try again from #5
9. and your DONE.....
Give feedback na lang po if merun kayong questions or problems on the rooting procedure....
TIPS:
1.) Twice ko po ni-run yung root.bat bago sya nag-reboot! after that rooted na sya, Superuser is installed now & has granted root access!
2.) Sa mga susubok sa root app pero sa ibang model or cpu chipset ng android at kung gumana sa inyo, paki-update po ako dito or post yung mga android clone phones nyo dito para maupdate ko dito sa 1st page…
3.) If you have problems on installing your own drivers for your unit, if the given drivers above didn't work for you, then download and install this small software, search on google: Moborobo OR (i.e. 'PdaNet for Android'). It will search suitable drivers for your device and install it automatically. You will see Android ADB Device or so.... in your Device Manager.
Thereafter open properties of your device from Device Manager. Go to 'Details' Tab and change 'Property' to Hardware Id….
You can see Device id.... something like this
USB\VID_1782&PID_5D04&REV_0229&MI_02
USB\VID_1782&PID_5D04&MI_02
Just copy these. Go the root app folder you downloaded earlier. Open the adb_usb.ini file and modify it using NotePad. You may open it in NotePad and paste the hardware ids lines in the file and save the file as adb_usb.ini.
Your adb_usb.ini file should contain lines like below:
USB\VID_1782&PID_5D04&REV_0229&MI_02
USB\VID_1782&PID_5D04&MI_02
0x1782
0x5D04
Your ADB prompt will start showing device now.
Solved some ERROR encountered while rooting:
1. "Read-only file system"
solution: type ADB root -d then afterwards ADB remount -d
2. "adbd cannot run as root in production builds"
solution: both adb remount and adb root don't work on a production build without altering ro.secure (boot.img has ro.secure set to 1, it drops permissions after it loads), but you can still remount /system by opening a shell, asking for root permissions and typing the mount command.
$ adb shell
$ su
# mount -o rw,remount /system
or
I've had this happen before. I fixed it by first killing adb with "adb kill-server", then do "adb root" to make adb run as root. Then you can "adb remount" to write to the filesystem, then push away! Hope that helps.
3. "adb server out of date issue"
solution: exit any "adb.exe" in your task manager, download the "adb.zip" in the attachment below, then extract, copy & paste the adb files (including the adb.exe) to the root app folder you are using, then run "adb.exe".
Supported Links:
[Q] Rooting Chinese Spreadtrum Phone w/ Android 4.0.3 - XDA Developers
How to solve Android adb device not found errors
Can't get ADB Root Access in certain ROMs? - XDA Developers
ADB Shell! - Pro Root method!
ADB Shell! - Alternate root method.
Home of Superuser
Run ADB in Root Mode with ADBD Insecure
http://forum.xda-developers.com/showthread.php?t=1899288
http://forum.xda-developers.com/showthread.php?t=1562595
Tutorial: A Guide to Link2SD for Android
lang po ok na.....>>>
ACTUAL SPECS OF THE UNIT using Antutu Benchmark
CPU HARDWARE: SP8810
CPU MODEL: ARMv7 PROCESSOR (VFPv3,NEON)
CPU FREQUENCY: 400.0-1024.0 MHZ
OPERATING SYSTEM: ANDROID 4.0.3 ICE CREAM SANDWICH
GPU VENDOR: ARM
GPU RENDER: Mali-300
GPU VERSION: OPENGL E520
MEMORY SIZE(INTERNAL): 126.3/506
MEMORY SIZE(EXTERNAL): UPGRADABLE UPTO 32GB
RAM: 512MB DDR3
DISPLAY SIZE: 4.7 Inch ( TFT, Capacitive Touch Screen )
RESOLUTION: 480 x 800 ( 260k Colors )
CAMERA: Dual Camera 2MP Back & 0.3MP Front 1600 x 1200 Pixels ( LED Flash & Auto Focus )
CONNECTIVITY: WiFi, Bluetooth, GPS
SIM Card: Dual SIM Card Dual Standby ( 1 Micro & 1 Regular SIM )
Screenshots:
Attachments
Last edited:
 Stupid me. *insert facepalm with incoherent grumbling here*


 Just follow the steps, hindi kayo aabutin ng 10 minutes. Salamat tlaga TS!!!!!!!


")