- Messages
- 229
- Reaction score
- 0
- Points
- 26
Lenovo A60+ -Official Users Thread- "Rooting Instruction + Google Playstore Fix
Lenovo A60+
Official Users Thread
Priced To Please!
SRP: 4999 PHP

Specifications
ROOTING INSTRUCTIONS
Credits To MobileUncle & Biege
Original Thread Link
http://www.symbianize.com/showthread.php?t=849736
Installing Google Playstore
Installing CWM Recovery And Custom ROM Credits to KUSKUS Indonesian Forum
[REQUIRES ROOT PREVILAGES]
Download this files
http://www.mediafire.com/?bo12ktkrrn57314
Extract the following files on the root of your SD card
after installing open mobile uncle tools. the one youve installed. not the one that is preinstalled in the rom
tap the option flash recovery from SDCARD

Then Choose Recovery.img

pag may promt na lumabas press "ok"

then automatically mag rereboot na siya sa CWM.
test some few features or try to install this rom
[COLOR=blue !important]A60+_S317_MASKID_1_2[/COLOR]
Procedures On How To Install This ROM.
CHANGELOG
UPDATED ANTUTU BENCHMARK RESULTS " AFTER ROOTING "
Review
Lenovo A60+ Is Superb! ika nga a decent android phone with its price of 4,999 Pesos. meron siyang 1Ghz Proccessor Cortex A9, PowerVR SGX531 Ultra GPU Almost Mid end android device narin to. medyo talo lang talaga sa ram. at sa sobrang daming bloatwares aka system softwares like Google+ App, Maps, Halos 60-70 MB nalang natitira sa RAM ko. pero kung sakaling may root instructions nman na para sa device natin eh madali nalang tanggalin ang mga bloatwares and gumawa ng virtual ram para mas bumilis pa ang device natin.
-arekupup
Overall Rating: 4/5 Stars ☆☆☆☆
All Of Your Questions Regarding Lenovo A60+ Phone
Will Be Discussed Here
Official Users Thread
Priced To Please!
SRP: 4999 PHP
Specifications
CPUCPU: MTK6575 ARMv7 Cortex-A9 40nm 1.0GHzGPU: PowerVR SGX531 Ultra
OS
Android V2.3.6
MemoryRAM : 256MB / ROM : 512MB MAX supports 64GB Class 12 Micro SD Memory Card (TF-Card)Size116 x 60.8 x 11.9 mmWeight120g with batteryScreen3.5" HVGA, 320 x 480, 262k Colors (TBD), TFT-LCDCapacitive Multi Touch ScreenNetworkDual Sim, supports W+G / G+G
2G:GSM/GPRS/EDGE: 850/900/1800/1900 MHz
3G:WCDMA/HSPA/HSPA+: 900/2100MHz
SAR:0.332W/kgColorBlack
GPSBuilt In GPS & A.GPSNote:We have maps for the following countries, please ask seller if you need additional information:Germany, Switzerland, Austria, Spain, Portugal, UK, Ireland, Belgium, Luxembourg, Netherland, France, Greece, Italy, Poland, Russia, Baltic, Finland, Denmark, Sweden, Norway, etc.
ConnectionBluetooth with EDR & A2DPWi-Fi : IEEE 802.11 b/g/n, supports Wi-Fi hotspotmicro USB 2.0
CameraBack 2.0 mega pixelSupport to shoot 3GP 480P with sound, Max 30 mins.
SensorGravity Sensor, Proximity Sensor, Light Sensor
RadioFM
VideoAVI, MP4, FLV, 3GP, MOV, ASF, MPEG, RMVB, H.263, H.264, etc.
AudioMP3, AAC, WAV, etc. / 3.5 mm Audio Jack
Special functionG-sensor, P-Sensor, L-Sensor, FM radio, Wifi, GPS, Multi-touch, Dual SIM, Schedule Power on/off
Package Includes- Li-ion Batteries 1500mAh x 1- Earphone / 3.5 mm Audio Jack- USB Cable- Charger
ROOTING INSTRUCTIONS
Credits To MobileUncle & Biege
Original Thread Link
http://www.symbianize.com/showthread.php?t=849736
As promised inayos ko na tong TUT na to para sa inyo para madaling maintindihan...
ALTERNATIVE ROOTING PROCEDURE COMPATIBLE TO OTHER MOBILE PHONES AS WELL <See link at the very bottom>
Things you need for the first TUT
SP Flash Tool
http://www.symbianize.com/attachment...1&d=1350005176
Boot file
http://pan.baidu.com/share/link?shar...&uk=1327862826
MTK drivers (Windows 7 64-bit included as per request)
***Papalala idisable nyo muna ung antivirus software nyo para walang aberya, don't worry safe ung mga files
http://www.symbianize.com/attachment...1&d=1350004603
After nyo maextract lahat follow the instructions below:
1. Set USB debugging on sa phone <Settings>Application>Development>USB debugging
2. Turn off phone and unplug from the USB cable
3. Open SP Flash tool
4. Click Scatter Loading
5. Select the Scatter file "MT6575_Android_scatter.txt" from the boot folder
6. Uncheck everything except the "BootIMG" checkbox
7. Click Download and select Yes
8. (Kaylangan mabilis ung pag plug nyo sa cable)
Press and hold the Volume Up button sa phone at i'manually install ung mga drivers
"Make sure to select the correct Driver for your phone"
http://www.symbianize.com/attachment...1&d=1350004603
***NOTE: Wag bitawan ung pag'hold sa volume up key kc pwedeng umulit installation ng drivers
9. Plug the phone while holding the Volume up
10. Rooting will commence>Red>Yellow>then Green circle ***Pwede na bitawan ung paghawak sa VOlume Up button
11. Close application
12. Unplug phone
13. Turn on
14. Select Allow Superuser access sa phone
15. Done and ready to go
Kapag Di gumana ung First tut it means na ung ROM nyo ay di compatible for the ROOT... Yet.
Idownload nyo lang tong Custom ROM sa baba.. Follow the TUT and try the first TUT again..
***It doesn't matter kung ano ung mauna ang mahalaga maroot ung phone by following the first TUT
2nd TUT na
You need this file:

Download it here:
http://pan.baidu.com/share/link?shar...&uk=1327862826
You need a working rom
Download ROM here:
http://pan.baidu.com/share/link?shar...&uk=1327862826
Follow these steps:

1: Select nyo ung Scatter file "MT6575_Android_scatter.txt"
2: Lalabas ung "Download File Load Successful" message
3. Click Select All
4. Click Start All
5. Make sure nakaplug ung USB cable sa likod ng PC//Root Port for laptop
6. Pindutin at ihold ang Volume Up button sa phone
7. Iconnect sa Cable
8. Mag'sstart na yan
8.1 Kapag nag'hanap ng driver download nyo tong file na to at imanual install ung drivers
http://www.symbianize.com/attachment...1&d=1350004603
9. Kapag lumabas na ung green circle pwede nyo na'iclose ung program, unplug USB drive and turn on nyo na ung phone
10. Magugulat kayo kc chinese Press Menu lang, tapos ung Settings icon>
Find Language icon ung may letter "A" then select the first option, then choose English...
Sa mga kaylangan ng patunay na gumagana to eto na screenies


***Again, kapag nakareceive kayo ng error regarding the driver just make sure to install it manually

For Vista, Windows 7> Browse

Screenshots from the original Chinese TUT here:
http://products.mobileuncle.com/thread-191551-1-1.html
Happy ROOTING and customizing guys kayo na bahala sa iba...
Credits goes to Kitty from Mobile Uncle.
Paunawa: Lahat ng files dito maliban sa ibang screenies ay di ko pag'mamay'ari
Kung ano mang mangyari sa CP ninyo ay di ko na problema un.
Lahat ng TUT dito ay guaranteed working maliban nalang kung nag'skip kayo ng step
Kung mabrick man ung phone nyo wag mag'alala kc nitry ko ibrick ung phone ko at napanumbalik
ko ito sa dati nyang maayos kundisyon gamit lang ung second TUT kaya wala kayong dapat ipangamba.
No Repeat questions please "Read, Read, and Read"
BTW: May isa pang way para maroot ung phone nyo kung sakali mang hirap talaga kayo sa drivers
Follow the steps on this website below <Tencent Mobile Housekeeper essential Official website>:
http://sj.qq.com/root/?qid=990524
QQPhonemanager99 tool
Installing Google Playstore
- Download
- http://www.mediafire.com/?137eq4jka5m5y4k
- Password For .rar
- "arekupup"
- download niyo at i extract ang rar file sa root ng SD Card niyo.
- after that download and install
- Root Explorer
- Open Root Explorer
- Allow Permision sa superuser
- Navigate To Gapps folder sa root ng SD Card niyo
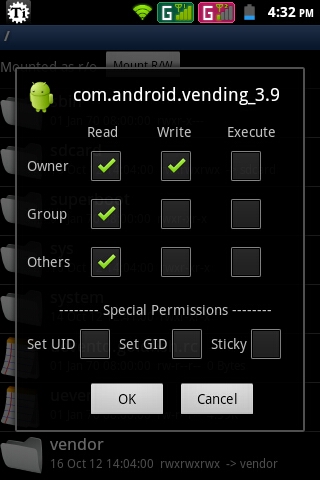
- select niyo ung lahat ng files sa gapps folder at imove sa /system/app/
- then change niyo ang permission ng lahat ng apps na nasa gapps folder
- Follow The Screenshot Below
- Restart
- Follow Instruction Sa Screen
- Then navigate To Settings / Accounts & Sync
- Add Your Google Account
- Check Niyo kung nainstall na ung market.
Installing CWM Recovery And Custom ROM Credits to KUSKUS Indonesian Forum
[REQUIRES ROOT PREVILAGES]
Download this files
http://www.mediafire.com/?bo12ktkrrn57314
Extract the following files on the root of your SD card
- recovery.img
- mobileuncle.apk
install mobileuncle.apk- mobileuncle.apk
after installing open mobile uncle tools. the one youve installed. not the one that is preinstalled in the rom
tap the option flash recovery from SDCARD
Then Choose Recovery.img
pag may promt na lumabas press "ok"
then automatically mag rereboot na siya sa CWM.
test some few features or try to install this rom
[COLOR=blue !important]A60+_S317_MASKID_1_2[/COLOR]
Procedures On How To Install This ROM.
- download this rom
- [COLOR=blue !important]A60+_S317_MASKID_1_2[/COLOR]
- [COLOR=blue !important][/COLOR]after downloading ilagay ang .zip file sa root ng sdcard niyo
- Reboot niyo sa CWM Recovery.
- choose wipe data & factory reset
- then wipe cache partition
- then choos install zip from SDCARD
- then choose zip from SDCard ulit.
- hanapin mo ung .zip file na dinownload mo kanina
- piliin mo un then select yes
- after that hintayin niyo lang matapos ang procedure
- pag tapos na balik kayo sa main menu at piliin ang reboot system now.
- DONE! enjoy yur new firmware!
CHANGELOG
Feature:
- Based on S317
- Support init.d
- Add transparent background in "SIM Background Color"
- Added Playstore, Busybox
- Already rooted
- Change loading icon, window animation, font, battery icon
- Remove all unnecessary application for better internal memori and ram space
- tweak for Faster 2G/3G/WiFi Settings, Google DNS, Better photo and video quality, better touch responsive & scrolling movement, render 2D with GPU, Dalvik VM! Tweaks, Call Tweak, Performance Tweak, Disable Debug icon, better memory management, battery saving tweak, enable 16bit Transparency
What's the difference between the Lenovo A60+ and the Lenovo A65?
Both phones have the same 3.5-inch HVGA display Android 2.3 Gingerbread OS and dual-SIM feature but the Lenovo A60+ uses a touch-sensitive Android buttons instead of a physical Android buttons and comes with a 1GHz processor as opposed to the 800MHz of the Lenovo A65.
Read more: http://www.ilonggotechblog.com/2012/09/priced-to-please-lenovo-a60-now.html#ixzz27YC7OPwD
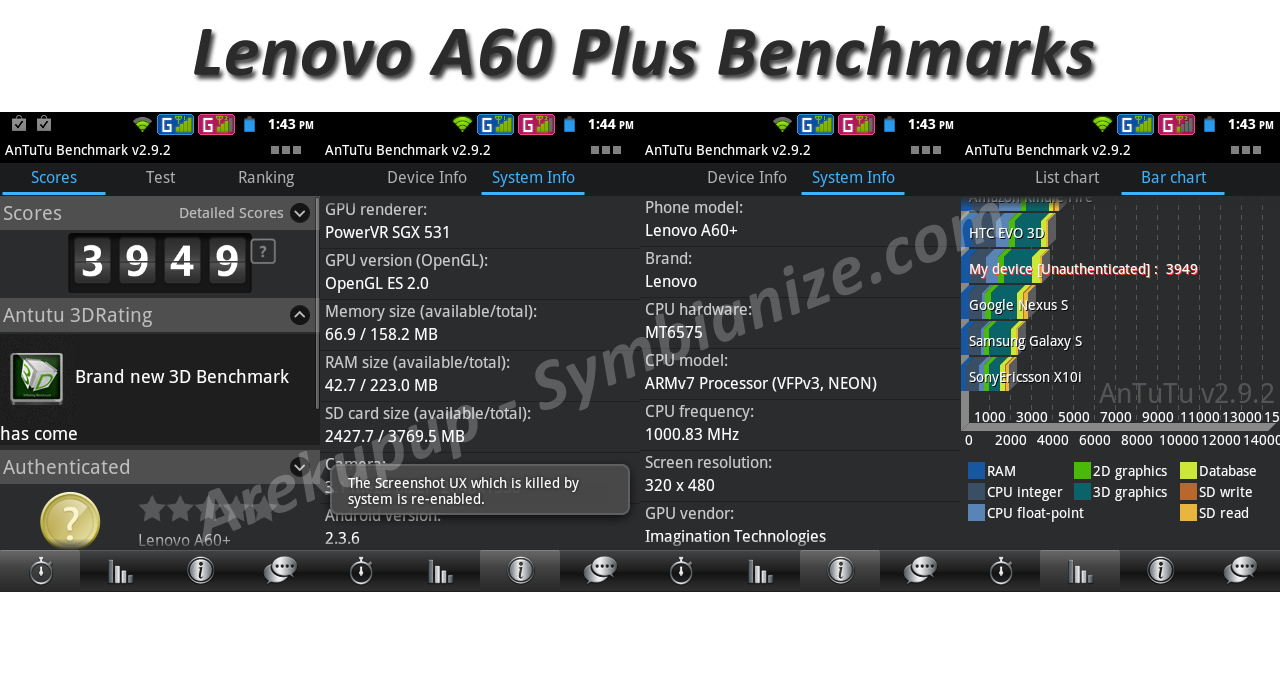
Benchmarks
Using Antutu Benchmark
Both phones have the same 3.5-inch HVGA display Android 2.3 Gingerbread OS and dual-SIM feature but the Lenovo A60+ uses a touch-sensitive Android buttons instead of a physical Android buttons and comes with a 1GHz processor as opposed to the 800MHz of the Lenovo A65.
Read more: http://www.ilonggotechblog.com/2012/09/priced-to-please-lenovo-a60-now.html#ixzz27YC7OPwD
Benchmarks
Using Antutu Benchmark
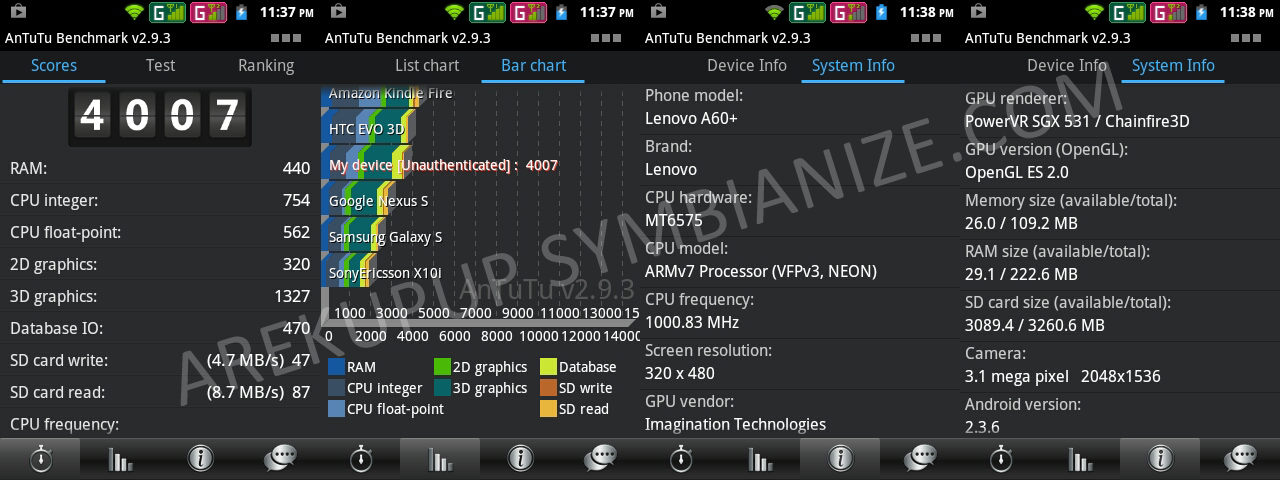
UPDATED ANTUTU BENCHMARK RESULTS " AFTER ROOTING "
Review
Lenovo A60+ Is Superb! ika nga a decent android phone with its price of 4,999 Pesos. meron siyang 1Ghz Proccessor Cortex A9, PowerVR SGX531 Ultra GPU Almost Mid end android device narin to. medyo talo lang talaga sa ram. at sa sobrang daming bloatwares aka system softwares like Google+ App, Maps, Halos 60-70 MB nalang natitira sa RAM ko. pero kung sakaling may root instructions nman na para sa device natin eh madali nalang tanggalin ang mga bloatwares and gumawa ng virtual ram para mas bumilis pa ang device natin.
-arekupup
Overall Rating: 4/5 Stars ☆☆☆☆
All Of Your Questions Regarding Lenovo A60+ Phone
Will Be Discussed Here
Last edited:

")


