- Messages
- 131
- Reaction score
- 64
- Points
- 83

FIRST THREAD KO DITONAPANSIN KO NA WALA PANG THREAD NG DEVICE NATO KAYA NAISIPAN KONG GUMAWA NG TUTS NG PAG ROOT.JUST WANT TO HELP SA MGA MAY SAMSUNG GALAXY S DOUS GT S7562 NA GUSTONG MAG ROOT AT MA TRY ANG CAPABILTY NG DEVICE NATO.
FIRST OF ALL, I DO NOT OWN THIS TUTS, NAKITA KO LANG TO SA PAG SEARCH KO KAY PARENG GOOGLE.SECONDLY, ROOTING WILL VOID THE WARRANTY OF YOUR DEVICE.(lalo na kung bagong bago pa ang cp).
BASED FROM THE COMMENTS SA TUTS NATO, MOSTLY SUCCESFULL AND PROCEDURES NG PAG RO-ROOT, KASAMA NA DUN ANG ANDROID PHONE KO.
NOTE: paalala lang po: Use these instructions at your own risk. I will not hold any responsibility or liability for whatever happens to your device arising from your use of the info of this rooting procedures.
OK LETS START.
1. Download the Samsung Galaxy S Duos Rooting Kit.zip
here's the link:
MEDIAFIRE ---ROOTING KIT
OR
MIRROR
Extract nyo using winrar,lagay nyo na lang sa desktop,lagay nyo sa isang folder.
look for the file named "odin.zip".extract nyo ulit at lagay nyo sa separate folder.(eto ang software na gagamitin natin para makapag flash ng recovery sa samsung s dous device)
2. Next,Install the drivers for your Galaxy S duos using KIES.
If you don't want to install full KIES just for installing drivers,
CLICK HERE
to download the drivers.
Once na madownload nyo ang samsung usb drivers, install nyo na lang sa pc or laptop nyo.(make sure na na install properly ang samsung usb drivers sa pc or laptop nyo).
3. Power off your device as you have to go to downloading mode.(full charge battery) -After your phone has switched off, press Volume Down + Home + Power button simultaneously until the Samsung logo appears on your device. A warning will appear on your device. Read it if you wish. Press Volume Up to continue to the downloading mode. You should see a screen with "Downloading" written on it alongwith some other stuff.
eto video kung paano e set into downloading mode.
4. Now, Connect your phone to the PC using USB cable. It should detect your device as you have installed the drivers in step 2.(this is important like i said is step 2.
5. Open the software Odin3v1.85.exe(kung naka windows vista or 7 ka, run it as Administrator).
6. ODIN should detect your device on any of the COM ports. You should now be rolling your eyeballs on a screen that looks something like the one below:

7. You will be seeing various boxes: some checked, and some, obviously, unchecked.chceck or uncheck them so that:
F. Reset Time is checked.
Auto Reboot is checked.
PDA is checked.
All other boxes should be unchecked.
Click on PDA under the Files (Download) section in ODIN and browse to recovery.tar file. You will find this file in the extracted rooting kit.
NOTE: Before pressing the start button, make sure everything looks like this:

9. Now,Click on start. Let ODIN complete the flashing process. Don't interrupt the process. Your phone will reboot now.
ONCE NA MAG KULAY GREEN UNG FIRST BOX AT MAY NAKALAGAY NA PASS(SUCCESSFULL UN).CLOSE THE ODIN SOFTWARE.
10. Copy CWM-superuser-3.1.3.zip to your phone's external or internal sdcard. The file is present in the rooting kit.
11. Power off your device and boot into recovery mode by pressing Volume Up + Volume Down + Home + Power button simultaneously till the Samsung logo appears followed by the CWM screen.
12. Your normal touch input won't work here. Press Volume up to scroll up and Volume down to scroll down. Home button is used to select while power button will take you a step back.
13. Scroll down to Backup & Restore and select backup. Let the backup process complete. Make sure you have atleast 500 MB storage free in the sdcard before performing the backup.
Note: If you want to unroot later on, boot into CWM and restore this backup. Then flash Stock recovery (present in stock recovery) using Odin, the same way you flashed recovery.tar in step 7.
Note: backup will take time, so be patient.
14.Once backup is done, Go to Install Zip from sdcard option and select "Choose zip from external sdcard" or "Choose zip from internal sdcard" depending on the choice you made in step 12. Finally select the cwm-superuser-3.1.3.zip and browse through the long list of "No" to select the only "Yes" option to install superuser to your device.
Incase mag ka problema kayo sa pag install ng super user.
try this(baka nilagay nyo sa internal sd card ang CWM-superuser-3.1.3.zip, so do the opposite: LAGAY nyo sa EXTERNAL SD CARD NYO).
follow nyo to:
Note: (important) as i tried this(nilagay ko sa internal sdcard ko ang file na CWM-superuser-3.1.3.zip, when i boot in recovery mode and i choose zip from internal card, an error occured saying "Error mounting sd card".
So ang ginawa ko,( nilagay ko sa external sdcard ang file na CWM-superuser-3.1.3.zip via usb cable...cut and paste ko lang)
then balik sa step 11 until 14 for booting in recovery mode.
this time i choose zip from EXTERNAL CARD(not internal) now you will see the file CWM-superuser-3.1.3.zip.Finally select the cwm-superuser-3.1.3.zip and browse through the long list of "No" to select the only "Yes" option to install superuser to your device.
15. Reboot your device and your done.
Note: kapag nag reboot ang android phone nyo, may lalabas dyan na yellow triangle---natural daw yan kapag rooted na phone nyo(un daw sabi nila).
ENJOY! SA ROOTED PHONE.
i want feedbacks kung gumana sa mag ta try at may lakas loob na mag try ng tuts nato.
TESTED ko to sa samsung galaxy s dous GT s7562 android phone ko running ICS 4.0.4.
Kabibili ko lang last week ng phone nato.vinoid ko kaagad warranty.(hehehe).
But im happy kasi rooted na phone ko.dami na akong magagawa dito.
LIKE I SAID DO IT AT YOUR OWN RISK.
HOW TO PARTITION SD CARD AND USE LINK2SD
This is a step by step guide on how you can run
Link2SD on your device . This tutorial will work for
both stock and cutom ROMs. For ClockWorkMod
Recovery users, you can check the other guide
below. Follow all the instructions carefully to
eliminate possible problems.
1. First you have to download Mini Tool Partition
Wizard Manager. You can download it here http://download.cnet.com/MiniTool-Partition-Wizard-Home-Edition/3000-2094_4-10962200.html
2. Insert your SD card to a card reader and open
it on your computer.
3. Back up all your files to the computer because
partitioning will wipe your data.
4. Open Mini Tool in your computer. Locate your
SD card (be careful in choosing and make sure
not to choose the drive of your computer)
5. Right click and choose Delete.
6. Right click on it again and choose Create New.
Create “FAT32″ partition (This is where all your
media files will go. Be sure to make it bigger
than the 2nd part)
7. Select “Create as: PRIMARY”
8. Next, create an ext2/ext3/ext4 partition (if
you’re on stock ROM, choose ext2). This is
where your apps will go. I suggest a value of
512Mb or 1Gb would be big enough but if you
insist you can go as high as 2Gb.
9. Select “Create As: PRIMARY” (make sure that
it is both set to primary because it will not
work if it is not set to primary)
10. Click the “Apply” button on the top left corner
and wait for it to finish the process. Done.
11. Put back your SD card to your phone and
switch it on.
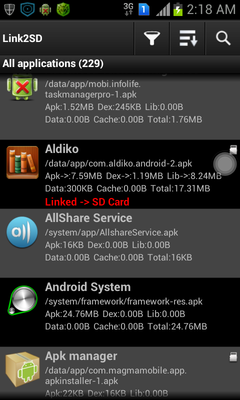
12. Download and install Link2sd from Google Play
Store .
13. Open Link2sd. You will be prompted to choose
between ext2, ext3, ext4 and FAT32. Select
ext2.
14. It will say mount script created. Reboot your
phone now.
15. Open link2sd and if the message doesn’t show
up, you succeded.
16. Go to Link2sd>Settings>check the autolink (to
automatically move apps upon installation)
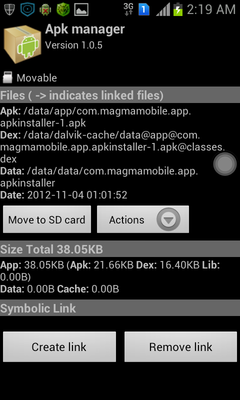
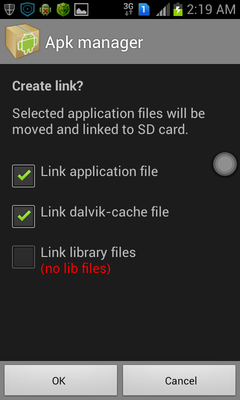
17. If you already have some apps, select “Create
Link” (be sure to check the three files: app,
dalvic-cache and library files)
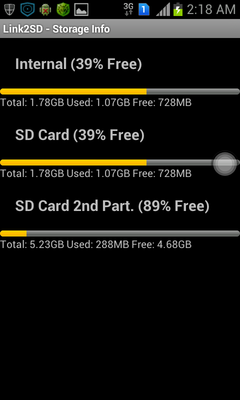
18.To check your memory, select “Storage Info”.
This will show you the current state of your
internal memory, FAT32, and ext2 partition.
19. Now you’re done and ready to install vast
amount of applications as you wish!
FOR CLOCKWORKMOD RECOVERY USERS ONLY
( ALTERNATIVE METHOD)
NOTE : You can also use the instructions above.
This guide will work on both stock and custom
ROMs.
1. Back up all your files to your computer.
Partitioning wipes the files of your SD card.
2. Go into recovery mode
3. Select “Advanced”
4. Select “Partition SD card”
5. Choose your SD-ext size (if you’re using a 2Gb
SD card, choose 512Mb. If your SD card is 4Gb
or greater, you can choose 1024Mb)
6. Select 0 swap
7. Wait for the process to finish. Reboot.
8. Download and install Link2SD from Google
Play Store .
9. Open Link2SD you will be prompted to choose
between ext2, ext3, ext4 or FAT32. Choose
ext4.
10. Follow instructions number 14-20. DONE!
Attachments
Last edited:


