Your phone comes with Pro camera mode, which gives you manual control over the camera settings (such as overlays, exposure, and shutter speed) for professional quality shots. To enable it, just follow this simple steps:
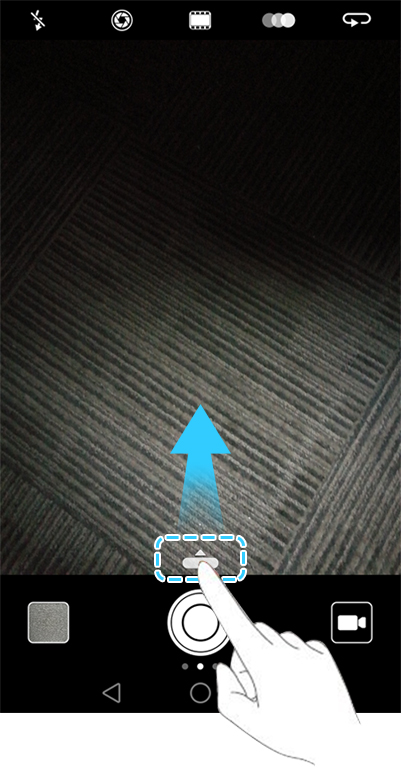
1. Open Camera and then swipe up on the slider to enable Pro mode. Pro camera mode can only be accessed from the Photo, Video, and Monochrome screens.
2. In Pro camera mode, you can adjust the exposure, shutter speed, and other camera settings. You can also add a grid overlay and output images in raw format.

Some of the benefits of using the pro mode is you can manually adjust the camera settings just like a DSLR. You can:
• When you switch to Pro camera mode, you can adjust a whole range of camera settings in the viewfinder to produce professional-looking shots. For example, you can adjust the ISO, exposure compensation, white balance, focus mode, shutter speed, and more.
• Adjust the shutter speed, white balance, and other camera settings: You can adjust the ISO, exposure compensation, white balance, focus mode, shutter speed and more on the Pro camera settings screen.
• Turn on the auxiliary focus light: Swipe left on the screen and turn on the AF auxiliary light switch. Use the focus light to make it easier to focus on your subject in dark surroundings.
• Add an overlay: Swipe left on the screen and touch Assistive grid. Select an overlay to help you compose your image.
• Output an image in raw format: Swipe left on the screen, and then turn on the RAW format switch. Photos taken in Pro camera mode can be saved in JPEG and DNG formats. Raw format is an image format used by professional photographers to record the unprocessed data from the camera's image sensor. Images saved in raw format retain all of their original detail and are easy to edit. However, raw images have a larger file size and therefore take up more space on your device.
3. After you have finished adjusting the camera settings, touch to take a photo.
The low exposure icon will appear when the exposure is too low. Touch the icon to restore the default exposure settings. This icon will only appear when the exposure is too low.
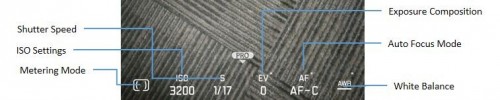
Manual settings
• [ ]: Touch to set the metering mode (the way in which your camera determines the exposure). You can select matrix metering, centre-weighted metering, or spot metering. Matrix metering is set by default.
•ISO: Touch to adjust the camera's sensitivity to light. Increasing the ISO will create a brighter picture, but there will be a noticeable increase in noise. You can
configure the camera to adjust the ISO automatically, or you can adjust it
manually.
•S: Touch to set the shutter speed. You can configure the camera to adjust the
shutter speed automatically, or you can adjust it manually.
•EV: Touch to set the exposure compensation. Select an exposure setting to
increase/decrease the brightness. Touch and hold the icon to lock the current
exposure setting.
•AF: Touch to set the focus mode. You can select touch to focus, continuous
autofocus, or manual focus. Continuous autofocus is set by default. When
continuous autofocus is selected, touch and hold the icon to enable the focus lock.
•AWB: Touch to select a white balance according to the ambient light conditions.
You can choose from daylight, tungsten bulb, fluorescent lamp, and more. You can also adjust the color temperature. Touch and hold the icon to lock the white balance.
1. Open Camera and then swipe up on the slider to enable Pro mode. Pro camera mode can only be accessed from the Photo, Video, and Monochrome screens.
2. In Pro camera mode, you can adjust the exposure, shutter speed, and other camera settings. You can also add a grid overlay and output images in raw format.
Some of the benefits of using the pro mode is you can manually adjust the camera settings just like a DSLR. You can:
• When you switch to Pro camera mode, you can adjust a whole range of camera settings in the viewfinder to produce professional-looking shots. For example, you can adjust the ISO, exposure compensation, white balance, focus mode, shutter speed, and more.
• Adjust the shutter speed, white balance, and other camera settings: You can adjust the ISO, exposure compensation, white balance, focus mode, shutter speed and more on the Pro camera settings screen.
• Turn on the auxiliary focus light: Swipe left on the screen and turn on the AF auxiliary light switch. Use the focus light to make it easier to focus on your subject in dark surroundings.
• Add an overlay: Swipe left on the screen and touch Assistive grid. Select an overlay to help you compose your image.
• Output an image in raw format: Swipe left on the screen, and then turn on the RAW format switch. Photos taken in Pro camera mode can be saved in JPEG and DNG formats. Raw format is an image format used by professional photographers to record the unprocessed data from the camera's image sensor. Images saved in raw format retain all of their original detail and are easy to edit. However, raw images have a larger file size and therefore take up more space on your device.
3. After you have finished adjusting the camera settings, touch to take a photo.
The low exposure icon will appear when the exposure is too low. Touch the icon to restore the default exposure settings. This icon will only appear when the exposure is too low.
Manual settings
• [ ]: Touch to set the metering mode (the way in which your camera determines the exposure). You can select matrix metering, centre-weighted metering, or spot metering. Matrix metering is set by default.
•ISO: Touch to adjust the camera's sensitivity to light. Increasing the ISO will create a brighter picture, but there will be a noticeable increase in noise. You can
configure the camera to adjust the ISO automatically, or you can adjust it
manually.
•S: Touch to set the shutter speed. You can configure the camera to adjust the
shutter speed automatically, or you can adjust it manually.
•EV: Touch to set the exposure compensation. Select an exposure setting to
increase/decrease the brightness. Touch and hold the icon to lock the current
exposure setting.
•AF: Touch to set the focus mode. You can select touch to focus, continuous
autofocus, or manual focus. Continuous autofocus is set by default. When
continuous autofocus is selected, touch and hold the icon to enable the focus lock.
•AWB: Touch to select a white balance according to the ambient light conditions.
You can choose from daylight, tungsten bulb, fluorescent lamp, and more. You can also adjust the color temperature. Touch and hold the icon to lock the white balance.