- Messages
- 262
- Reaction score
- 28
- Points
- 38
Samsung Galaxy Grand Prime SM-G530H
LOLLIPOP Version 5.0.2
Requirements:
0.) Backup your Personal Files or Data
1.) Samsung USB drivers to be installed on your PC/Desktop
2.) Download the latest Odin
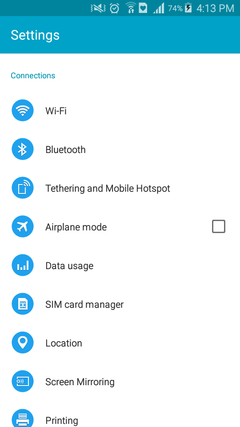
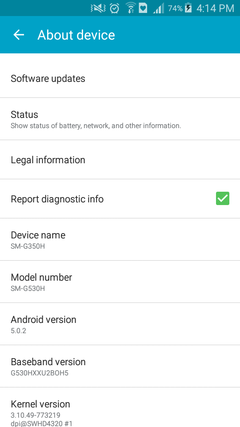
3.) Check your phone's Baseband Version: Go to settings>About device>Baseband Version
4.) Lollipop firmware update file for your SM-G350H
*Note : Russian firmware talaga yan pero oks na oks yan here in the Philippines. And yan ang gamit ko ngayon.
Russian Firmware nga pala gamit ko
________________________________________________________________________________________________
>>> How to install Firmware using Odin <<<
Step 1:
Install USB driver for Samsung
Step 2:
Extract Odin to your computer/desktop.
Step 3:
Power off your phone.
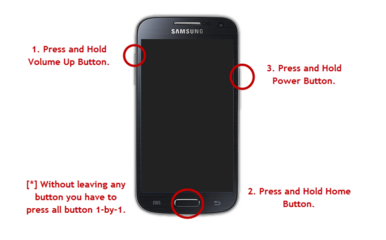
Step 4:
Press Volume down and Home Key and Power Button together and wait for the warning message to be appeared on your screen.
View attachment 228892
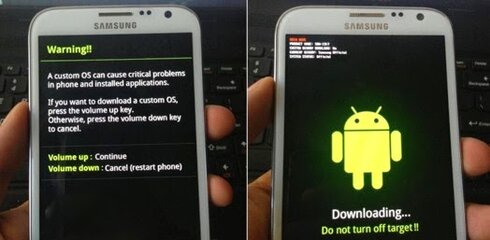
Step 5:
Then hit the Volume Up to continue into Download mode.
View attachment 228893
Step 6:
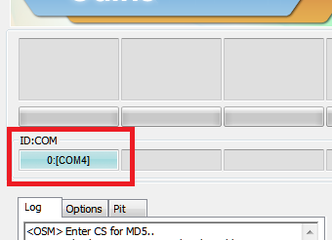
While in download mode connect your device to PC via the USB cable. At this stage make sure that Odin has recognized your device.
View attachment 228878
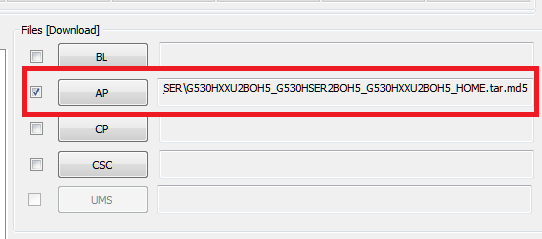
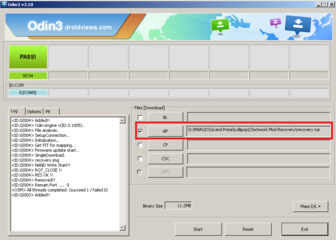
Step 7:
Hit the AP/PDA button then browse and select a tar.md5
View attachment 228880
View attachment 228879
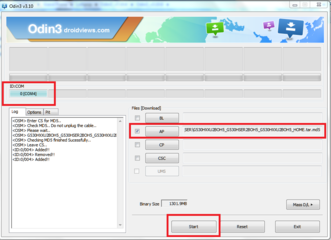
Step 8 :
Click on the START button to begin the Flashing Process
View attachment 228881
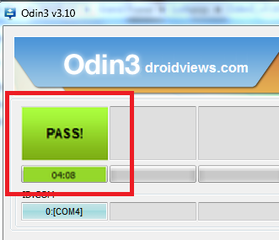
Step 9 :
Once you see, the GREEN PASS Message appears then remove USB cable from the device. After this process, your device will restart automatically.
View attachment 228888
If something wrong happen it's usually because of the wrong download of firmware or corrupted, or your antivirus.
________________________________________________________________________________________________
>>> How to Factory Reset <<<
OPTIONAL
Step 1 :
Power off your phone.
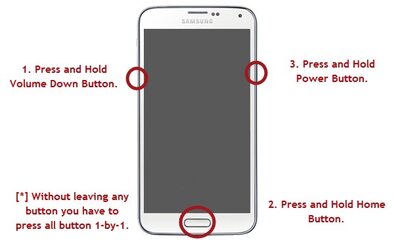
Step 2 :
Press Volume up and Home Key and Power Button together.
View attachment 228889
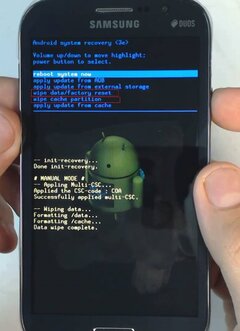
Step 3 :
In Recovery Mode, do a Wipe Data/Factory Reset. Use Volume keys for controls.
View attachment 228890
Step 4 :
Once Cache Data was cleared, Select System Reboot Now from the recovery menu.
Step 5 :
Now, your samsung Device will restart without any issue with the ROM you have flashed.
________________________________________________________________________________________________
>>> Rooting Lollipop <<<
OPTIONAL
Requirements : Lollipop CF Auto root
Download the latest Odin
Step 1:
Power off your phone.
Step 2:
Press Volume down and Home Key and Power Button together and wait for the warning message to be appeared on your screen.
Step 3:
Then hit the Volume Up to continue into Download mode.
Step 4:
While in download mode connect your device to PC via the USB cable. At this stage make sure that Odin has recognized your device.
Step 5:
Hit the AP/PDA button then browse and select CF-Auto-Root.tar
Step 6 :
Click on the START button to begin the Flashing Process
Step 7 :
Once you see, the GREEN PASS Message appears then remove USB cable from the device. After this process, your device will restart automatically.
________________________________________________________________________________________________
>>> Flashing CWM Recovery <<<
OPTIONAL
Requirements : recovery.tar
Download the latest Odin
View attachment 230589
Step 1:
Power off your phone.
Step 2:
Press Volume down and Home Key and Power Button together and wait for the warning message to be appeared on your screen.
Step 3:
Then hit the Volume Up to continue into Download mode.
Step 4:
While in download mode connect your device to PC via the USB cable. At this stage make sure that Odin has recognized your device.
Step 5:
Hit the AP/PDA button then browse and select recovery.tar
Step 6 :
Click on the START button to begin the Flashing Process
Step 7 :
Once you see, the GREEN PASS Message appears then remove USB cable from the device. After this process, your device will restart automatically.
________________________________________________________________________________________________
>>> Flashing TWRP Recovery <<<
OPTIONAL
Requirements : TWRP 2.8.7.0 Lollipop.tar
Download the latest Odin
Step 1:
Power off your phone.
Step 2:
Press Volume down and Home Key and Power Button together and wait for the warning message to be appeared on your screen.
Step 3:
Then hit the Volume Up to continue into Download mode.
Step 4:
While in download mode connect your device to PC via the USB cable. At this stage make sure that Odin has recognized your device.
Step 5:
Hit the AP/PDA button then browse and select TWRP 2.8.7.0 Lollipop.tar
Step 6 :
Click on the START button to begin the Flashing Process
Step 7 :
Once you see, the GREEN PASS Message appears then remove USB cable from the device. After this process, your device will restart automatically.
*Enable the TWRP Recovery
Step 8:
Power off your phone.
Step 9 :
Press Volume up and Home Key and Power Button together.
Step 10 :
Swipe to right to enabled
Good Luck !
*Note : Do it at your own risk
LOLLIPOP Version 5.0.2
Requirements:
0.) Backup your Personal Files or Data
1.) Samsung USB drivers to be installed on your PC/Desktop
2.) Download the latest Odin
3.) Check your phone's Baseband Version: Go to settings>About device>Baseband Version
4.) Lollipop firmware update file for your SM-G350H
Baseband Version XXU
06-03-16 Russia(5.0.2) - Sammobile Download JUNE UPDATE
04-28-16 Russia(5.0.2) - Sammobile Download APRIL UPDATE
09-21-2015 Russia(5.0.2) - Sammobile Download
09-01-2015 Russia(5.0.2) - Mediafire Download
Baseband Version XCU
07-26-16 Russia(5.0.2) - Sammobile Download JULY UPDATE
04-28-16 Russia(5.0.2) - Sammobile APRIL UPDATE
08-01-2015 Russia(5.0.2) - Mediafire Download
STOCK FIRMWARE 4.4.4
Philippines Stock OpenLine - Sammobile
OTHER FIRMWARE by Sammobile
Samsung Firmwares - Sammobile
*Note : Russian firmware talaga yan pero oks na oks yan here in the Philippines. And yan ang gamit ko ngayon.
Russian Firmware nga pala gamit ko
________________________________________________________________________________________________
________________________________________________________________________________________________Salamat dito working yung flash sken

>>> How to install Firmware using Odin <<<
Step 1:
Install USB driver for Samsung
Step 2:
Extract Odin to your computer/desktop.
Step 3:
Power off your phone.
Step 4:
Press Volume down and Home Key and Power Button together and wait for the warning message to be appeared on your screen.
View attachment 228892
Step 5:
Then hit the Volume Up to continue into Download mode.
View attachment 228893
Step 6:
While in download mode connect your device to PC via the USB cable. At this stage make sure that Odin has recognized your device.
View attachment 228878
Step 7:
Hit the AP/PDA button then browse and select a tar.md5
View attachment 228880
View attachment 228879
Step 8 :
Click on the START button to begin the Flashing Process
View attachment 228881
Step 9 :
Once you see, the GREEN PASS Message appears then remove USB cable from the device. After this process, your device will restart automatically.
View attachment 228888
If something wrong happen it's usually because of the wrong download of firmware or corrupted, or your antivirus.
________________________________________________________________________________________________
>>> How to Factory Reset <<<
OPTIONAL
Step 1 :
Power off your phone.
Step 2 :
Press Volume up and Home Key and Power Button together.
View attachment 228889
Step 3 :
In Recovery Mode, do a Wipe Data/Factory Reset. Use Volume keys for controls.
View attachment 228890
Step 4 :
Once Cache Data was cleared, Select System Reboot Now from the recovery menu.
Step 5 :
Now, your samsung Device will restart without any issue with the ROM you have flashed.
________________________________________________________________________________________________
>>> Rooting Lollipop <<<
OPTIONAL
Requirements : Lollipop CF Auto root
Download the latest Odin
Step 1:
Power off your phone.
Step 2:
Press Volume down and Home Key and Power Button together and wait for the warning message to be appeared on your screen.
Step 3:
Then hit the Volume Up to continue into Download mode.
Step 4:
While in download mode connect your device to PC via the USB cable. At this stage make sure that Odin has recognized your device.
Step 5:
Hit the AP/PDA button then browse and select CF-Auto-Root.tar
Step 6 :
Click on the START button to begin the Flashing Process
Step 7 :
Once you see, the GREEN PASS Message appears then remove USB cable from the device. After this process, your device will restart automatically.
________________________________________________________________________________________________
>>> Flashing CWM Recovery <<<
OPTIONAL
Requirements : recovery.tar
Download the latest Odin
View attachment 230589
Step 1:
Power off your phone.
Step 2:
Press Volume down and Home Key and Power Button together and wait for the warning message to be appeared on your screen.
Step 3:
Then hit the Volume Up to continue into Download mode.
Step 4:
While in download mode connect your device to PC via the USB cable. At this stage make sure that Odin has recognized your device.
Step 5:
Hit the AP/PDA button then browse and select recovery.tar
Step 6 :
Click on the START button to begin the Flashing Process
Step 7 :
Once you see, the GREEN PASS Message appears then remove USB cable from the device. After this process, your device will restart automatically.
________________________________________________________________________________________________
>>> Flashing TWRP Recovery <<<
OPTIONAL
Requirements : TWRP 2.8.7.0 Lollipop.tar
Download the latest Odin
Step 1:
Power off your phone.
Step 2:
Press Volume down and Home Key and Power Button together and wait for the warning message to be appeared on your screen.
Step 3:
Then hit the Volume Up to continue into Download mode.
Step 4:
While in download mode connect your device to PC via the USB cable. At this stage make sure that Odin has recognized your device.
Step 5:
Hit the AP/PDA button then browse and select TWRP 2.8.7.0 Lollipop.tar
Step 6 :
Click on the START button to begin the Flashing Process
Step 7 :
Once you see, the GREEN PASS Message appears then remove USB cable from the device. After this process, your device will restart automatically.
*Enable the TWRP Recovery
Step 8:
Power off your phone.
Step 9 :
Press Volume up and Home Key and Power Button together.
Step 10 :
Swipe to right to enabled
Good Luck !
*Note : Do it at your own risk
Attachments
-
 com.png10.2 KB · Views: 528
 -
 AP_PDA.PNG8.9 KB · Views: 663
 -
 XXU.PNG1.7 KB · Views: 235
 -
 START.png114.4 KB · Views: 677
 -
 PASS1.png38.3 KB · Views: 270
 -
 Factory Reset.PNG117.5 KB · Views: 211
 -
 Wipe.jpg151.7 KB · Views: 283
 -
 download.jpg36.6 KB · Views: 452
 -
 volume up.jpg28.4 KB · Views: 458
 -
 CWM.PNG82.4 KB · Views: 407
Last edited:


")
")

