Unbricking 
Console Tool Method
I will try to teach you how to unbrick your router, marami akong nakitang mga tut about unbricking our tomato router, karamihan ay kulang and it takes time for me to work this thing (natawag ko na lahat ng santo dahil sa tagal kong pinag aaralan ang process, ilang araw rin kasi naka tambak yung router ko

)
JTAG po gagawin natin, di ko kasi mapagana TFTP method sa router ko, pero try niyo, kasi sabi ng iba working pero in my case hindi

Edit: btw, habang nageexplore ako sa Windows Features, may nakita ako dun na TFTP, naka untick akin, kaya siguro ayaw gumana yung TFTP method sakin di ko pa siya na try kaya try niyo nalang

This tutorial will only apply in Windows OS (Apple product sucks, I really love Linux
)
Ok let's start with the requirements:
Code:
1. Brick Router
2. PL2303 usb to ttl converter: [URL="http://www.e-gizmo.com/KIT/USB.htm"]Dito pede kayo bumili[/URL]
3. Putty :
[url]http://www.chiark.greenend.org.uk/~sgtatham/putty/download.html[/url]
4. Common Sense :D
Download PL2303 Driver at their website:
http://www.prolific.com.tw/US/ShowProduct.aspx?p_id=225&pcid=41
Then plug the pl2303 cables to the router then plug in to your PC/Laptop.
Cable Layout (credits to the owner of the images) wala na ko time para i baklas kabit router ko, nakakatamad
:
Pin 1 - Vcc 3.3V (Don't connect anymore since the router will be powered by the supplied adaptor.)
Pin 2 - GND (Connect to GND on TTL Converter)
Pin 3 - TXD (Router side) to be connected to RXD on UART Converter
Pin 4 - RXD (Router side) to be connected to TXD on UART Converter
CW5356u:
Pin 1 to Pin 4, From Left to Right
CW 5358u
Pin 1 to Pin 4, From Left to Right also
Next, Setting up recovery:
Diba before nirequire ko kayo iinstall ang driver para ma communicate natin yung router via serial connection.
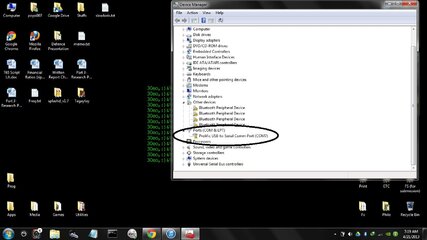
After niyo i plug yung converter sa USB, mag iinstall yan wait niyo lang matapos then go to device manager for us to check what com port yung converter niyo.
As you can see at my ss, nasa com7 siya nakasaksak, gagamitin natin yan later.
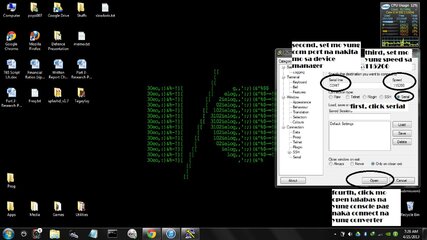
Setting up putty for serial communication:
Ang ginamit ko for serial communication is putty, ang makikita niyo sa ss ay hyperterminal, wala na kasi time para i re enact yung unbricking process, ang goal ko lang is makita niyo lang ang mga text na lalabas siya console.
Click serial tab
Set serial line to the com port na nakita mo sa device manager mo (In my case, com7)
Set speed from 9600 to 115200
Then click open
Mag oopen na yung console as long as naka connect na yung converter and naka on yung router
Entering recovery mode and recovery GUI:
Focus more to this, dito ako nag tagal nung una kasi sakin walang lumalabas na text
Diba before, in order na ma open mo yung console ng putty e naka on yung router, if na open mo na yung putty pede na nating irestart, kailangan mabilis na dito, ang goal natin is to stop the booting process to recovery mode in order to access the recovery GUI
I restart mo na yung router, kailangan eto lalabas na mga text sa console, pag labas ng mga yan press CTRL+C para ma stop ang boot, spam mo medyo delay kasi respond nan, para sure ma stop yung process.
Sa ss, may makikita kayo na apat na C dun sa console, it means apat na beses niya pinress yung CTRL+C to stop the process, kasi delay mag rerespond ang consolem kaya hanggat maari i spam mo siya. (pasensya na malabo yung pic, papalitan ko nalang pag nag ka time)
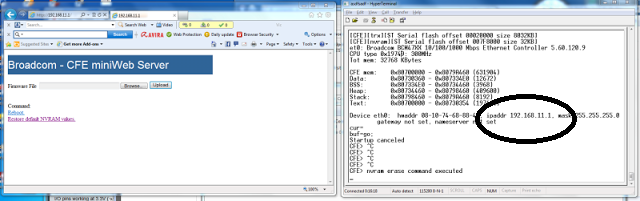
Ngaun na stop na natin yung process of booting, saksak mo ngaun yung LAN Cable sa Lan 1 ng router mo and dun sa LAN port ng PC/Laptop mo, tapos change natin yung IP address ng LAN Adapter mo
Check ulit SS, As you can see sa encircled text na kailangan yun yung default gateway ng LAN Adapter mo in order to access yung Web GUI niya
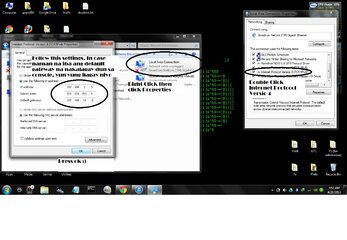
Change na natin IP Address and Default Gateway nung LAN Adapter mo, Open network and sharing center then click change adapter settings at the upper left part ng window
Follow the SS for settings
In my case, my LAN Adapter is the Broadcom gigabit ethernet port, ewan ko sa inyo, basta explore
And yung Default Gateway e finollow ko lang yung nasa SS para di kayo malito, sa case ko nun kasi 192.168.1.1, e yung nasa SS is 192.168.11.1 kaya yun nilagay ko, siguro depende yun sa last fw na finlash mo, kasi toastman build ginamit ko nun
After that, you can access na yung recovery GUI sa browser, Itype niyo yung Default Gateway na lumabas dun sa console na nilagay niyo dun sa LAN Adapter
sa GUI, click niyo "Restore default NVRAM values" muna to ensure clean install then browse niyo yung FW na iflaflash niyo, mas maganda balik stock kayo, Check niyo first page for download links ng FW, then click upload.
After that, ok na ulit router niyo, PARTY PARTY na
You can restore the default settings nung LAN Adapter niyo sa automatically obtain IP Address
TFTP Method
This method is quoted from sir xtechnouser post:
1. Static LAN (192.168.1.33 (IP) / 255.255.255.0 (Subnet) / 192.168.1.1 (Gateway)
2. Connect router and PC
3. Copy stock firmware to local disk. (Pref. C:\)
4. Open Control Panel (Windows 7) > Programs and Features > Enable TFTP Function
5. Open CMD (Run as Administrator)
6. TYPE 'cd C:\'
7. TYPE 'tftp -i 192.168.1.1 put XXXXXXXXXXX.trx' where XXXXXXXXXX is the firmware filename.
8. Plug your router, then press enter on CMD.
9. Wait until successful. Then, restart.
10. Don't change LAN settings. Open 192.168.1.1 in your browser.
11. You will see the Broadcom GUI, click erase NVRAM or something, then after that, browse your preferred firmware file then hit upload.
12. You router should be fine now. You can now do the auto obtain function in LAN. That's it!


")


